

1. Purpose
This document sets out the main functional enhancements made to the CARL Berger-Levrault programs since the previous major version of each program.
Specifically, this document describes only the new features of the following:
-
CARL Source Admin version 5.5
-
CARL Source version 7.7.0
-
CARL Touch version 7.7.0
-
CARL Xpress version 7.7.0
-
CARL Flash version 7.7.0
Furthermore, the document does not mention the modules or the options associated with the functional enhancements presented later on.
Your CARL Berger-Levrault sales contacts are at your disposal to provide you with useful information on the configuration of your granted CARL Source license.
2. CARL Source Admin
CARL Source Admin 5.5 uses Java™ in version 17. When installing it, it is mandatory to provide its path.
| New 5.2 |
For security reasons, as of version 5.2, the
When upgrading, the |
| New 5.3 |
Starting with version 5.3, CARL Source license management is integrated into CARL Source Admin. |
For further details regarding CARL Source Admin 5.5, please see Using CARL Source Admin 5.
3. CARL Source
3.1. General
Versions 7.X are mainly enhanced by:
-
Ergonomic adjustments,
-
An automatic assignment of resources motor,
-
Enhancements in multi-currency,
-
New products regarding energy and fluid,
-
New features regarding integrated intelligence,
-
Enhancements of the report workflow, characteristics sheet and checkpoints,
-
Enhancements of GDPR memos, anonymization and consent.
-
Enhancements of mobile products.
3.2. Including of addons in the standard product & related developments
| New 7.2 |
The reinstatement of certain addons in this version implies functional readjustments to the solution operation. |
From this version onwards, the following addons are included in CARL Source and disappear from the distributions linked to the product:
-
CNEH
-
BUREAU VERITAS import
-
SOCOTEC import
-
Verticalizations:
-
FACILITY
-
HEALTHCARE
-
TRANSPORTATION
-
CITY
-
This including implies functional tailoring to ensure that addons can be mixed without conflict within a single installation. This involved deleting standard data and tailoring vertical-specific operating principles.
The aim of these technical and functional upgrades is to migrate the application to Saas mode. It will ultimately simplify maintenance complexity, and migration and deployment of the solution.
The CARL Source product content in version 7.2.0 goes from a hundred distributions to around fifty.
A New visual for the login page has been set up to take into account the generic BL CARL design and express the multi-business aspect of the application for all new installations. The image can be changed from the image document details in the library.

|
Most of the values in the values lists added by the addons have been removed, or are no longer shown as standard values that cannot be changed. |
All features dedicated to verticalizations are included in the product.

|
The default profile offered in the application authorizes all verticalization features. This makes it easier to customize a new profile based on the Standard profile by deactivating authorizations on a bulk basis, rather than searching for and activating features one by one. |
The business domain concept associated with labels has changed to make the coexistence of business contexts on the same application instance compatible. This is now referred to as Business vocabulary.

|
When upgrading to version 7.2.0.. City add-on Transport add-on |
3.2.1. Addon Control-S
The Addons deployment previously added the configuration of inspection report imports via the creation of a supplier on behalf of the inspection report service provider (BV or SOCOTEC).
Following the including of the BUREAU VERITAS and SOCOTEC addons in the application, a new installation of CARL Source should not impose specific supplier data as default. This will no longer be the case.
From now on, the creation of a supplier and its configuration for BV and SOCOTEC service providers will be carried out in the same way as for any other inspection service provider, at the customer’s initiative.

|
Only technical elements such as jobs, connection points and error handling are included in the standard as default. They can be used in the configuration of these 2 service providers. |
The on-line help details the default configurations of these service providers, as well as dedicated project service documentation.
3.2.2. Addon CNEH
This addon added CNEH data of the Main points and/or Family tree structure type and/or specific purchasing types regarding the healthcare sector (French-speaking).
This data is no longer available as an addon, but has been tailored for loading via the application’s standard XML interface. They are available in the Knowledge base article on the support site for interested customers.
3.2.3. Business sector Verticalizations addon
Verticalizations addons, which configured the application in a single business domain, have been tailored and included in the standard product. They were not mutually compatible. On deployment, they specified the application in a dedicated way for a business context, permanently changing the global deployment configuration for all users and processes.
The Saas approach, for a single deployed product containing all contexts, requires customization of a business context through the configuration.
Verticalizations addons have therefore been tailored to include and be compatible with each other, offering the option of mixing business contexts on a single deployment.

|
CARL Source can be tailored to various business contexts, with prepared customization elements that can be activated as required. |
Some of these customizations require only simple user configuration, while others require additional configuration of cross-functional elements, affecting all users.
The application features pre-configured elements that enable quick implementation of these customizations through User data:
-
new standard customization groups dedicated to a business context
-
business vocabularies.
|
|
It remains possible to dedicate an entire instance of the application to a business context by replacing the use of the customization group with the "public" activation of dedicated custom forms and the general color theme. Business vocabulary and profile rights remain to be configured on the user. |
3.2.3.1. Facility
3.2.3.1.1. Customizing a user to reflect the Facility context
For a dedicated Facility user, the following must be filled in at least:
-
the "Facility" business vocabulary,
-
the "FACILITY" standard customization group regarding the forms, menus, color theme and visuals of this standardized context used during the user experience.
-
if necessary, a specific new profile from the standard profile, having removed access to Facility out-of-context and/or not useful functionalities.
3.2.3.1.2. Customization of application cross-functional elements (optional)
If the entire application is dedicated solely to the Facility context, it is advisable to rename the "PRINCIPAL" equipment structure code to "LOT_TECHNIQUE" for greater consistency with the customized name (Business vocabulary) of this structure. This specific overload previously applied to deployment can no longer be applied, and the standard values are retained.
3.2.3.2. Healthcare
3.2.3.2.1. Customizing a user to reflect the Healthcare context
For this dedicated healthcare user, the following must be filled in at least:
-
the "Healthcare" business vocabulary,
-
the "HEALTHCARE" standard customization group regarding the forms, menus, color theme and visuals of this standardized context used during the user experience.
-
if necessary, a specific new profile from the standard profile, having removed access to Facility out-of-context and/or not useful functionalities.
3.2.3.2.2. Customization of application cross-functional elements (optional)
If the entire application is dedicated solely to the Facility context, it is advisable to rename the "MATERIAL" equipment structure code to "INVENTORY" for greater consistency with the customized name (Business vocabulary) of this structure. As default, this code overload, applied at addon deployment, can no longer be played: the standard values are kept.
3.2.3.3. City
In previous versions of the application, City was deployed with a possible overload of another verticalization.
From now on, the City business context is managed like any other business domain, with the specific features of the FM Addon.
|
|
The new City business vocabulary comprises the vocabularies of the CITY and FACILITY version 7.1.0. |
3.2.3.3.1. Customizing a user to reflect the City context
For this dedicated city user, the following must be filled in at least:
-
the "City" business vocabulary,
-
the "CITY" standard customization group regarding the forms, menus, color theme and visuals of this standardized context used during the user experience.
-
if necessary, a specific new profile from the standard profile, having removed access to Facility out-of-context and/or not useful functionalities.
3.2.3.3.2. Customization of application cross-functional elements (optional)</h4>
For public financial management using cascading budgets, standard "CUSTOMER" forms may need to be activated. This activation enables you to benefit from all the mechanisms associated with this context for PURCHASING processes such as Purchase request and Purchase order.
3.2.3.4. Transport
This business verticalization proposed a large number of data overwrites and specific standard behaviors following its deployment.
|
|
A major technical and functional overhaul has been undertaken to reflect browsing behaviors and specific features relating to rolling and fixed assets without changing CARL Source’s standard behavior. |
This change makes it possible to configure Specific equipment groups in a standard way, to change them, and even to tailor them to a context other than Transport if necessary.
|
|
When migrating a Transport customer, you’ll need to check that the settings have been configure and that the migrated application is working properly. |
3.2.3.4.1. Customizing a user to reflect the Transport context
For this dedicated transport user, the following must be filled in at least:
-
the "City" business vocabulary,
-
the "CITY" standard customization group regarding the forms, menus, color theme and visuals of this standardized context used during the user experience.
-
if necessary, a specific new profile from the standard profile, having removed access to Facility out-of-context and/or not useful functionalities.
3.2.3.4.2. Customization of application cross-functional elements (required)
In the default Transport context, some module settings need to be activated in order to use the mechanisms associated with this context.
|
|
This setting will change the application’s general behavior for all users. |
The EqptTypeGroup1 and EqptTypeGroup2 module settings must be configured with the "Fixed" and "Rolling" equipment type groups (customizable values if required). This changes the application’s behavior towards mobile and fixed assets, but also corresponds to the customized transport forms offered as standard. This setting is effective for all users of the application.
In the user profiles, rights can then be added to display specific creation menus for assets, work requests and work orders tailored to these specific values.
|
|
When creating work orders or work requests, if a "work category" value (WO or MR "workCategory" attribute) is identical to one of the module settings values entered previously (EqptTypeGroup1 and EqptTypeGroup2) and the associated asset is of an equipment type belonging to this same group, the work category field will then be initialized with this same value. |
|
|
For the version migration, the forms based on the specific "Fixed" and "Rolling" forms will be automatically tailored to correspond to the forms associated with Specific equipment of group 1 for "Fixed" and group 2 for "Rolling". |
3.2.4. Business vocabulary
The business domain concept is gradually becoming a business vocabulary and defining a business context in its own right.
Vocabulary terms involved in installing Verticalized addons are no longer overwritten.
Prior to version 7.2.0, some standard data was influenced by the business vocabulary specific to the installed addon.
As a result, even users not configured for the addon’s "Business domain" were able to view this data using the business vocabulary specific to the installed addon.
From v7.2 onwards, these users with a default "Business domain" (renamed "Business vocabulary" in this version) will view this data with the default business vocabulary.
Only users configured with the addon’s "Business vocabulary" will see this data using the business vocabulary specific to the installed addon.
With the FM addon, the TMPL_MRTRANSFER message template used when transferring a work request is seen with this name depending on the context and versions:
Up to 7.1.0
User with the 'Default' business domain: Transfer of WR
User with the 'Facility' business domain: Transfer of WR
From 7.2.0 onwards
User with the 'Default' business domain: Transfer of WR
User with the 'Facility' business domain: Transfer of WR
3.2.5. Specific equipment
3.2.5.1. Principle and settings
In order to include the specificities of Rolling and Fixed assets from the Transport addon into the standard application and make its use more generic, the specific assets concept has been added and can be configured by mere configuration.
|
|
The configuration of specific assets applies to the entire application and is not reserved to the logged-in user. |
The administrator can define up to 2 groups of asset equipment types to be handled differently in the application from the other assets.
A set of specific asset equipment types are configured in the module settings (equipment section) with the following settings:
-
EqptTypeGroup1 - Group 1 equipment types for specific assets (FIXED for the Transport business context)
-
EqptTypeGroup2 - Group 2 equipment types for specific assets (ROLLING for the Transport business context)
Once these equipment type groups have been defined, the administrator can alter the profiles to configure the following rights for the Asset, WR, Work order and Work report features:
-
Display the Group 1 equipment creation menu for specific equipment types,
-
Display the Group 2 equipment creation menu for specific equipment types,
-
Authorize the creation menu for assets other than those in the specific group. (Default value true)
3.2.5.2. Application behavior
When creating, via a specific menu, or accessing the details of an asset specific to one of the defined groups, a work request, a work order, a work report associated with a specific asset, the application displays:
-
the custom form for this group of specific assets, if any, with the "asset" IZ or the "equipment type" field, which is now required and filtered on Group elements
-
if not, use the entity’s custom form (if any) changing the "asset" IZ or the "equipment type" field, which is now required and filtered on Group elements
-
alternatively, use the standard form changing the "asset" IZ or the "equipment type" field, which is now required and filtered on Group elements.
In one of the entities affected, if the detail displayed is standard and the asset or equipment type field is filled in (or changed) by an element from specific group 1 or 2 assets, the system prompts you to tailor the detail screen by reloading the form dedicated to the specific asset in question.
|
|
Custom forms to manage specific assets are not required. |
|
|
To customize a specific form for one of the features associated with specific assets, a menu entry with the reference to Group 1 or Group 2 is available to the custom form configuration for the "Form" field. |
3.3. Ergonomic adjustments
The following ergonomic adjustments have been carried out on version 7.0.0:
-
Installation of the Poppins font,
-
Change to the colors of the 3 application fields:
-
Left field: Menu,
-
Right field: Linked documents and comments,
-
Top field: Application header.
-
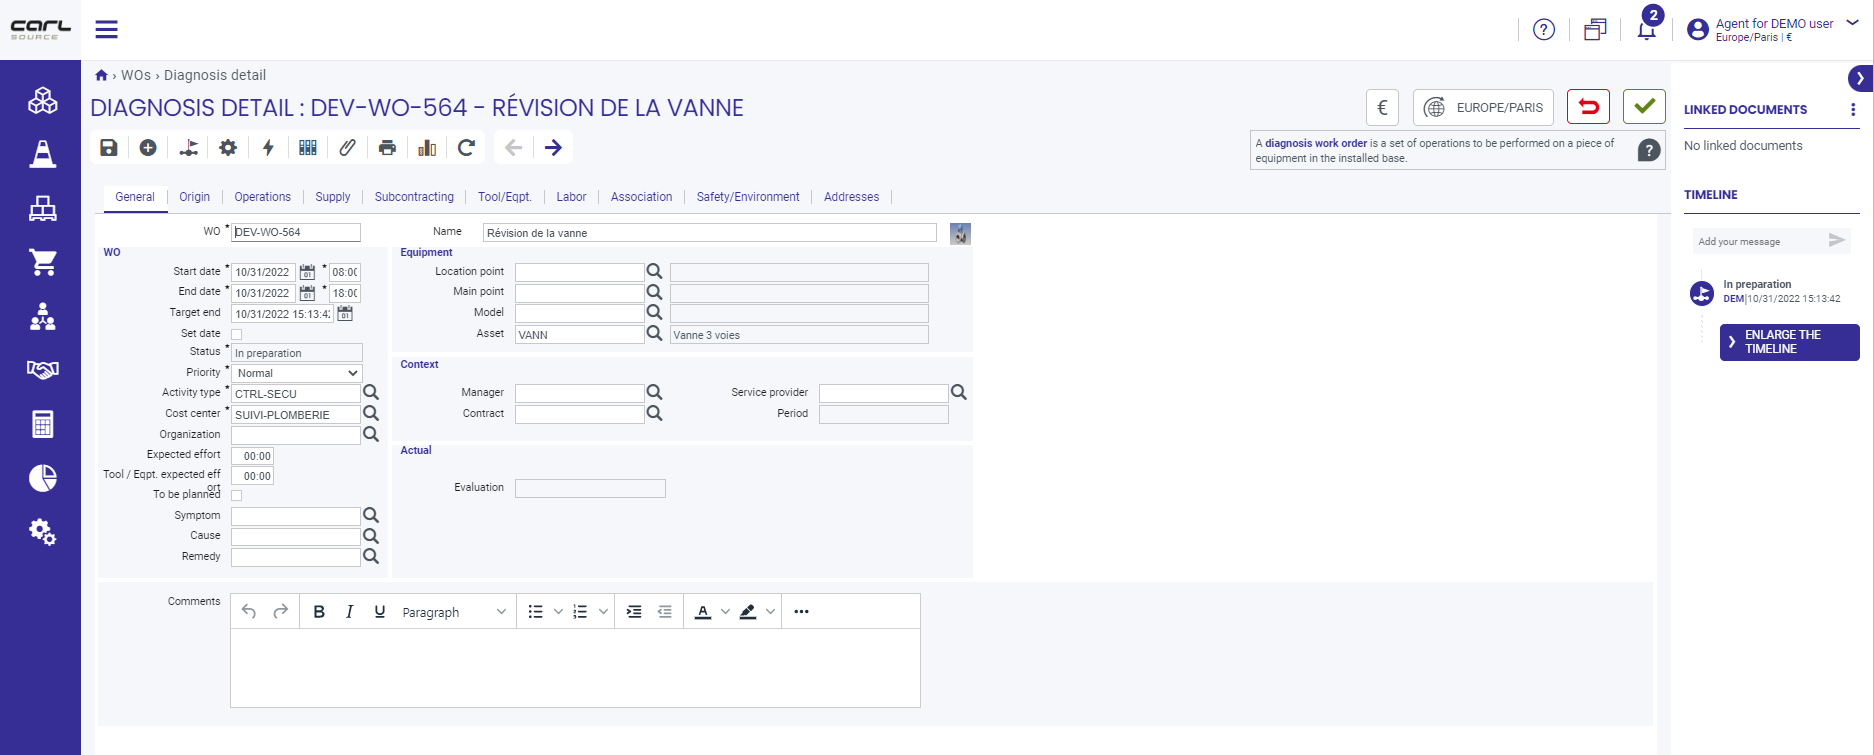
-
New style for tabs and sub-tabs:
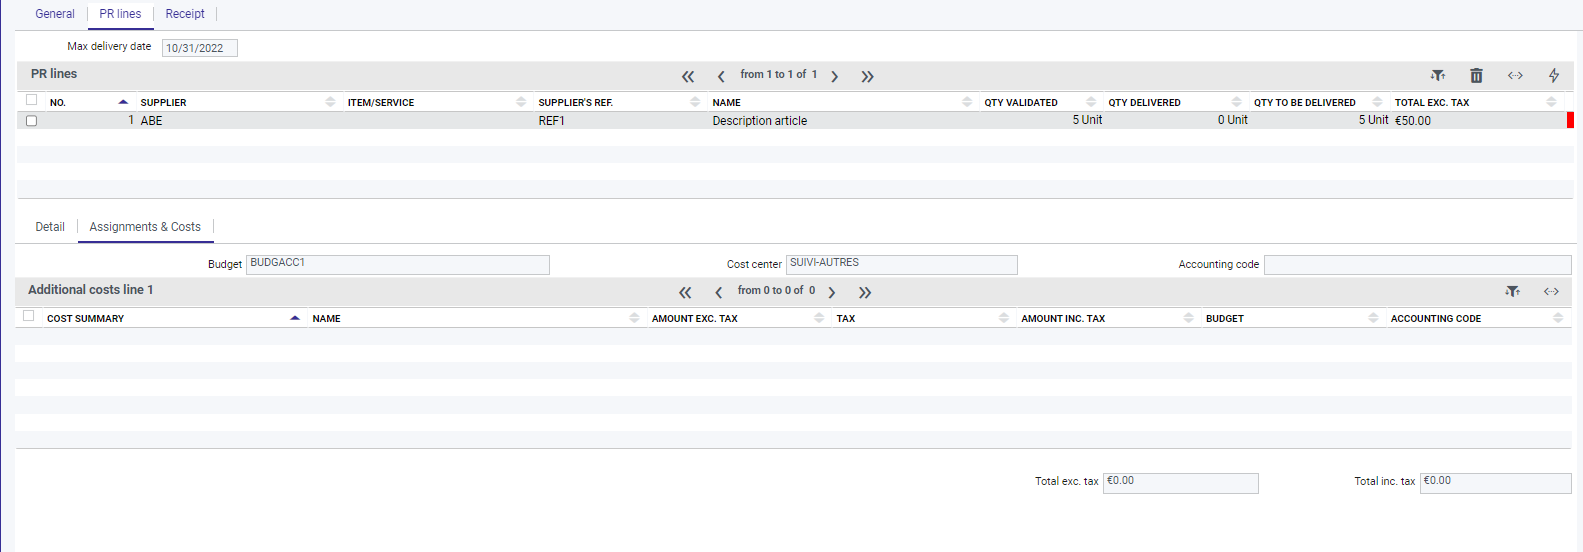
-
Add a tooltip with the module name on the menu icons:

-
In the "Amount" fields, add the complete amount without rounding off in the tooltip,
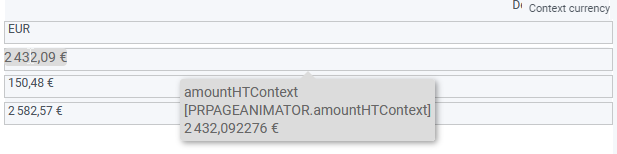
-
Adapt the graphics style to the CARL Source category:
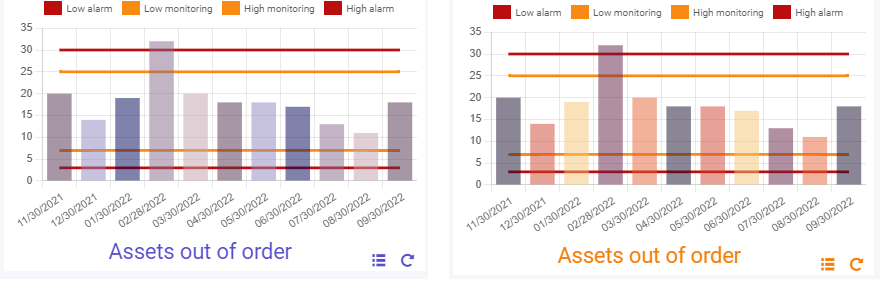
-
Increase the contrast of the line selected in the lists,

-
Updating of the loading indicator:

3.4. Automatic assignment of resources
The automatic assignment of resources is based on a "constraint solver" using a non-deterministic algorithm whose purpose is to provide the assignment of technicians and material resources for all selected work orders and which correspond to the assignment criteria defined in the assignment engine.
The automatic resource assignment action is only accessible if you have the "Start automatic resource assignment" profile right and the user has the right to change work orders.
3.4.1. General operation of the constraint solver
When the solver starts to look for solutions, there is no indication of how and when to stop. In order to find a balance between the quality of the generated solution and the execution time needed to find an acceptable solution, a stopping mechanism is set.
This mechanism makes it possible to observe the qualitative enhancements in the solutions provided by the solver. Each generated solution is assessed and assigned a score based on several criteria. The optimization stopping mechanism will observe the change in the scores attributed to each solution.
As the improvement of the solutions becomes increasingly difficult over time, if no solution generated outperforms the best solution found during a period of time (defined in the module settings) the optimization will then stop.
3.4.2. Weighting constraints
3.4.2.1. High-level constraints
-
A technician must be assigned to a resource based on the technician’s availability,
-
A technician cannot be assigned to more than one resource at the same time,
-
The assignment is limited by the work order dates,
-
The assignment must comply with the team and/or the discipline and/or the technician indicated.
3.4.2.2. Low-level constraints
-
Use as few technicians as possible.
-
Give preference to the exact time defined. However, solutions are also assessed with schedules around the defined time while minimizing the solution score. The configuration is carried out through module settings (WO_OPTA_PERIOD, WO_OPTA_STEP).
A solution must comply with all high-level constraints. The low-level constraints allow the solution score to be minimized or maximized.
3.4.3. Initiation constraints
In order for the automatic resource assignment to be initiated for all the selected work order(s), they must meet the following requirements:
-
The work order must be in a state belonging to a state family other than TERMINATE / CLOSE / ARCHIVE / CANCEL.
-
For each labor or material resource line desired, the following must be filled in:
-
At least one team and/or discipline and/or technician,
-
A date and time,
-
A period.
-
-
The calendars of technicians must be entered.
|
|
Each time the "Automatic resource assignment" action is initiated, a unique identifier is generated and associated with all the changed data (work order, labor and material resources lines). This information is available in a database and allows better follow-up. |
3.4.4. Scenarios
-
Fill in the data for the work order while complying with the constraints,
-
Initiate the "Automatic assignment of resources" action,

-
a message informs you that the action has been initiated in asynchronous mode and that a memo is generated on completion of processing,

-
On completion of processing in asynchronous mode, a memo is generated indicating the automatic assignment status:
-
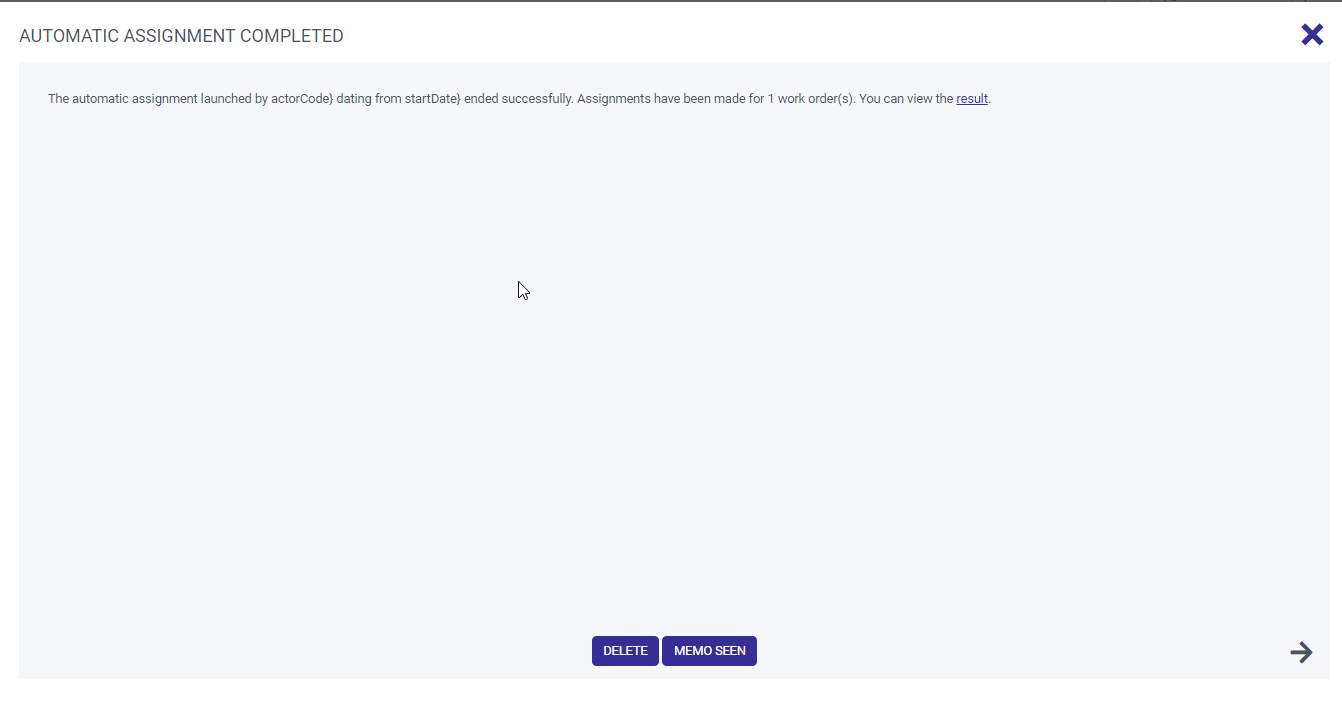
Automatic assignment completed: this type of memo appears when the automatic assignment was able to be carried out for at least one work order. A link allows you to open the list of work orders where an assignment has been made.
-
-
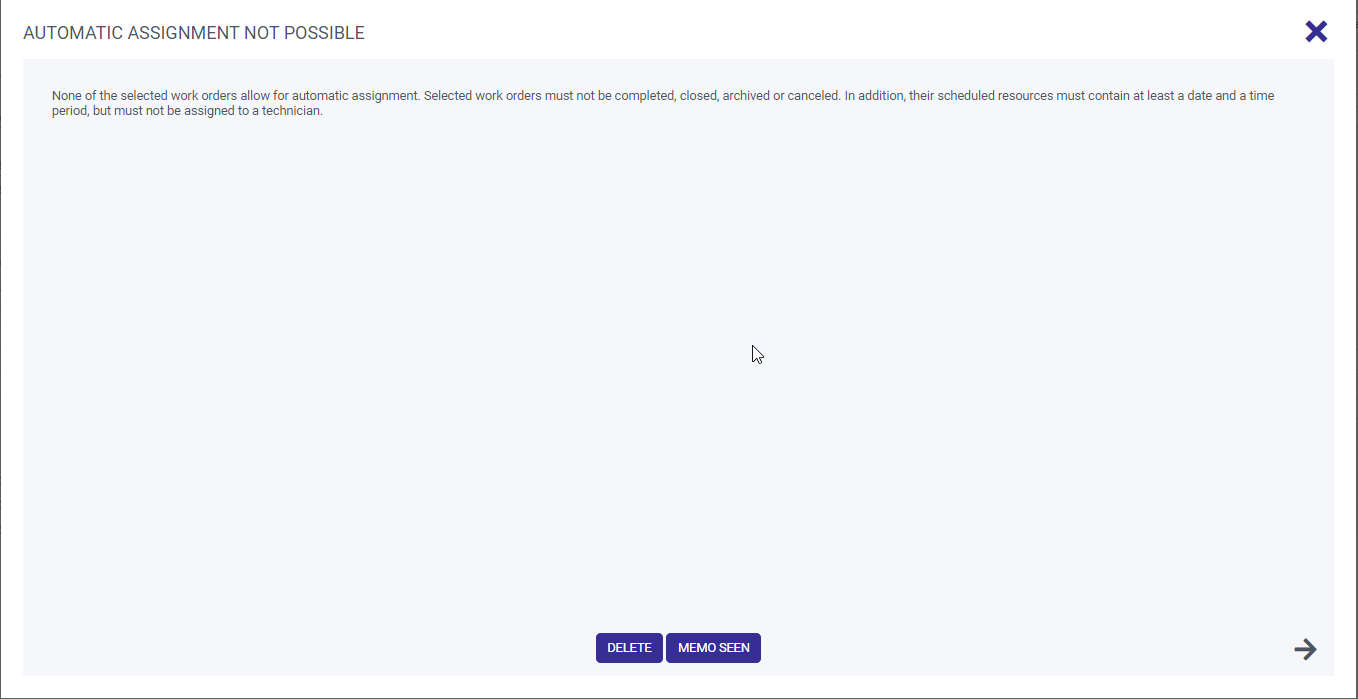
Automatic assignment impossible: this type of memo appears when the automatic assignment has not been able to carry out an assignment for all the work orders, either because the initiation constraints were not filled in, or because no solution was found.
| New 7.1 |
CARL Source can be used in a multi-currency environment. Users working in countries with different currencies may use a single CARL Source. The detailed operation will be described in section Multi-currency management. |
3.5. Multi-currency management
3.5.1. General
| New 7.1 |
If CARL Source is used in an international context, i.e. by users located in different countries, working in different currencies, the same CARL Source environment can be used in these countries. |
For each user/agent, the administrator can select another time zone from those defined as being set to "multi-currencies". In this way, when users log on to CARL Source, they will be working in their own currency. This is known as the context currency.
The user’s context currency is shown in the banner user field.

|
|
The context currency is the reference currency specified in the system configuration when CARL Source is used in a single-currency environment. |
3.5.1.1. On-the-fly changes
Expanding the section accessible by clicking on the name of the connected user (top right), the drop-down list provides access to a list of currencies. This list allows the user to dynamically switch between various currencies considered as "multi-currencies". Selecting another currency changes the context currency on-the-fly.
If the context currency is different from the entity’s currency and to facilitate the understanding of the amounts displayed, the amount converted into the context currency is shown in the tooltip displayed when hovering over an "amount" field. It is an informative data taking the exchange rate at the time T to carry out the conversion.
The next time that the user logs on to CARL Source, the user currency will once again be in the currency set in their user sheet.
3.5.1.2. Viewing an entity
In an entity’s search forms and details form, the "amount" data are displayed in the entity’s currency.
In some specific forms such as orders and PRs, data is displayed in the entity’s currency as well as in the context currency for better understanding.
When creating or viewing, an entity’s currency is displayed in the upper detail field.

3.5.1.3. Creating an entity
When a new entity is created, it is automatically initialized in the user context currency. However, the currency of some entities can change when certain information is selected in the form.
Entities are described in detail in section Description of dependent entities.
3.5.1.4. Changing an entity’s currency
The applicable rules for changing an entity’s currency are defined in section Change the currency of a master entity.
Once the currency has been changed:
-
The data being viewed are converted into the new currency by applying the appropriate exchange rate.
-
While the data entered takes the new currency into account, the value entered is not converted and remains the same. If the value is no longer consistent with the new currency, the user must change the value in the field.
|
|
For operations associated with a work order, the currency change on the work order results in a recalculation in the new currency of the unit price in an operation’s details. |
3.5.1.5. Search
In order not to clutter the search screens, the "currency" field is not automatically added on the screens corresponding to entities including a currency. However, the mechanism has been implemented. It is therefore very simple to add the currency field to a search form by going through the depending customization function.
-
Go to the search form and select the "Enter the customization mode" action,
-
Add a field and enter the expression #{formAnimator.searchBean.currencyCode} in the "value" attribute,
-
Add, if needed, the "CURRENCY" value list to the "infozone" attribute to obtain help for entering using the magnifying glass.
3.5.2. Currency and exchange rate
The "Currency" function allows you to declare all the currencies needed to manage the context of international suppliers and also to manage the multi-currency context of CARL Source users.
For a currency to be considered as multi-currency, the multi-currency box in the function must be checked.
this option is subject to the CARL Source/Global/Manage multi-currency environment profile right.
Once a new currency (standard or multi-currency) is saved, the exchange rate may be updated at the same time in order to facilitate the update (initialized at 1 or updated manually by the user).
|
|
The reference currency is checked as default as multi-currency. It therefore cannot be unchecked. |
A saved currency cannot be deleted. However, if it is no longer used, it can be disabled so that it is no longer visible in the drop-down lists offering a choice of currencies.
3.5.3. Defining entity types
3.5.3.1. Description of master entities
Master entities are entities that have amount fields and the entity of which is responsible for its own currency.
The list of master entities is shown below:
-
Item
-
Budget
-
Customer
-
Cost center
-
Rental contracts
-
WR
-
Supplier
-
Location
-
Store
-
Asset
-
Template / Item defined as a "Template"
-
Project template (if the Single cost center? box is not checked)
-
Reading point template
-
Purchase type
-
Structure point
-
Profile
-
Skill
-
Operation types
3.5.3.2. Description of dependent entities
Dependent entities are entities with amount fields and the currency of which depends on a master entity.
The list of dependent entities is shown below:
-
Purchase order: the currency depends on the supplier’s currency.
-
Contract: the currency depends on the supplier’s currency.
-
Purchase request: the currency depends on the supplier’s currency (if specified).
-
Transfer request: the currency depends on the supplying warehouse’s currency.
-
Quotations: the currency depends on the customer’s currency.
-
Invoices: the currency depends on the supplier’s currency.
-
Work order template: the currency depends on the cost center’s currency.
-
Technician: the currency depends on the skill currency.
-
Work order: the currency depends on the cost center’s currency.
-
Project template: the currency depends on the cost center’s currency if the Single cost center? box is checked.
-
Material resource: the currency depends on the skill currency.
-
Reading point: the currency depends on a reading point template’s currency.
3.5.4. Functional rules
Functional rules to check currency consistency have been implemented in the application.
3.5.4.1. General rules
-
Budget: currency consistency between the budget and the parent budget.
-
Cost center: currency consistency between the cost center and the parent cost center.
-
Customer: currency consistency between the customer and the parent customer
-
Transfer request: currency consistency between the requesting warehouse and the supplying warehouse.
-
Template / Item defined as a "Template": currency consistency between the template and the item defined as the associated "template". Updating the template updates the associated item and vice versa.
All these checks have been carried out at the backend level so that they can be applied during jobs such as interfaces or REST APIs.
3.5.4.2. PMP specific rules by organization
The rules and checks below are performed when the Stock valuation type setting = "PMP by organization" is set up in the application.
3.5.4.2.1. Warehoue
All warehouses of a given organization must have the same currency.
All warehouses with no organization must have the same currency.
3.5.4.2.2. Item
The warehouses associated with the item managed in stock the supply and storage details tabs may have different currencies. However:
-
The storage lines of warehouses with the same organization will necessarily have the same PMP.
-
The storage lines of warehouses that do not have an organization will necessarily have the same PMP.
3.5.4.3. Rules specific to the Global PMP
The rules and checks below are performed when the Stock valuation type setting = "Global PMP" is set up in the application.
3.5.4.3.1. Item
The warehouses associated with the item "managed in stock" in the supply, storage details and catalog tabs must have the same currency as the item. A check has been added so that only consistent warehouses are offered.
3.5.5. Change the currency of a master entity
The currency of master entities can be changed at any time in CARL Source if:
-
The CARL Source/Global/Change entity currency profile right is enabled,
-
The functional rules authorizing the change are followed.
The change can be made through the list or the details of the desired entity from the "Change currency" action available under the icon of available actions.
If the functional rules are not followed, the "Change currency" action is not accessible in the entity details.
3.5.5.1. Description of the checked functional rules
This section describes the functional rules to be checked in order to access the "Change currency" action in detail and as a list.
-
WR: No functional rules to be checked.
-
Family: No functional rules to be checked.
-
Location: No functional rules to be checked.
-
Asset: No functional rules to be checked.
-
Purchase type: No functional rules to be checked.
-
Structure point: No functional rules to be checked.
-
Profile: No functional rules to be checked.
-
Budget: No entry was made regarding the budget involved. The budget has no ascendants or descendants.
-
Cost center: No entry has been made regarding the relevant cost center. The cost center has no ascendants or descendants.
-
Customer: No conditions are entered regarding the customer in the "Conditions" tab. No "Parent customer" field entered or quote associated with this customer.
-
Rental agreement: There are no rental receipt lines associated with the rental contract.
-
Warehouse: There are no stock movements (of any type) regarding this warehouse.
-
Reading point template: There are no reading points associated with this reading point template.
-
Reading point: No readings should be taken at this reading point. No "Reading point template" field has been entered.
-
Discipline: There are no material resources or/and technicians related to this skill.
3.5.6. Change the currency of a dependent entity
The currency of a dependent entity can change provided that the master entity on which the dependent entity depends is changed and the latter has a different currency (Description of dependent entities).
3.5.6.1. Work order
When a cost center is changed, a release mechanism regarding the old cost center and a re-subscription mechanism regarding the new cost center will be implemented on the basis of the exchange rate on the current date to perform the conversion.
For operations associated with a work order, the currency change on the work order results in a recalculation in the new currency of the unit price in an operation’s details.
3.5.6.2. Supplier
A supplier’s currency can be changed as long as no catalog and/or contract and/or purchase is related to this supplier, regardless of a purchase’s status.
If you want to change the currency of a supplier related to a canceled purchase (order, purchase request), you first have to delete the canceled purchase through the appropriate feature.
3.5.7. Interfaces
CARL Source offers a certain number of XML interfaces as standard. The interfaces have been changed to add the currency concept.
There are 3 possible cases for XML interfaces:
-
The currency is entered at the level of an entity with an attribute of the "Amount" type.
-
The currency is not entered at the level of an entity with an attribute of the "Amount" type.
-
The currency is not entered for an entity with an attribute of the "Amount" type but we want to force the currency.
For CSV interfaces, a new version of the standard has been created.
3.5.8. Reports
3.5.8.1. Standard reports
All standard reports with currency concepts have been updated. The currency is now included next to each currency field.
Depending on report, the information is displayed in:
-
The entity’s currency
-
The context’s currency.
If reports aggregate in currencies different from the entity’s currency, the description corresponding to the aggregation then displays the date and time the report was generated. In this way, it is much easier to find the applied exchange rate.
3.5.8.2. Customized reports
Customized reports prior to version 7.7.0 must be corrected:
-
If reports are based on queries with links to the currency table. In this case, the query must be updated.
-
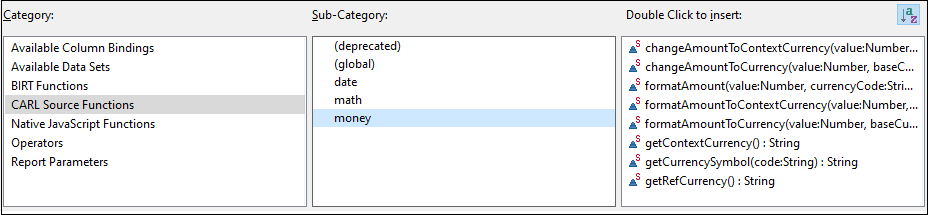
If the reports are used in a multi-currency environment. In this case, the new methods available in the BIRT Designer tool should be used.
| New 7.1 |
|
The conversion functions without the displayed currency:
-
Converting an amount into a target currency: changeAmountToCurrency (amount, source currency, target currency, valuation date)
-
Converting an amount in the context currency: changeAmountToContextCurrency (amount, source currency, valuation date)
The formatted conversion functions with the currency:
-
Formatting an amount in its currency: formatAmount(amount, amount currency)
-
Formatting an amount in a target currency: formatAmountToCurrency(amount, source currency, target currency, valuation date)
-
Formatting an amount in the context currency: formatAmountToContextCurrency(amount, source currency, valuation date)
Others multi-currency BIRT functions:
-
Monetary symbol for a currency: getCurrencySymbol(currency)
-
Context currency: getContextCurrency()
|
|
The valuation date is not mandatory in these functions. If it is not defined, the exchange rate used for conversions will be that of the current date/time. Custom reports used in a single-currency environment work without the need to correct BIRT functions. However, it is good practice to update them. |
3.5.8.3. Report wizard
Through the report wizard, a new column can be added with the currency code associated with an amount. However, no changes have been made to aggregate amounts with different currencies.
If totals can be made on different currencies, they have to be grouped by currency code first.
3.6. Energy and fluid
| New 7.2 |
The energy topic is new. Using this feature requires the acquisition of additional rights. For more information, contact CARL Berger-Levrault. |
3.6.1. Meter type
The meter type is used to classify energy points. The information defined at the meter type level facilitates the creation of an energy point by initializing certain information (cost center, cost type, energy type, etc.).
|
|
Standard icons for each energy type have been added to the CarlSource library. |
|
|
The "energy" cost type has been added to the COSTTYPE values list to handle "energy and fluid" analytical costs. |
3.6.2. Energy point
The energy point brings together all energy and fluid-related information in a single location. In particular, you can track the consumption and costs of the energy sources used on equipment.
The details of an energy point contain general data (supplier, distributor, subscription No.), information on the associated reading points and the associated energy bills.
|
|
To meet the requirements of the service sector decree, the "Service sector decree: reference year" and "Service sector decree: reference consumption" attributes are available in the dictionary. They can easily be added as customizations to make them appear in a building’s or a site’s details. |
3.6.2.1. General
-
The energy point can be associated with CARL equipment (Location, Structure Point, Asset), which will enable energy information to be viewed directly through the equipment sheet.
-
The billing reading point corresponds to the main reading point for the energy point. The latter is also related to energy billing. The readings taken at this reading point are consistent with the information contained in the energy billing.
3.6.2.2. Reading points
This tab lets you display all the reading points associated with the energy point, to make it easier to monitor energy consumption through readings.
-
Entering a billing reading point initializes this information in the "Reading points" tab. The latter is considered the main reading point and cannot be deleted.
-
On this tab, you can add other reading points considered as sub-metering reading points.
-
For example, a building can be associated with the billing (main) reading point, and each floor can have its own reading point (sub-metering).
-
|
|
This tab provides direct access to the "Readings" function. |
3.6.2.3. Invoices
This tab allows you to view and enter all energy bills related to the energy point. As default, invoices for the current year are displayed, but a filter lets you adjust the dates.
-
Entering the data included in the physical bill, such as the bill amount and consumption in terms of volume, will enable comparisons to be made between the billed amount and readings, as well as providing information on the cost of energy for each item of equipment.
-
A link exists between the energy bill entered and the billing reading point.
-
A breakdown of the invoice is possible to get a more precise breakdown of energy costs by equipment / structure point / location.
-
For example, the overall invoice is for the building, but a breakdown by floor is required (15% basement, 50% ground floor, 35% FLOOR_1)
-
-
The cost center, cost type, structure point, location or asset fields can be initialized with the data entered in the "General" tab, if included.
-
To save time and productivity, you can break down an energy bill based on the breakdown made on the last bill. For this operation to be carried out automatically, the REPARTITION_MODE (Energy bill distribution mode) module setting must be updated to "Automatic".
-
Negative amounts can be entered on an energy bill to meet credit note needs.
3.6.2.3.1. Mechanism: breakdown of an energy bill
-
Adding an energy bill line automatically initializes a line in this sub-list, with a default percentage of 100% of the bill line entered, and the amount corresponding to the bill amount including tax.
-
Users can then add as many distribution lines as they want, ensuring that:
-
The distribution percentages amount is 100 before saving,
-
The amount incl. tax of each breakdown line is equal to the amount incl. tax shown on the invoice line.
-
-
Changing the breakdown percentage or amount incl. tax of the breakdown line automatically updates the other linked field.
-
Users can change all the information in the invoice breakdown sub-list if they want to make a more detailed breakdown, such as by building, floor.
3.6.2.3.2. Energy bill states and cost accounting entries
Commitment, de-commitment and completion entries are generated based on the status of the energy billing lines.
-
In preparation: The invoice has been created. Bill-related information and bill-breakdown-related information cannot be changed.
-
No entry is committed on the cost center.
-
-
To be paid: The invoice is to be paid.
-
When an energy bill line changes to the To pay state, costs are incurred on the cost center and for the cost type of each of the energy bill breakdown lines.
-
-
Closed: the invoice is closed.
-
When an energy bill line changes to the Closed state, a cost-accounting entry line is generated to de-commit costs previously incurred on the cost center and for the cost type of each of the energy bill breakdown lines.
→ A cost-accounting entry line is generated to de-commit costs incurred on the cost center and for the cost type of each of the energy bill breakdown lines.
-
-
Canceled: the invoice is canceled.
-
If the bill line was in the To be paid state whereas a cost-accounting entry line is generated to de-commit costs previously incurred on the cost center and for the cost type of each of the energy bill breakdown lines.
-
|
|
A cost-accounting entry will only be generated if the cost center AND the cost type are entered on a distribution line. |
|
|
Energy bills are not related to CARL Source’s existing bill process in the purchase module. |
3.6.3. Energy billing follow-up
The "Energy billing follow-up" feature lets you view energy billing lines and their breakdown across all energy points, from the moment energy bills are managed through the energy point.
To refine the billing data to be viewed, various search criteria are available, such as equipment with or without descendants.
|
|
It is possible to view the energy billing history of an item of equipment (asset, location, structure point) from its file. |
|
|
A "readings monitor " block containing energy-related information can be added to the information area. |
3.7. Integrated intelligence
| New 7.2 |
The integrated intelligence topic is new. |
CARL Source’s built-in intelligence is designed to alert users to situations they may not be aware of when carrying out their work.
The aim is to provide non-intrusive help for CARL Source operation, which can be configured and deactivated as required.
3.7.1. Consulting assistant
A consulting assistant lets you define the settings and recipients of the consulting alerts that will be generated by the running of the associated automatic job.
Standard consulting assistants cannot be removed. However, they can be duplicated as a basis for the creation of new consulting assistants.
The following information can be configured in the detail form:
-
An execution interval (Day, Hour, Minute),
-
A display time after which the consulting alert is no longer visible in the application header,
-
A filter to restrict input data,
-
Entry settings for raising a consulting alert (specific to each consulting assistant),
-
Advice for users,
-
Recipients with access to the generated consulting alert (user, profile, organization).
|
|
When a consulting assistant is activated, the date of the status change (from inactive to active) is retained and used as the starting point in the consulting assistant initiation mechanism. The purpose of this logic is to limit the initiation of the consulting assistant (first activation or reactivation). |
Two standard consulting assistants are supplied as standard in CARL Source.
3.7.1.1. Consulting assistant: Recurrence of work orders on equipment (WO_RECURRENCY_EQPT) - MATERIALOCCWOJOB
This consulting assistant alerts the user to a recurring work order on an item of equipment.
The settings are as follows:
-
Control range (in number of days): number of days over which the number of work orders on an item of equipment is calculated. Default value, 30 days.
-
Occurrence trend percentage: trend percentage at which reference can be made to recurrence. Default value, 20%.
-
Time interval used as a reference for calculating an average (in number of days) : time interval used to calculate an average number of work orders on an item of equipment. Default value, 180 days.
3.7.1.2. Consulting assistant: : Item overconsumption (ITEM_OVR_CONSUMPTION) - ITMOVRCONSUMPTIONJOB
This consulting assistant alerts the user to over-consumption of items.
The settings are as follows:
-
Control range (in number of days): number of days over which to calculate the number of items issued from stock. Reference is made to an item/warehouse pair. Default value, 30 days.
-
Occurrence trend percentage: trend percentage at which reference can be made to overconsumption. Default value, 20%.
-
Time interval used as a reference for calculating an average (in number of days) : time interval used to calculate average inventory withdrawals for the item/warehouse pair. Default value, 180 days.
3.7.2. Viewing of consulting alerts
CARL Source’s consulting alerts allow you to display the results of consulting assistant execution.
Consulting alerts can be accessed from any screen via the top area of the application by clicking on the associated icon. An insert on the icon shows the number of consulting alerts.

Consulting alerts displayed take into account the alert maximum display date (job execution date + display duration) and the list of recipients defined in the consulting assistant’s details.
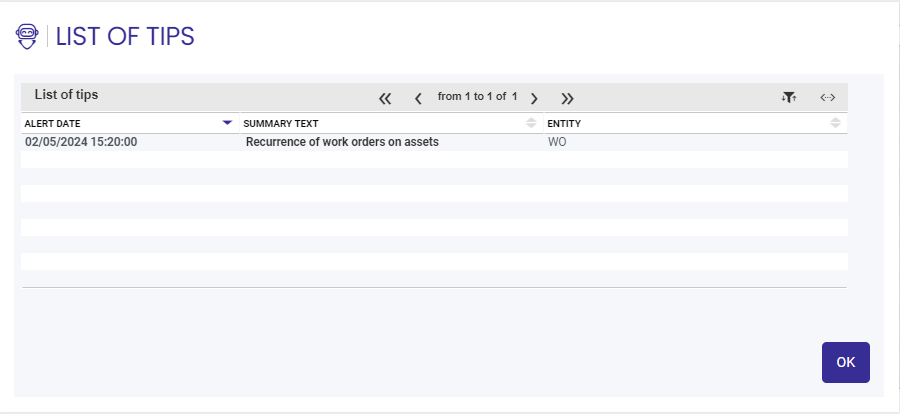
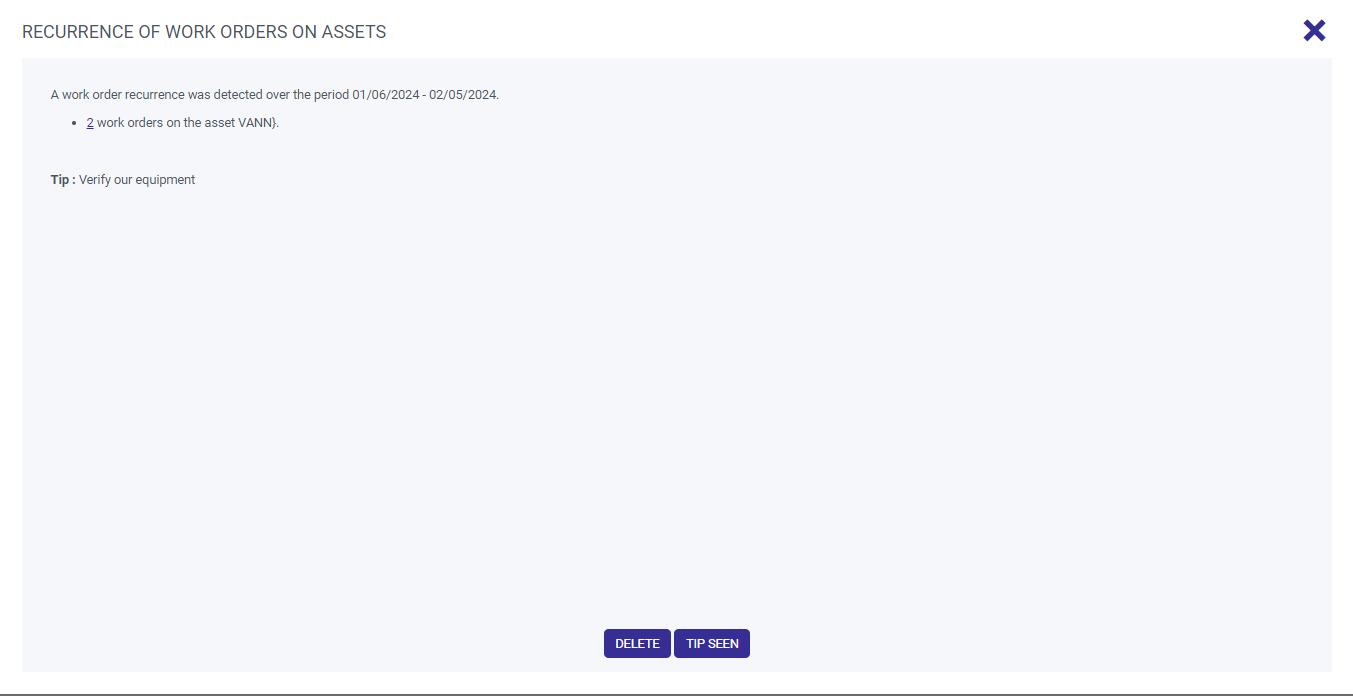
The details of a consulting alert are displayed:
-
A description of the alert.
-
The number of occurrences concerned by the alert and a link to open the results screen for the entity involved, filtered by occurrences.
-
The consulting to be applied.
But you can also click on:
-
CONSULTING SEEN → The alert will then be marked as "read".
-
DELETE → The alert will then never be displayed again.
3.7.3. Consulting alert follow-up
The "Follow-up alerts" function lets you view all the consulting alerts that have been created following the running of the jobs corresponding to the consulting assistants.
This feature, available in the "System" module, enables the administrator of consulting assistants to analyze them and adjust the starting settings accordingly.
3.8. Business Intelligence
| New 7.2 |
CARL Source version 7.2 has the new "BI data configuration" feature, designed to simplify data management within CARL Source by enabling the creation of data models. Using this feature requires the acquisition of additional rights. For more information, contact CARL Berger-Levrault. |
3.8.1. Data model
At the core of this feature, the data model is defined as a structured, filtered representation of the data. It allows users to create a dataset based on their needs, without requiring any particular knowledge of SQL.
|
|
CARL Source comes with a number of standard data models, which you can duplicate and create as many as you need. |
The data model includes general information such as name, detailed description, main business object, organization and topic. It also includes two sub-tabs: [Data] and [Filter]. For these sub-tabs to be visible, an initial data model record is required."
|
|
The data model name corresponds to the table title in the OData API results. In the absence of a name, the table title will be that of the main business object. |
3.8.1.1. Data
The [Data] sub tab is used to define the elements to be incorporated in the dataset. You can select an attribute from the tree structure on the left, and it will be added to the table on the right.
The attributes included in the tree structure are associated with the main business object chosen. This tree structure includes all attribute types (persistent and non-persistent).
|
|
The attribute code can be changed and corresponds to the column header in the OData API results. |
3.8.2. OData API
In addition, OData API integration offers a practical solution for retrieving this data readily from external tools, while complying with the data access rights specific to each CARL Source user (access restriction groups, profile rights, and organization groups).
This approach ensures data security and confidentiality, while providing a customized experience so that the extracted data is in the user’s language.
|
|
To preserve system performance, it is essential to create models with reasonable datasets, limiting the number of lines retrieved. |
3.8.2.1. Use of the OData API
You can use active data models in OData API-compatible tools by accessing their dedicated URL.
You can also use objects globally using the following Odata URL: http://[host]:[port]/[context]/API/ODATA/V1
The settings [host], [port] and [context] correspond to the machine name, the port and the path in which CARL Source is installed.
|
|
Access to the OData API requires the 'CARL Source -> Global -> OData API access' profile right. |
3.9. CARL Optim
| New 7.3 |
Version 7.3 of CARL Source provides a resource scheduling optimization solution.
Using this feature requires the acquisition of additional rights. For more information, contact CARL Berger-Levrault. |
3.9.1. Optimization configuration
The goal is to be able to configure optimization models that will be applied at the time of optimization launch to best meet the specific needs of each customer.
-
Optimization constraints are standard and can be disabled by administrators if necessary.
-
Constraints can be applied individually or combined. Some constraints include sub-parameters to refine the rules.
-
There are two types of optimization models: VRP (with travel) and TASP (without travel).
3.9.2. Execution of an optimization
CARL Optim is an optimization engine designed to solve complex scheduling and routing problems by applying specific constraints to best meet your needs.
-
The selection of constraints as well as the choice of constraint level and weighting guide the optimization result.
-
By applying these different parameters, a score per constraint level (strong, medium, flexible) is calculated for each tested solution. The best proposed solution is the one closest to a score of 0/0/0.
-
However, a solution with a negative score corresponding to strong-type constraints will not result in a proposed solution.
3.9.3. Optimization history
The objective is to provide tracking of the optimizations performed via the CARL Optim engine in CARL Source.
-
The "Optimization history" feature allows monitoring optimizations with details such as run number, date, model, user, and status.
-
Available actions on an optimization include acceptance or rejection, depending on the "Awaiting decision" status and solution validity.
-
The validity period of a solution is configurable and by default set to 24 hours, after which actions become inaccessible.
-
A purge option allows deleting optimization JSON data while retaining the information for traceability.
-
Purging the cost matrix, which calculates travel times, is a manual action required to account for route changes.
3.9.4. Management of a standard week
This new feature allows defining a company’s opening hours in the form of a standard week, so it can be applied when launching an optimization without needing to define schedules for each individual resource.
-
The "Standard Week" feature allows defining work hours for a week in the "Resources" module.
-
A graphical calendar makes it easy to add availability slots.
-
The display range is configurable via "Module settings".
-
This feature is intended to optimize resources by applying a standard week model to all staff.
3.9.5. Travel management
Two travel management modes TASP and VRP are taken into account during resource optimization:
-
The TASP mode allocates tasks without considering travel, while the VRP mode optimizes routes by accounting for journeys.
-
The VRP mode uses a cost matrix based on ORS to calculate distances between addresses, integrating parameters such as transport mode and fixed departure/arrival locations.
-
Travel times calculated in VRP mode are included in interventions as labor lines, affecting the total workload.
-
Travel can be managed outside CARL Optim by directly entering the labor type in the intervention.
-
Travel information is visible and editable in the resource schedule.
4. General functional enhancements
4.1. Equipment module
4.1.1. Adjustment of regulatory attributes / Locations
CARL Source version 7.0.0 provides an enhancement to the regulatory attributes for qualifying a location.
The public building classification has been reviewed and part of the content has been isolated and dedicated to the VTB (Very Tall Building) property.
The adding of a E.R.T. (workplace) checkbox and a L.U.H. (residential use) checkbox will enable locations to be properly classified.
4.1.2. Equipment tree structures
The quick search pop-up in the equipment tree has been enhanced to reflect the optional "Equipment type" and "Template" attributes to refine and complete an equipment search.
4.1.3. Configuration of equipment types: Characteristics sheet
The existing equipment types configuration already reflected the characteristics. It now refers to characteristics sheets allowing you to quickly define a set of characteristics to be initialized for a typical configuration.
An application priority between sheets is also available in order to specify the priority for creating characteristics in the event of identical characteristics on 2 different sheets filled in.
|
|
Referring to a characteristics sheet, in relation to the characteristics directly linked to the configuration, allows you to always apply these characteristics up to date in the event of changes to sheet’s elements. Changes to a file will be immediately reflected when the configuration equipment type referencing the sheet is reapplied without any further processing. |
See: Characteristics sheet for further details.
4.1.4. Checkpoint principle
CARL Source version 7.0.0 introduces the concept of checkpoints, which allow you to monitor specific points on equipment assets according to a list of predefined states.
For for building, for example, property managers will set "declarative" checkpoints for each room in the building in order to monitor the state of electrical sockets, windows, doors, floors, and light fixtures, through which they (or field teams) will indicate the state by direct entry. This is done without declaring additional equipment for monitoring these points.
They will then define "calculated" checkpoints, as required, directly for the building in order to summarize the general state of sockets, wall lights, and/or more generally the electrical system, as well as the woodwork, floors, etc., for simplified, customized overall follow-up and management.
|
|
If the design of the checkpoint templates is relevant, the source checkpoints are automatically determined by the system on the calculated points when the calculated checkpoint is created. |
The administrator has checkpoint templates in order to generate checkpoints and provide consistency in the available states.
|
|
Each checkpoint is associated with a device but they can also be associated with an independent structure of a specific structure point in order to provide a classification and grouping/view that is different from the equipment at the point. These can be customized technical packages for equipment, plants or official building classifications such as OmniClass, UniClass, Uniformat. |
4.1.4.1. Checkpoints
A checkpoint is a component representing a "state", the information of a component associated with a device. Although a log of past values is available, only the current state of the point is used in the application. The checkpoint template is required.
There are 2 types:
-
Declarative: a point located on a device, usually at a low level in the hierarchy, for which a status will be entered. This status can be declared for the point details or in a list (result or sub-list) by enabling the checkpoint line: a link is displayed to enter the status.
-
Calculated: a point located generally at the top of the equipment tree structure, which will indicate a state resulting from an operation on a set of checkpoint states generally resulting from downstream equipment.
For its calculation to be performed, the calculated point must be linked to "source" checkpoints. These can be determined automatically from the calculated checkpoint template and/or added manually.
However, the list of state values must be the same between all source points and the calculated point to maintain the calculation consistency.
An automatic job will initiate the calculation of the calculated checkpoints according to the periodicity setting entered for each calculated checkpoint.
When properly declared, checkpoint templates allow you to quickly and easily add checkpoints to equipment.
If the user
1. has declared A, B, C declarative templates for electrical sockets, ceiling lights, electrical switches with the same status value list.
2. has created checkpoints for the rooms of a building with these types with these declarative templates.
3. has point templates calculated with calculations such as average (for example) having referenced as a declarative source template the templates previously designated A, B and C.
The user then simply creates calculated checkpoints, based on the previously mentioned calculated point templates, on the floors, buildings or sites located hierarchically above the rooms.
These high-level calculated points will then be directly filled by all the declarative checkpoints of the premises with the right declarative templates (A, B and C) when the checkpoint is created.
Once the templates are correctly configured, at the level of the links, the advantage of this is to have the same information for all equipment assets and to have simplified declarations of calculated checkpoints automatically configured on their creation.
|
|
The checkpoints can be generated automatically through the equipment templates: A tab has been added to the template to automatically generate checkpoints for the equipment, as already done with the reading points. |
4.1.4.2. Checkpoint templates
Checkpoint templates allow you to configure and type checkpoints. The template is required to create a checkpoint.
They are used to specify the type of point, the list of state values to be used and the calculation operator. They also allow you to initialize certain checkpoint values from the template.
The structuring of checkpoint templates is important in order to ensure the consistency of the checkpoints that are derived from them, in particular by automatic generation of these points from equipment templates.
4.1.4.2.1. Calculated type
The calculated type point template has different properties from that of the declarative type.
The calculation is based on the value associated with each state. It can also be based on the "quotation": a "note" added manually for each state.
A calculation operation must be filled in (Sum, Minimum, Maximum, Average, Weighted average) as well as the data used for the calculation: value associated with the state or quotation.
The declarative checkpoint templates that are the source of the calculation can also be declared:
When the calculated control point is created, these lead to an automatic declaration of the source points coming from the descendants of the equipment.
4.1.4.3. Reading follow-up / equipment details tab
CARL Source version 7.0.0 adds the overview of equipment checkpoints and reading points directly in equipment details, through the new "Reading follow-up" tab.
This tab includes 2 sub-lists dedicated to each of these point types.
Dynamic filtering options are provided in the header of each list in order to sort the elements quickly and efficiently.
|
|
The Show descendants option of each list is used to display the points associated with the equipment hierarchically below the equipment currently displayed. This capability adds a quick view if needed of this information without leaving the details of high-level equipment. |
|
|
Two actions are added to the equipment details to allow for quick consultation of these Point elements. They allow you to directly open the checkpoint and filtered reading point functionalities on the components of the equipment from which the call is made. |
4.1.5. Standardized FUEL import interface
The FUEL import interface is now available as standard. This new feature implies a change to the detail and search forms of the Reading points and Reading point templates. The Category attribute is now associated with a values list.
4.1.6. Reading points
4.1.6.1. Calculating the linear extrapolation value
| New 7.1 |
CARL Source version 7.1.0 introduces the possibility of calculating the linear extrapolation value of the meter based on previous readings. |
The action can only be accessed if the extrapolation is linear.
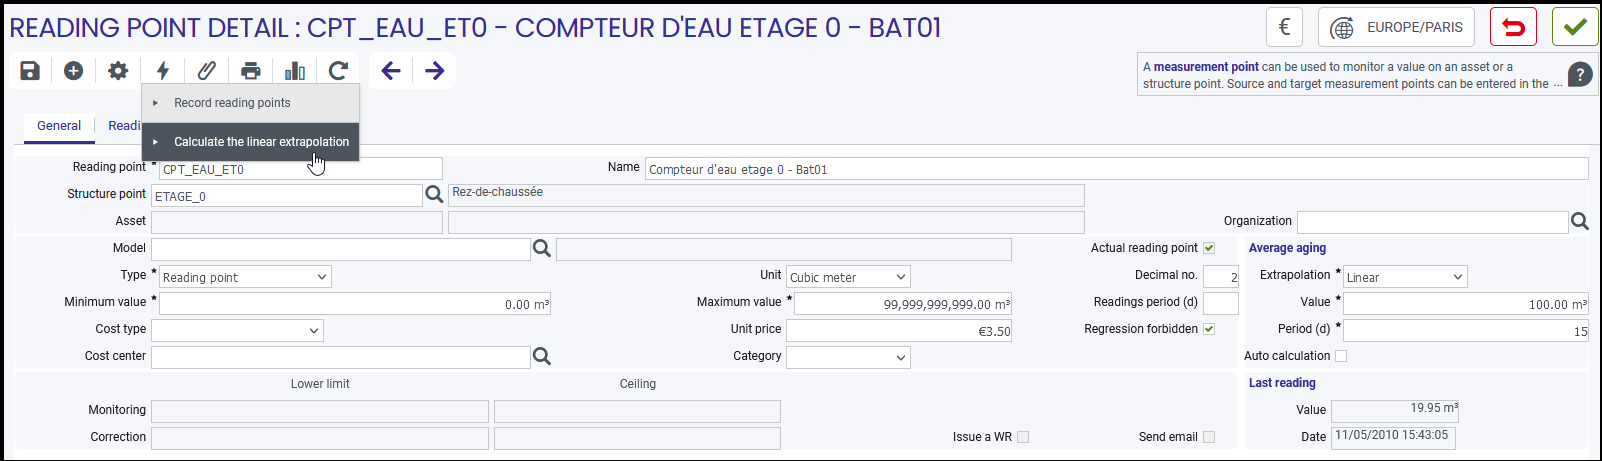
The calculation of the linear extrapolation value uses the period (j) specified in the average aging. If no period is indicated, the period will be considered as 0, which will result in a linear extrapolation value also equal to 0.
To initiate the calculation action, the reading point must have at least two readings. If not, an error message will be displayed.

4.1.6.2. Linear extrapolation calculation automation
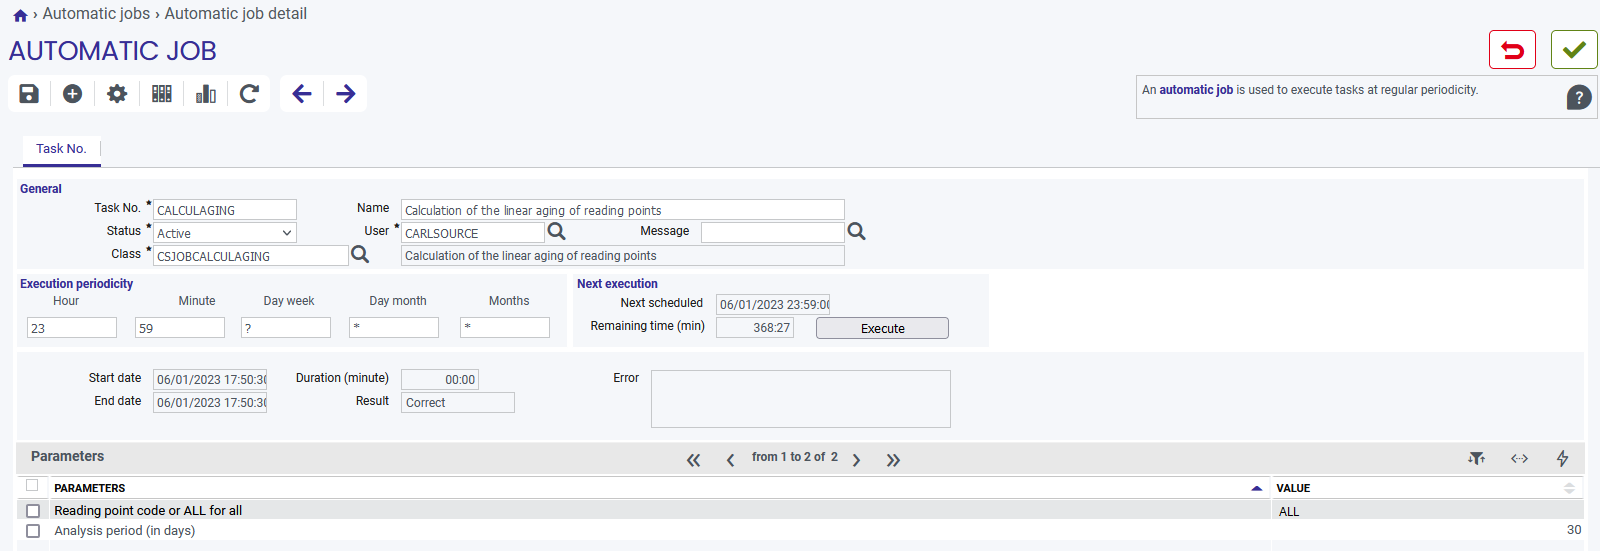
| New 7.1 |
This CARL Source version provides an automatic job to automate the calculation of the average meter reading increase based on previous readings. |
This automation can be enabled by checking the "Auto-calculation" box, which can only be selected for linear extrapolation. If the extrapolation has the value Customized or None, this box becomes inaccessible.
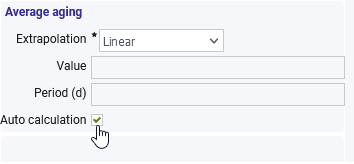
When the "Auto-calculation" box is checked, the Value and Period fields also become grayed out and cannot be changed.
The automatic calculation choice allows the "CALCULAGING" automatic job to calculate and update the value and period of the linear extrapolation based on its settings at the chosen execution interval.
4.1.7. BIM feature
|
|
The use of this feature requires the purchase of additional rights. For more information, contact CARL Berger-Levrault. |
4.1.7.1. Coordinate systems
| New 7.2 |
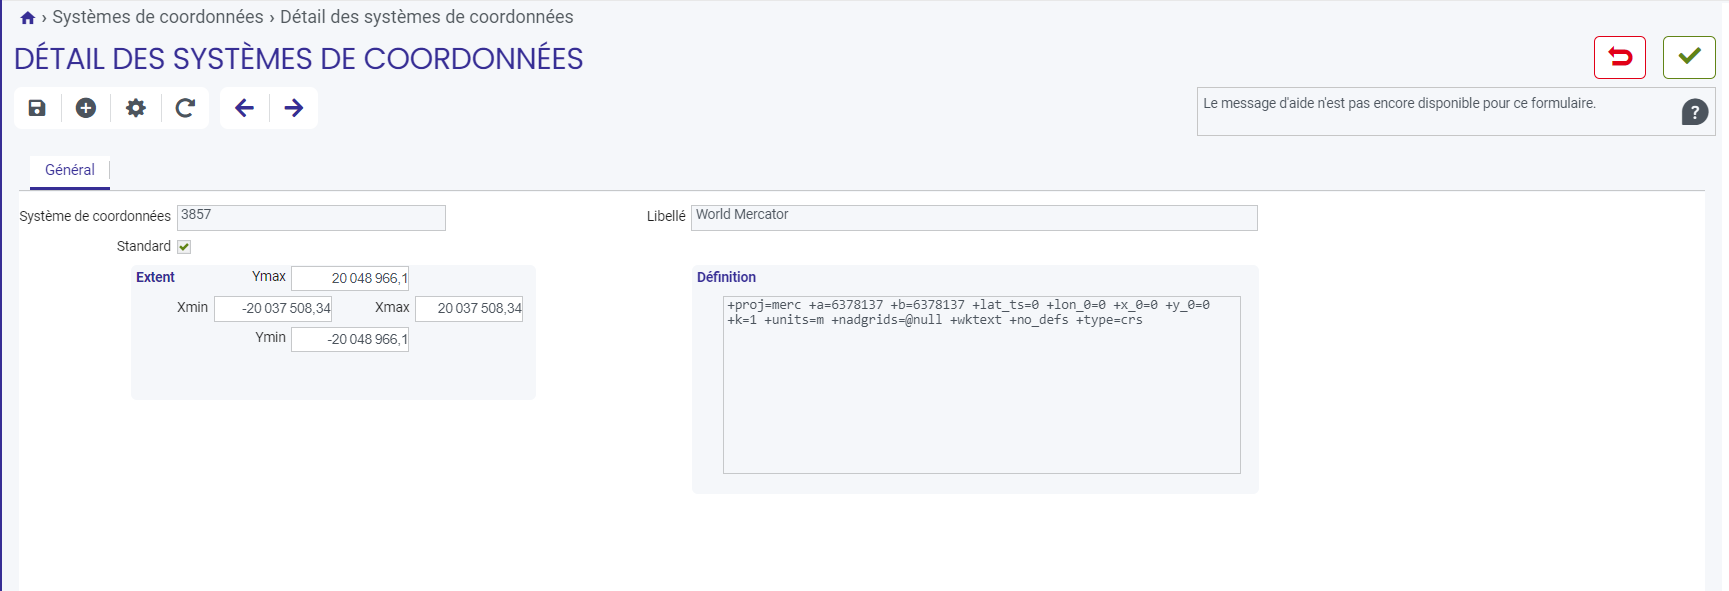
This version of CARL Source introduces the option of defining a projection reference system (Lambert, World Mercator). |
4.1.7.2. Map backgrounds
| New 7.2 |
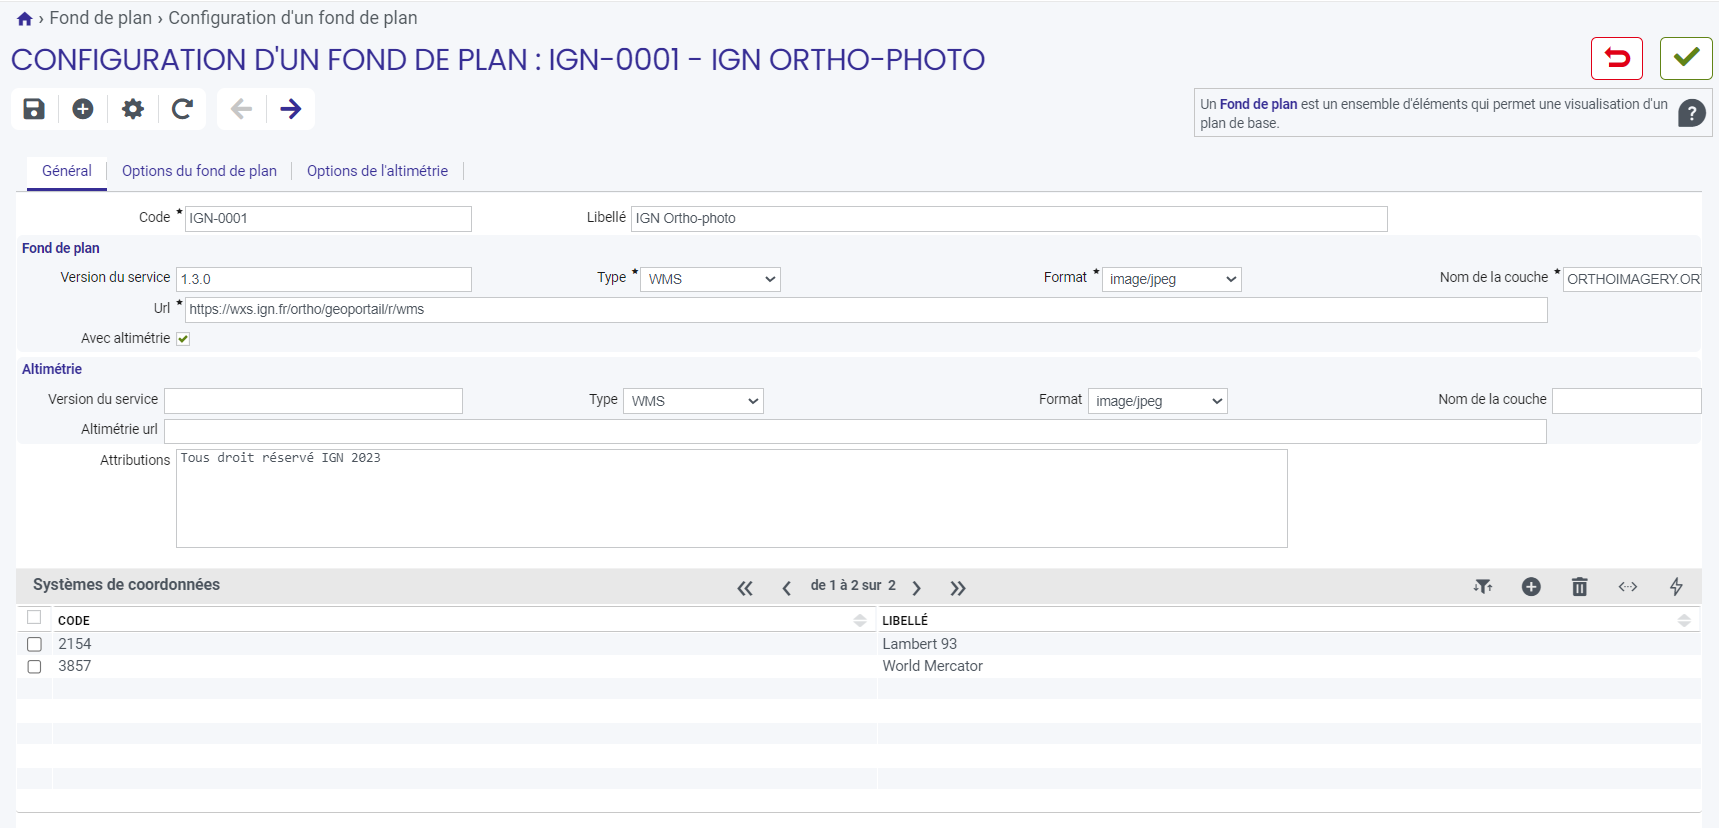
This version of CARL Source adds a new feature enabling you to define a map background map reference system (IGN, OSM). These map backgrounds can be used to view BIM Viewers (3D Viewer). These map backgrounds are currently intended for BIM processes only, and are not used in GIS processes. Backgrounds have been added to CARL Source, but users can add their own map backgrounds. Each map background must be associated with one or more coordinate systems. |
4.1.7.3. BIM templates
| New 7.2 |
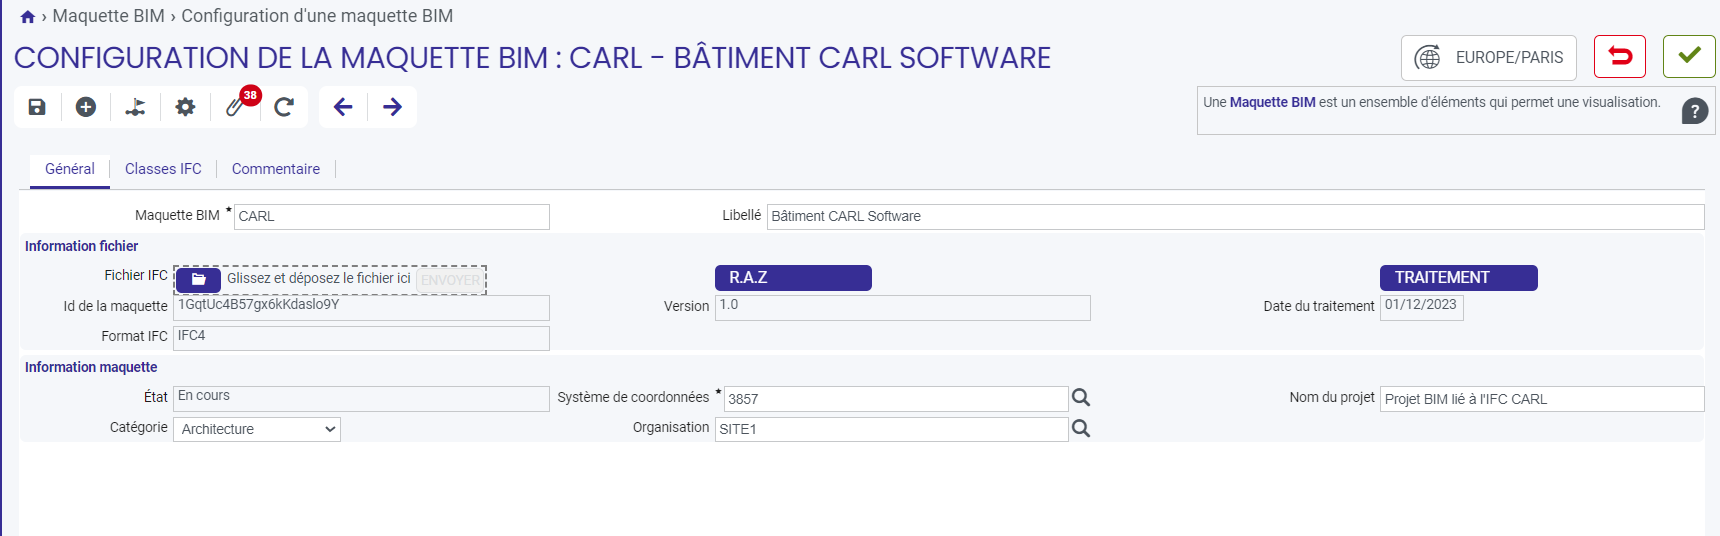
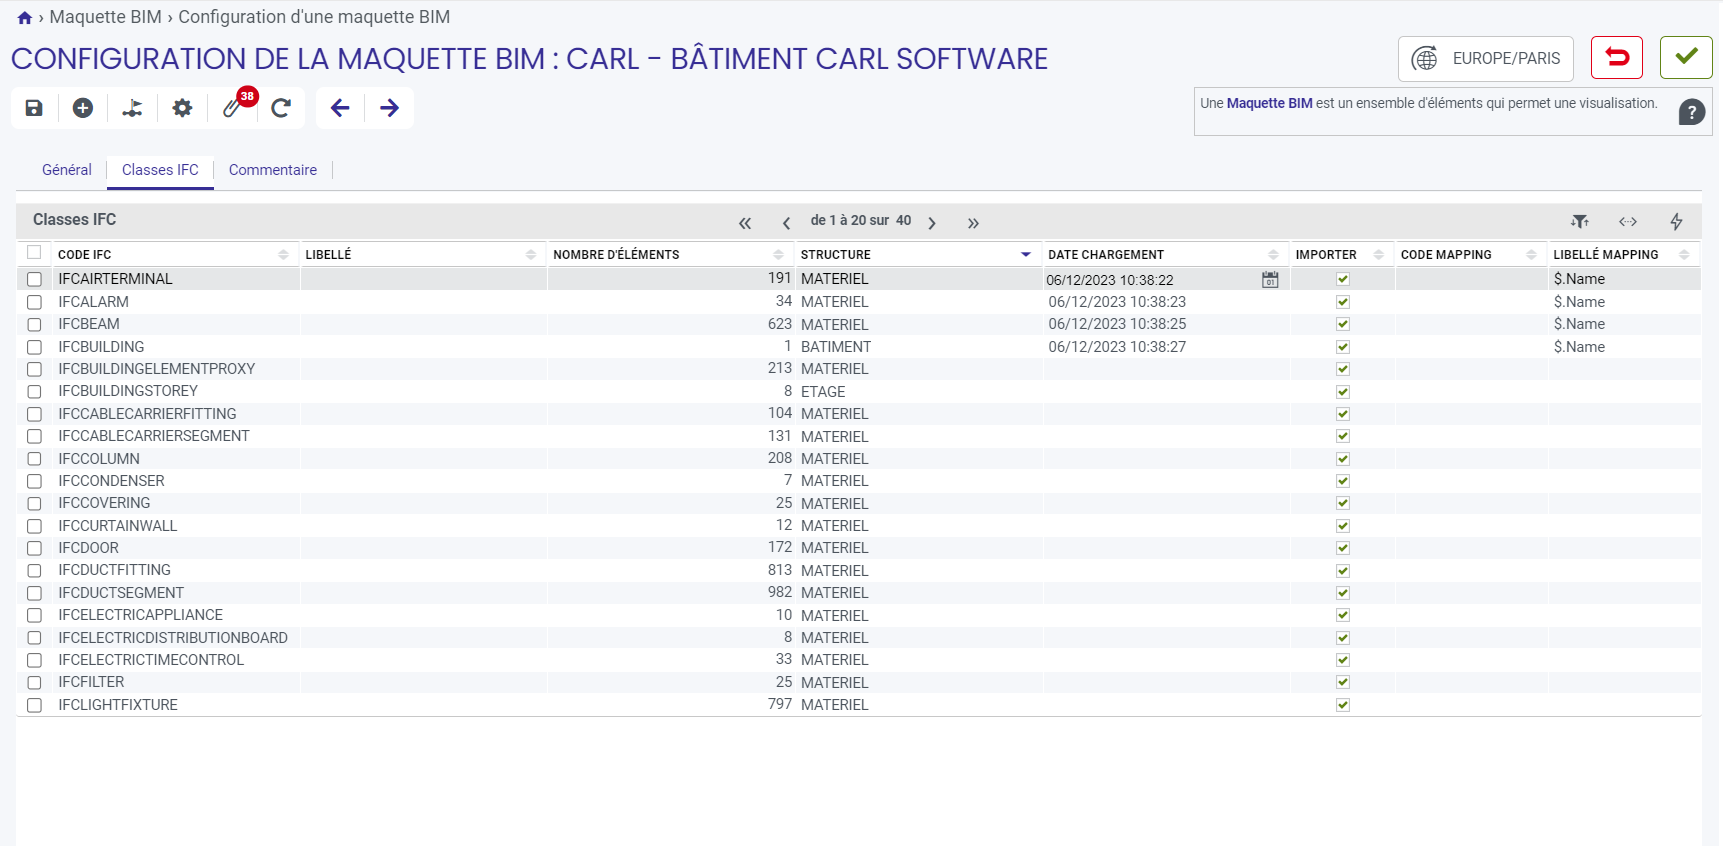
This version of CARL Source adds a new feature for defining a BIM template reference system. These templates are used to view buildings in 3D. These templates can be used to retrieve information from IFC files (parsing, loading and tile generation microservices). Each of these processes operates asynchronously. A memo is sent to the user once the job is completed. |
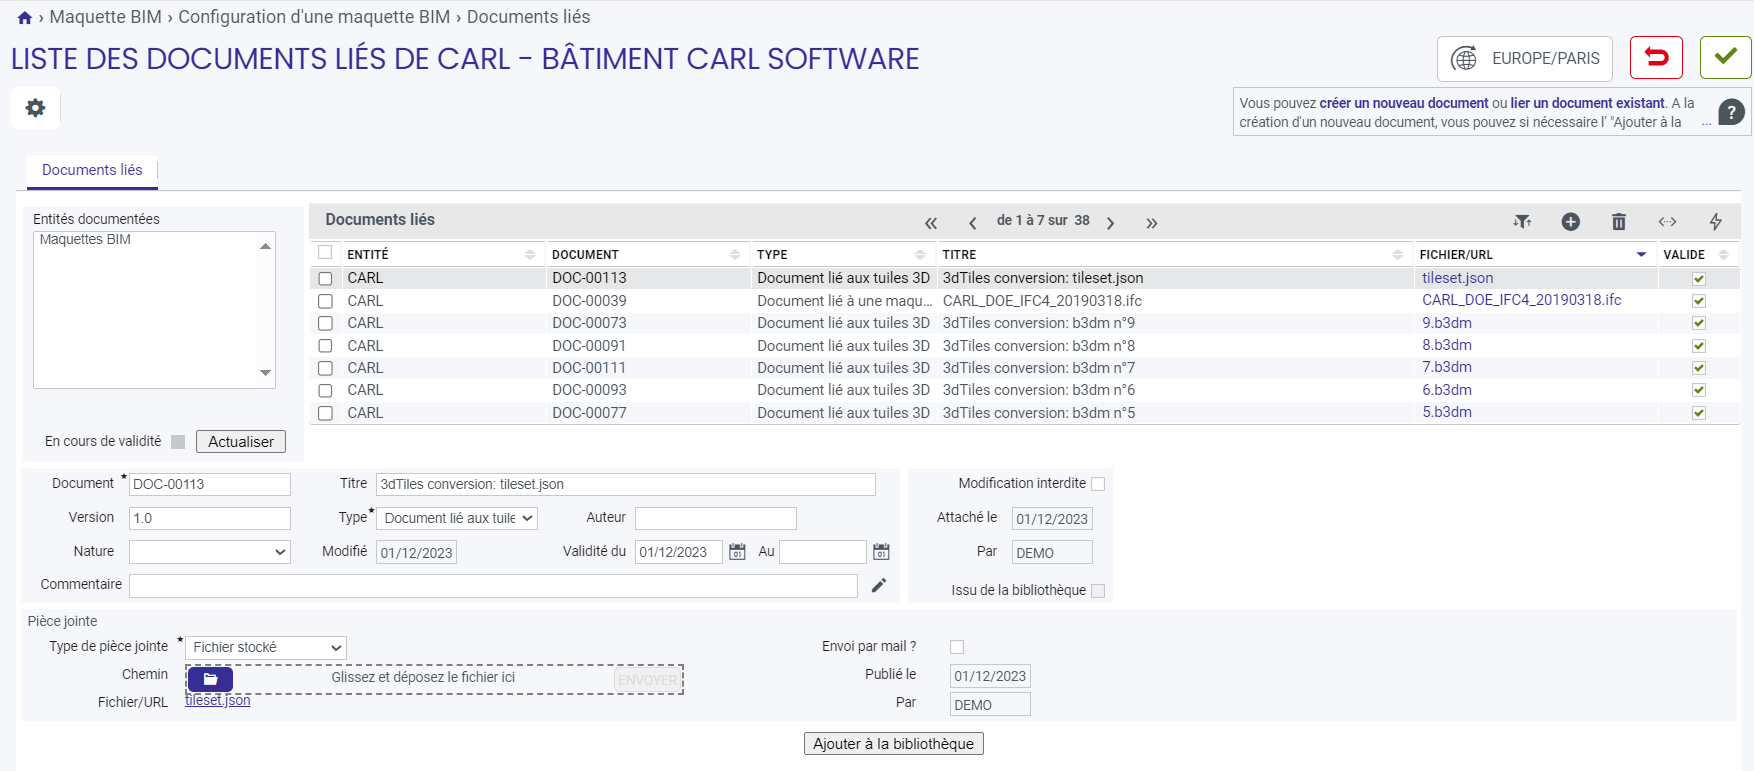
|
|
1. The parsing job identifies all the IFC classes related to the imported file, as well as the number of items of equipment associated with these classes. 2. The loading job loads all the equipment associated with the IFC classes into CARL Source. This loading can be total or partial, as required. 3. The tile generation job converts the IFC file into a 3bdm file. These files are essential for viewing the building in the 3D Viewer. |
4.1.7.4. BIM mapping
| New 7.2 |
This version of CARL Source adds a new feature for defining a 3D Viewer. |
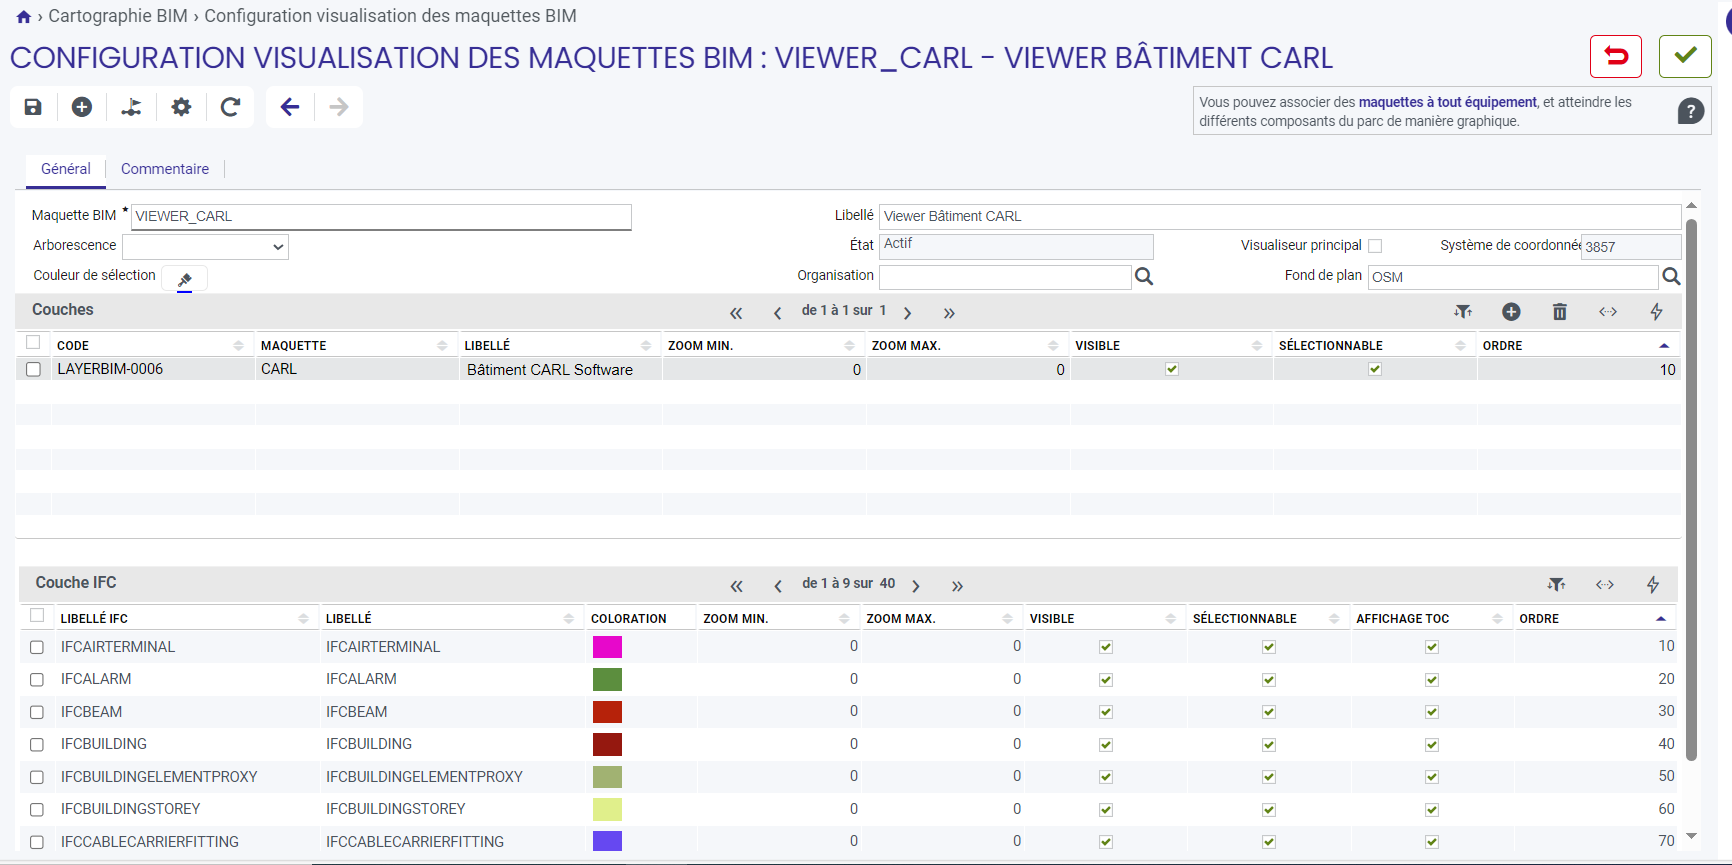
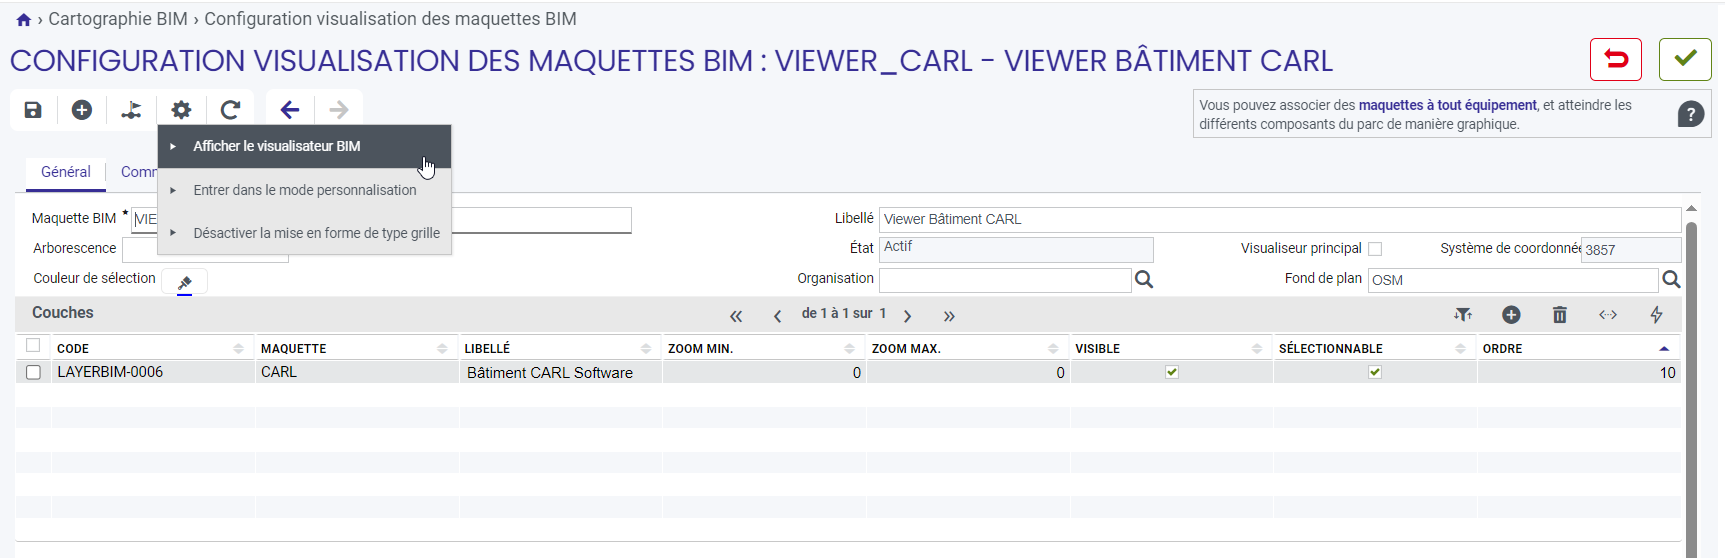
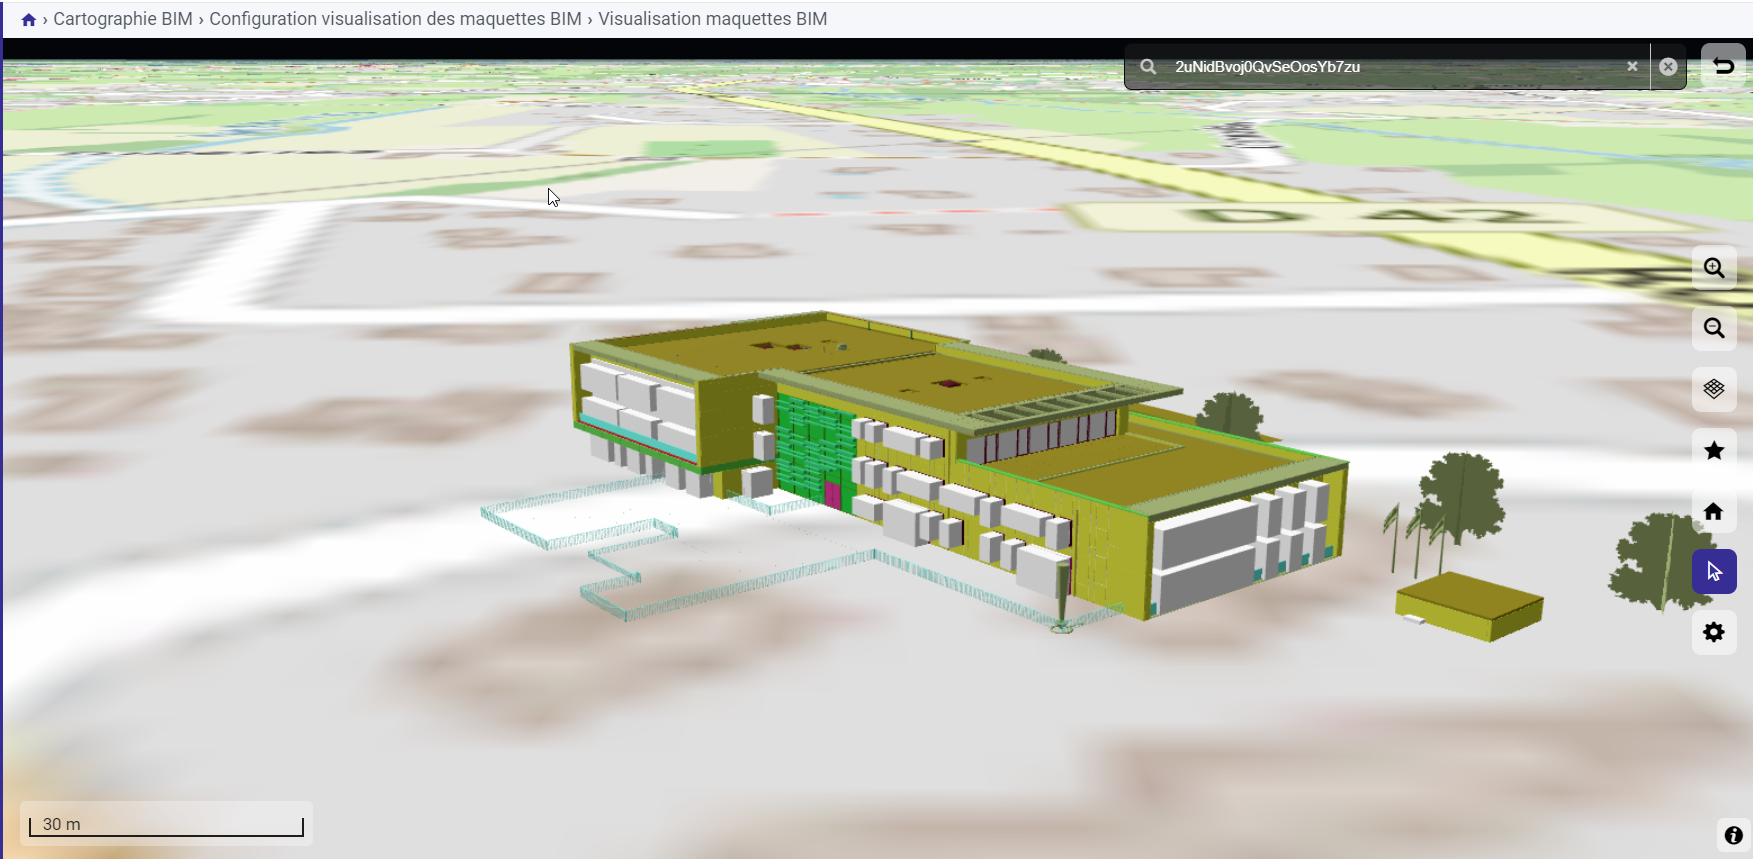
4.1.8. CARL GIS
| New 7.3 |
Version 7.3 introduces its own CARL GIS. This standalone GIS allows you to:
|
4.1.9. Style management
A new style management feature has been integrated into CARL GIS to improve the graphical representation of map elements.
-
This feature allows you to manage styles for "Point", "Line", and "Polygon" geometries, with customization options such as color and thickness.
-
A new library makes it possible to obtain graphical representations, and icons can be used for "Point" geometries.
-
A search form has been added to retrieve styles based on criteria such as geometry and category.
-
A detail form allows managing style attributes, including geometry, category, and other visual parameters.
-
A preview area is included to visualize the defined styles.
4.1.10. Configure a map
A new feature for autonomous management of cartographic data has been integrated into CARL GIS, replacing the MapGuide® and ArcGIS® tools.
-
CARL GIS allows access to geolocated data directly in the CARL Source database or through external databases.
-
A new creation menu and a detail form have been added to manage map information, including options for layers and styles.
-
Administrators can add CARL Source and external layers, such as GeoJSON and WFS, to enrich existing maps.
-
Grouping layers can be created to organize the table of contents, always visible and non-selectable.
-
Managing parameters of external layers and defining the selection ID is possible via dedicated icons.
4.1.11. Configure a plan
A new feature has been integrated into CARL GIS to manage plans without using MapGuide®, with a dedicated creation menu and a detail form for configuring the plans.
-
A new creation menu in the Equipment module provides quick access to the plan detail form.
-
The detail form is divided into three parts: general information, layer table, and layer detail table.
-
Initializing a plan requires associating technical information, with a fixed SRID set to 0.
-
CARL Source layers and grouping layers can be added to manage equipment and organize the table of contents.
-
Administrators can manage visibility, display order, and layer style in the Viewer.
4.1.12. Plan import
It is possible to load and synchronize plans and equipment into CARL Source from DWG and ZIP files.
-
ZIP files contain annotation and equipment data, which are imported into CARL Source to display the plans.
-
DWG files must comply with certain rules, particularly regarding file names and geometries.
-
A new equipment import feature has been added to CARL Source, allowing comparison and updating of existing data.
-
Synchronization of equipment is essential to make the plan usable in CARL Source, with mandatory information such as import date.
4.1.13. Plan management
This new feature improves plan management in CARL GIS by integrating equipment imports.
-
Plans can only be created by importing from Draw2DB-SaaS, with no manual creation option.
-
A new form allows managing plan information, including code, description, and import date.
-
To activate a plan in a configuration, the import date and associated structure point must be specified.
-
When updating a plan:
-
If a plan is not associated with a configuration, it is overwritten by the new plan without a version change.
-
If a plan is associated with a configuration, a new import of the plan will replace it, the version will change, and the configuration will be updated automatically.
-
4.2. Works module
4.2.1. Work order readings
| New 7.2 |
The action and form dedicated to the Transport addon are now included in the standard. |
Here are the rules for the appearance of the work order readings on an work order detail:
-
Action available only if the work order has at least one reading point (on its asset or on the reference)
-
The standard names for the WOMeasure-DET screen and all vocabulary (other than TRANSPORT) are:
-
Odometer ==> Main reading point
-
Hourmeter ==> Secondary reading point
-
-
For users with the Transport vocabulary: the old names are kept (assigned to the TRANSPORT business vocabulary).
4.3. Stock module
4.3.1. Stock movement - Expiry date
CARL Source version 7.0.0 adds a check of the expiry date of the item when it is shipped, taken out of stock or consumed on the work order.
If an expired item is withdrawn, shipped or consumed, a confirmation pop-up will alert the user giving them the choice to continue or otherwise.
4.4. Purchase module
4.4.1. Supplier - Item the item designation
The "Import (updating) of catalog prices" function has been enhanced in order to reflect the item name in the supplier’s catalog during the importing the data.
A "name" field has been added to the "Import (updating) of catalog prices" function, to fill in the number of the column designating the item’s name in the imported prices file.
4.5. Account module
4.5.1. Budget
| New 7.2 |
Adjustment of budget details following City integration. |
The budget additional concepts of the CITY addon are added as standard.
A new financial information tab appears in the budget details, with free-entry fields and the associated AE/AP/Assignments.
This tab is only visible if the Authorized assignment checkbox is set to true. (It is set to False as default.)
If authorized account assignment is true for a budget entered on a purchase order or purchase line, the Financial information sub-tab is accessible for this purchase order or purchase line.
|
|
To quickly hide this financial information concept, simply hide the Authorized assignment checkbox on the budget detail, and this information will never be accessible to users in the application. |
4.7. System module
4.7.1. User
| New 7.2 |
Name changes. |
-
In the user file, the Business domain term has been renamed "Business vocabulary. This attribute designates the lexicon by business context applicable to a given user. + It no longer determines the application’s behavior, as was the case with the Transport verticalization.
-
Customization has been renamed Customization group to remove any ambiguity.
4.7.2. Agent - Management
In an agent’s details, the "Service" attribute in free entry mode has been replaced by the Management attribute pointing to the Management entity code.
4.7.3. Customization groups
| New 7.2 |
Adding a profile setting. |
The Default display structure for the location tree structure profile setting has been added to the Equipment / Equipment fleet tree structures functionality.
It overrides the module setting of the same name for a user associated with the profile.
As a reminder, this lets you enter the code of the default structure displayed when a tree structure is called from a Location point/Location IZ.
|
|
This module setting was set to Location when the FACILITY addon was installed. |
4.7.4. Characteristics template
The "characteristic" function in the system module is renamed Characteristics template for more accuracy.
Indeed, these elements allow you to generate the characteristics of entities of the application and only contain properties of the characteristic to be generated and not directly usable information.
The Group attribute has been added to the characteristics templates and to the characteristics. It can be initiated on the characteristics template and is reused when the characteristic is generated on the entities involved.
4.7.5. Characteristics
The group attribute has been added to the characteristics and can be changed at the level of the individual characteristic, as can be the already existing "Important" attribute. It allows groupings suitable for the context of the entity without necessarily being dependent on the characteristic template as provided by the "Category" attribute.
The concept is added to all the characteristics lists as well as the Characteristics Widget.
The filtering application button is removed.
The dynamic filters above the characteristic lists in the Characteristics tabs are applied directly to the list for greater efficiency and ease of browsing.
|
|
The implementation of the characteristics has been completely revised. The characteristics, regardless of the entity carrying the information, are now a single entity. |
The characteristics lists include a new "Add a sheet’s characteristics" action. This quick copy allows you to quickly generate characteristics from a collection of predefined characteristics with organized sheets.
4.7.6. Characteristics sheet
CARL Source version 7.0.0 introduces the concept of a characteristics sheet, which is a collection of pre-filled in characteristics ready to be used in various user contexts.
The characteristic sheet is a coherent set of pre-filled in characteristics, adjusted for elements that are regularly created in the application.
For example, the user can create characteristics sheets that can be used repeatedly as needed for building security characteristics, site monitoring, sets of characteristics by room type, etc.
4.7.7. Workflow multiple
CARL Source version 7.0.0 introduces the multiple workflows concept.
For a workflow linked to an entity, different behaviors and life cycles can now be considered, depending on certain conditions of the entity.
The possibility of multiple life cycles for a workflow is allowed for the Equipment entities (Locations, structure points and asset) and Purchasing entities (Purchase order and purchase request).
| New 7.2 |
CARL Source version 7.2.0 enables multiple workflows on all entities. |
|
|
Changing a workflow is a tricky action reserved for those who are proficient in the advanced concepts of entity lifecycle concepts so as not to encounter application errors. |
4.7.7.1. Workflow details
The details sheet has been enhanced to reflect the possibility of multiple cycles for an entity call be referred to as a workflow branch.
There is a Workflow tree structure and its branches on the left side of the form. The user clicks on it to display the details on the right side of the form:
-
Main node in the header: Workflow generic information + condition attributes determining the transition from one life cycle to another for the entity. Note: the entity must be entered on the WF to access the multiple Workflow.
-
A Workflow first branch: main branch identified by the number "0". Required and primary.
-
Other nodes as required: alternative branches: based on the inheritance of the main branch elements, the user can set the conditions that initiate the application of these adapted states and transitions (hiding of states and transitions automatically inherited from the main branch + other states and transitions only valid for this branch).
| New 7.2 |
Ability to add a condition to workflow transitions. |
|
|
You have to keep a common creation state for all branches in the first position. It should also be checked that the standard states/transitions forming the basis of system automatic actions on the standard Workflow are not disabled in the alternative branches in order to maintain entity workflow stability. |
4.7.7.2. Workflow profile rights
The managing of workflow profile rights is adapted to the multi Workflow context: Each workflow branch is displayed with the associated profile rights.
Actions to propagate the WF rights set on a profile are available in the workflows rights lists. They allow you to copy Workflow rights to other profiles in a single action from the set profile.
4.7.8. Custom form - Customized creation menu
CARL Source version 7.0.0 introduces custom creation menus, according to customization attributes, based on custom entity detail forms.
When the administrator has custom forms configured on a customization attribute of an entity, for each value of this attribute it is possible to specify whether a custom creation menu should be displayed. If so, the menu name must be filled in.
An additional menu entry is then added to the list of creation actions for the entity involved, with the customized menu name. This will open the entity being created with the custom form and the initiated customization attribute value.
This representation is displayed only when the system setting related to custom creation representation to the In list mode.
|
|
However, some functions cannot display these custom menus in a list: the creation menu is already contextualized for these entities in the standard. |
If the configuration setting is set to Advanced menu, the customized menus in the list are not displayed directly as a list. A custom creation pop-in is displayed after the user has enabled the creation of the standard entity.
The pop-in offers the user the possibility of standard creation of the entity and other creation menus through two lists:
-
The first list uses the name of the desired form,
-
The second list uses the custom menu name taken from the chosen custom form.
Through these customized creation actions, the user directly accesses the appropriate form with the value of the customization attribute filled in.
|
|
This configuration combined with a specific workflow branch having the same form customization conditions directly provides the user with access to the specific workflow on the specific element being created. |
For example, if the asset workflow has been customized on the equipment type and custom forms have also been customized based on this attribute, the user could directly access the creation of types such as "plants", "public property", "specific asset", each with its own contextualized workflow branches. This addition allows a strong contextualization by configuring application entities, in particular on the equipment side.
4.7.8.1. Customization groups
| New 7.2 |
Adding standard data. |
The Standard property is added to customization groups.
In order to quickly customize the application and recover the equivalent browsing of the old verticalization addons, the application features standard customization groups.
These can be used to quickly apply forms and menus from one of the business contexts to a user.
These standard customization groups cannot be changed, but can be duplicated and tailored.
4.7.9. Consent
CARL Source version 7.0.0 introduces the possibility of consenting to certain data where personal information is present (e.g. telephone numbers, addresses, contacts).
Principle: the concept of consenting to data is characterized by a new Anonymization date attribute.
If this date is not filled in then the data has not yet been granted consent.
If this date is filled in, then the data has been granted consent. It is either accepted or refused. A data item that has been refused consent will automatically go into an inactive state. It is therefore no longer usable in the application.
The standard scope of consent includes the following functions: Agent/User - Technician - Customer - Tenant - Supplier.
An agent can have one of two different management modes.
Either the consent type included in the agent sheet is optional and in this case, the user does not have to give consent when connecting to the application.
Or the consent type is required and the user has to give their consent when connecting to the application.
However, at any time, users can access the consent through a new Access to the GTUs to change their choice.
|
|
Only the administrator can (new System\Global\Manage consent profile right) to accept or refuse consent for the Technician - Customer - Tenant - Supplier functions. The administrator also has graphical indicators in the banner to identify whether the data has been consented or not. |
4.7.9.1. GDPR memo
In the Memo function, an "origin" field allows a new GDPR memo to be declared. This type of memo is used to display the General Conditions of Use either when the user logs in, or through a new Access to GTUs menu.
The Conditions of Use must be recorded in the memo text field.
This memo has its own properties. It is necessarily of the Pop-up type and is characterized in its use by the display of two buttons Cancel and Refuse. The notified user is therefore required to choose between these two options.
|
|
If the customer wants to view the General Conditions for Use in different languages, they have to create several RDGP memos. Each memo will have a text box with each translation. |
4.7.9.2. Anonymization
CARL Source version 7.0.0 introduces the possibility of anonymizing data where personal information is present (e.g. telephone numbers, addresses, contacts).
Principle: the data anonymization concept is characterized by the deletion or changing of data to remove any personal character from it in the application.
Anonymization processing can be carried out either through an action directly available in the functions involved, or through an automatic process (global processing of the database).
The anonymization standard scope includes the following functions: Agent/User - Technician - Customer - Tenant - Supplier.
However, an entity can be added for the purposes of anonymization through the dictionary. To do so, you just have to check the GDPR box on the dictionary object, and to fill in the data retention period. Only the attributes with GDPR checked are considered in unitary or global anonymization processing.
|
|
Only the administrator can manage unitary or global anonymization processing (new System\Global\Manage anonymization profile right). An anonymizing process is a definitive process for which there is no going back. |
4.7.10. Memo - Display sender
CARL Source version 7.0.0 introduces the possibility of displaying the memo sender.
In the Memo functionality, a "Show Sender" checkbox has been added to allow you to display the agent’s name and identifier on the memo.
4.7.11. Report
4.7.11.1. Removing the duplication of reports
It is no longer possible to duplicate a report directly. From now on, we advise you to proceed as follows:
-
Retrieve the rptdesign file from the report to be duplicated.
-
Edit this rptdesign file outside the CARL Source application.
-
Create a new report by uploading the changed rptdesign file.
4.7.11.2. Removal of the IDAutomationHC39M font
This font allowed the use of barcodes in the Code-39 format in reports.
It is no longer embedded; instead, the getBarcodeData javascript method must be used (use the standard reports eqpt_label_list.rptdesign and item_label_list.rptdesign as an example).
4.7.11.3. New visual for the login page
| New 7.2 |
New generic image on the authentication page. |
The "LEFT_LOGIN_PAGE" library document defines the visual (left) of the application login page.
As default, it is associated with the new generic image, which has a neutral business connotation.
|
|
An administrator can change the URL of this document to point to an image of the same size but customized to replace the visual on the login page. |
4.7.12. Signature
| New 7.3 |
An evolution of the electronic signature makes it compatible with users connected via a Single Sign-On (SSO) system by integrating a one-time security code authentication system sent by e-mail.
|
The new features of this version are as follows:
-
A one-time code (OTC) authentication system is introduced to enable electronic signatures with SSO, sending a code by email to the user.
-
The OTC code has a limited validity period and is configurable, with a default length of 6 digits, and can only be used once.
-
Users can choose between approval by password or OTC code through a global parameter in the system configuration.
-
User interface adaptations include a button to receive an OTC code and a field to enter the received code, with controls to prevent errors.
-
The extension of the OTC mechanism also applies to sensitive data records, requiring a code to validate the operation.
4.7.13. Dynamic coding on dates
| New 7.3 |
The main objective of this enhancement is to make entity codes more dynamic and simplify the management of date-based expressions. |
Here are the principles of this enhancement:
-
Entity codes can now be dynamically generated using date-based expressions, with control over the length and validity of the expressions.
-
A new boolean column "Interpreted expr." allows selecting rows subject to dynamic coding, influencing how dates are displayed in codes.
-
An interpretation process has been added to translate expressions into dates, and an error message is displayed if unknown expressions are present when saving.
-
An action to configure date expressions has been introduced, allowing users to customize prefixes and suffixes with date expressions, while respecting editing rights.
-
Upon validation, error or confirmation messages appear depending on the presence of errors or valid expressions, ensuring effective management of modifications.
4.7.14. Mass profile update
| New 7.3 |
This feature allows a CARL Source administrator to manage profiles in bulk, simplifying the administration of permissions, functionality parameters, and state workflows. The main goal is to save time when managing multiple profiles simultaneously.
|
5. CARL Touch
This version offers the following enhancements:
-
Approval of the GTUs.
-
New task-related features:
-
Display an Assignments block for the details of a task.
-
Proposal of assigned technicians when transferring a task.
-
-
Allow you to consult the scheduling of work orders.
-
Perform an asset survey.
-
Show details of a stock movement.
| New 7.1 |
|
| New 7.2 |
|
|
|
Further details can be found in the CARL Touch User Guide. |
These enhancements are available on the CARL Touch multiplatform version.
Starting with version 7.1.0, the existing features of CARL Touch Android™ have been transferred to the multiplatform version.
5.1. New ergonomics
5.1.1. Multi-environment
| New 7.1 |
In the Settings menu, the user can set up several connection environments. |
5.2. New task-related features
5.2.1. Assignment a task
The user can sort the tasks list by the work order scheduling date.
In the task detail form, the assignment block can be displayed. It is read-only.
When a task is transferred, the users assigned to the work order are given priority if it has any assignments.
| New 7.1 |
In the operations list, the user can add operations from a work order template. |
| New 7.2 |
When creating a task, the user can select Report to quickly create a work order and enter their report. |
5.3. Scheduling
The "Scheduling" function allows users to see any work orders that are scheduled for them.
The scheduling corresponds to the assignments entered in the tasks. This is the content of the "Labor" tab of the work order detail form in CARL Source.
The scheduling is only accessible in read-only mode. It cannot be changed from the mobile application.
5.4. Asset survey
The "Asset survey" function allows users to survey assets from a location, a main point or a parent asset.
The user can confirm the presence of an asset, add a new asset or to break the link between the asset and the selected parent link.
5.5. Stock movement new features
In the list of stock movements, the user can click on the line of the movement to display the details of the stock movement.
The detail screen is customizable via custom forms.
5.6. Remote Assistance
| New 7.3 |
Remote assistance provides field technicians with advanced support including video conferencing, messaging, visual annotations, and much more. Exchanges are recorded as reports directly linked to interventions in CARL Source.
The use of this feature requires the acquisition of additional rights. For more information, please contact CARL Berger-Levrault. |
5.6.1. Remote assistance settings
The configuration and access to the remote assistance module features in CARL Source and CARL Touch follow these points:
-
Access to the remote assistance module requires the purchase of a license, activated by an XML file.
-
Users can enable access to remote assistance via the profile parameter "Access to remote assistance".
-
In CARL Source, authorized users see specific tabs and checkboxes for expert-related and remote assistance features.
-
In CARL Touch, the "Remote Assistance" button allows viewing reports and accessing the list of experts for remote assistance calls.
5.6.2. Configuring experts
-
Experts can be internal or external to the company and do not need a connection to CARL Source or CARL Touch.
-
An expert must be active and have an e-mail address to be contacted via remote assistance.
-
Expert skills can be associated with various elements such as equipment, location, or models.
-
A new tab allows associating multiple experts with a specific entity.
-
Expert configuration facilitates remote assistance calls through a dedicated webapp.
5.6.3. Calling a technician
This section describes how a technician can initiate and use the remote assistance module in CARL Touch to obtain help from experts.
-
Access to remote assistance requires specific rights defined in CARL Source.
-
The technician can initiate a remote assistance call from an ongoing intervention by selecting an expert from a proposed list.
-
The remote assistance module allows enabling/disabling the microphone and camera, taking photos, and using annotations.
-
An integrated chat allows message and document exchange between the technician and the expert.
-
At the end of the call, a remote assistance report is generated and recorded in CARL Source.
5.6.4. Receiving a call as an expert
On the expert’s side, receiving a remote assistance call works as follows:
-
Experts receive an invitation by email to connect to a remote assistance session via a link.
-
The application allows changing the language, enabling or disabling the microphone, speaker, and camera before joining the session.
-
During the call, experts can take photos, zoom, access the chat, and end the call.
-
Photos can be annotated with tools for freehand drawing or shapes, and annotations can be modified or deleted.
-
The chat feature allows exchanging text messages, files, and annotated photos.
5.6.5. Viewing remote assistance reports in CARL Touch
-
Remote assistance reports are accessible from an intervention in the "Acknowledged" or "Started" state.
-
The Remote Assistance menu provides access to the list of experts and the report history.
-
Each remote assistance call generates a report containing dates, times, participants, messages, documents, and exchanged annotated photos.
-
Users cannot modify remote assistance reports via CARL Touch.
-
A new action "Report History" is available to view reports related to a specific piece of equipment.
5.6.6. Viewing remote assistance reports in CARL Source
Remote assistance reports can be viewed in CARL Source:
-
A new "Remote Assistance Reports" feature is added in the Interventions/Management menu, with tabs for search criteria and results.
-
Remote assistance reports include detailed information such as the report code, technician name, and call duration.
-
A new "Detail" tab displays exchanged messages, annotated photos, and documents shared during calls.
-
An "Remote Assistance History" action is available to filter reports by intervention code or initial entity.
-
These improvements are designed to facilitate the management and handling of object attributes in CARL Source.
5.7. Point readings
| New 7.3 |
A new feature called "Reading" allows technicians to take readings on measurement points and control points. |
-
The "Reading" feature is accessible via the general menu and requires profile rights to access it.
-
Readings are sorted by date and time, grouped by equipment, and display information defined in customized forms.
-
An action "Read again" allows entering new readings using the initial data, with the possibility of modifying the date and time.
-
A three-step wizard facilitates the creation of new readings, including the selection of equipment and points to be read.
-
Readings can also be initiated directly from equipment, simplifying the process for authorized users.
6. CARL Xpress
The mobile application for entering reports offers the following enhancements:
-
Approval of the GTUs.
-
Sort the reports list.
-
Display the dots containing the number of reports included.
|
|
Further details can be found in the CARL Xpress User and Configuration Guide. |
7. CARL Flash
The mobile application for service requests offers the following new features:
-
Change in Flash account information.
-
Choice of tab displayed as default.
-
Possibility of sorting the list of requests.
-
Ability to display the acceptance of work step or otherwise for Flash users.
-
Add several photos per work request.
-
Possibility of selecting criticality in a values list.
-
Retrieval of the address via the geolocation step.
-
Display work request details.
-
Display information entered at the confirmation stage.
7.1. Simplified creation
| New 7.3 |
This evolution speeds up and simplifies incident reporting for occasional users of the application. It is therefore possible to submit a request in just a few actions:
|
For further information on these enhancements, refer to the CARL Flash User and Configuration Guide.
Trademark notice
Every effort has been made to ensure the accuracy of the information at the time of publication of this document.
As CARL Source is constantly evolving, CARL Berger-Levrault cannot be held responsible for any gaps or errors in this document.
If you notice any inconsistencies or errors, please contact CARL Berger-Levrault’s support department.
Any reproduction, in whole or in part, in any form whatsoever, is strictly prohibited without the prior authorization of CARL Berger-Levrault.
All trademarks and product names mentioned in this document are the property of their respective owners as listed below:
-
Android™ and Google Chrome® are registered trademarks of Google LCC.
-
ArcGIS® is a registered trademark of the Environmental Systems Research Institute.
-
Elasticsearch® is a registered trademark of Elasticsearch B.V. in the United States and other countries.
-
Firefox® is a registered trademark of the Mozilla Foundation.
-
Java™ and Oracle® are registered trademarks of Oracle Corporation.
-
PostgreSQL® is a registered trademark of The PostgreSQL Community Association of Canada.
-
Safari® is a trademark of Apple Inc. registered in the U.S. and other countries.
-
Azure®, SQL Server®, Microsoft Edge® and Windows® are registered trademarks of Microsoft Corporation.
-
Tomcat® is a registered trademark of the Apache Software Foundation in the United States and other countries.