

1. Introduction
CARL Flash enables users of assets, equipment or public areas to contact the departments responsible for maintenance and operations, for a variety of needs.
CARL Flash provides access to numerous services, including issuing and tracking work requests and repair requests, and reporting malfunctions, damage or vandalism.
CARL Flash users do not necessarily need to be declared as CARL Source users.
This document describes how to use and configure CARL Flash 7.7.0 for use in combination with CARL Source 7.7.0.
2. Prerequisites
-
CARL Source
-
Version 7.7.0
-
-
CARL Source Admin
-
Version 5.5
Instructions for installing the CARL Flash add-on are given in the "CMN-AD-Use of CARL Source Admin" document (available in your CARL Source package or via the CARL Berger-Levrault support website).
-
-
Smartphones and tablet devices
-
iOS 13 or higher
-
Android™ 10 or higher
-
-
Web browsers
-
Google Chrome®
-
Safari®
-
Firefox®
-
Microsoft Edge®
-
-
Secure environment (https)
-
TLS 1.2 environment mandatory
-

|
Barcode labels: Black barcodes on a white background are preferred. White barcodes on a red background are not interpreted by CARL Flash. |
|
|
Caution concerning the compatibility of Android™ versions with the various TLS security protocols.
|
3. Using CARL Flash

|
After installing or updating CARL Flash to version 7.7.0, and to optimize the Asset search, the following init job must be run once: EQPTSEARCHINITJOB. |
3.1. Running the program
CARL Flash can be run in various ways.
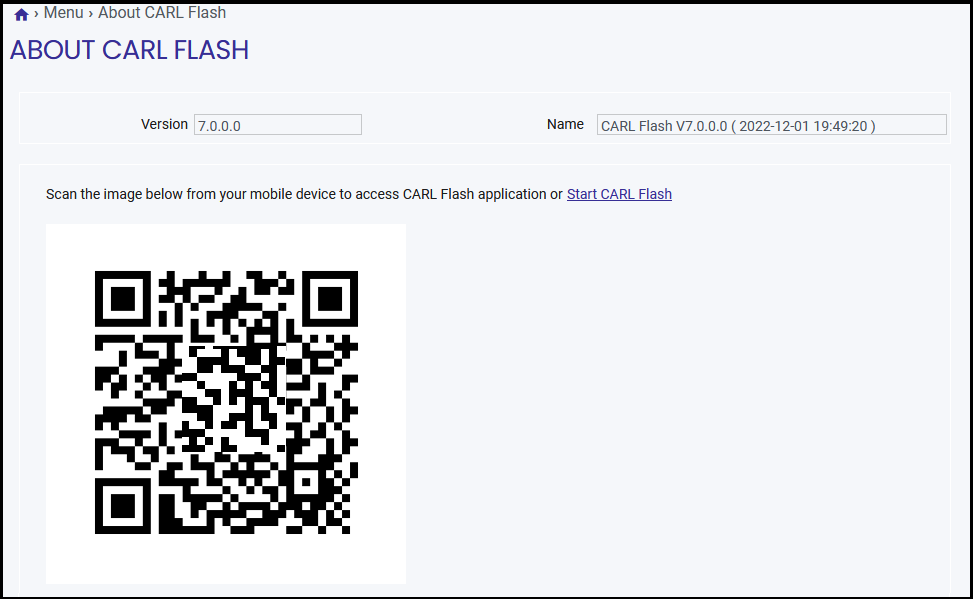
3.2. Home page
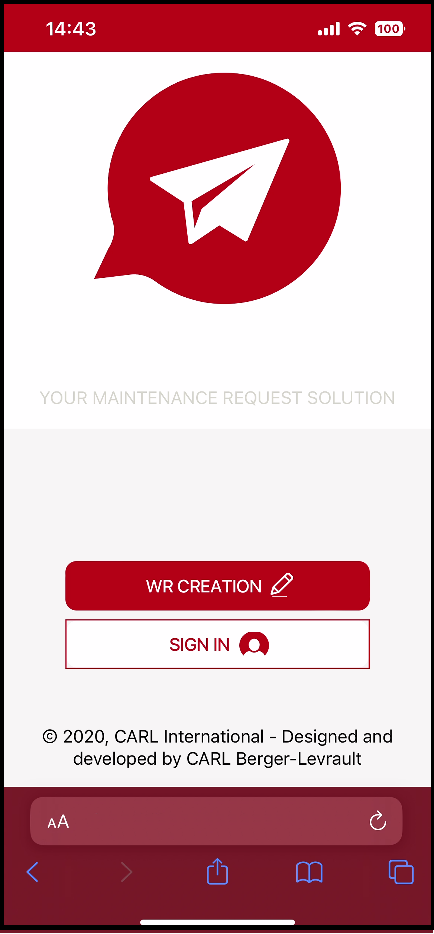
CARL Flash displays the home page. The user can:
-
Either "Create a request" directly.
-
Or "Sign in".

|
If the "CARL FLash operating mode" system setting is not defined for anonymous users, the "Create request" button is hidden. |
3.3. Authentication
To log on in CARL Flash, on the Home page, users press the "Log on" button.
CARL Flash displays the log on form. This form enables users to enter:
-
Their username in the ‘Identifier' field.
-
Their password in the ‘Password' field. The eye icon to the right of the field can be used to display the password in plain text if needed.
Users must complete the log on process by selecting the ‘Log in' button. CARL Flash checks the number of licenses available, verifies the user’s authentication details with CARL Source and then displays the data and authorizes access.
-
From the home page:
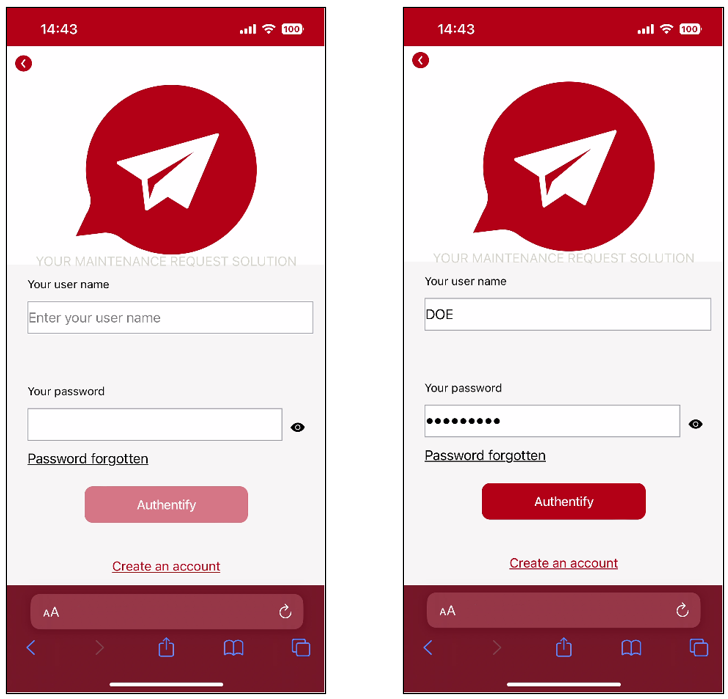
In CARL Flash version 7.7.0, the user can also use the ‘forgotten password' function.
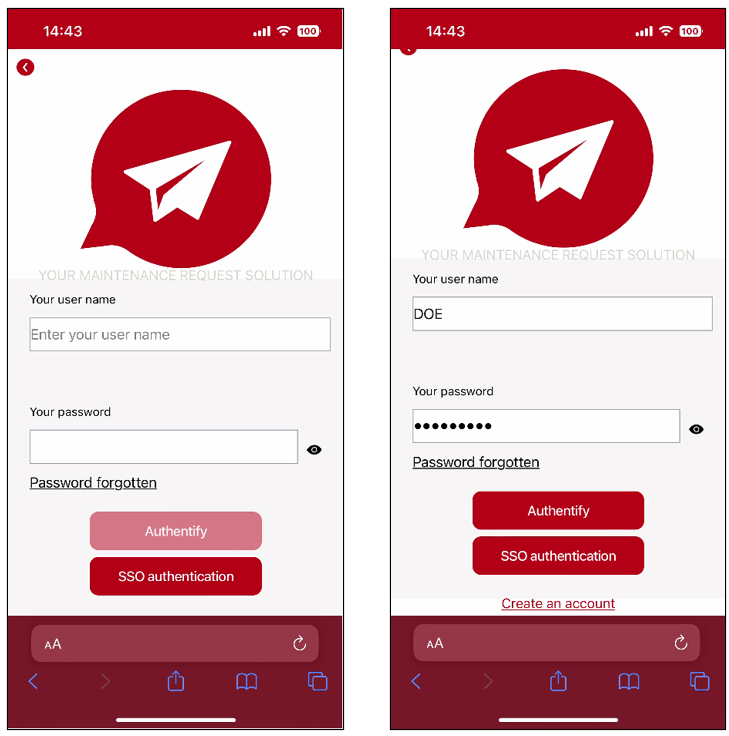
If CARL Source is configured for SSO authentication in the authentication system settings, a SSO Authentication button is used to switch to your organization’s SSO portal. After entering and validating their user name and password, users are returned to CARL Flash and the list of requests is displayed.
If CARL Source is configured for Mixed authentication in the authentication system settings, users can choose to log into CARL Flash:
-
Either with their CARL Source user name and password,
-
Or with their SSO user name and password. A SSO authentication button is added to the login page and allows them to switch to their organization’s SSO portal.
3.4. Registration
3.4.1. Presentation
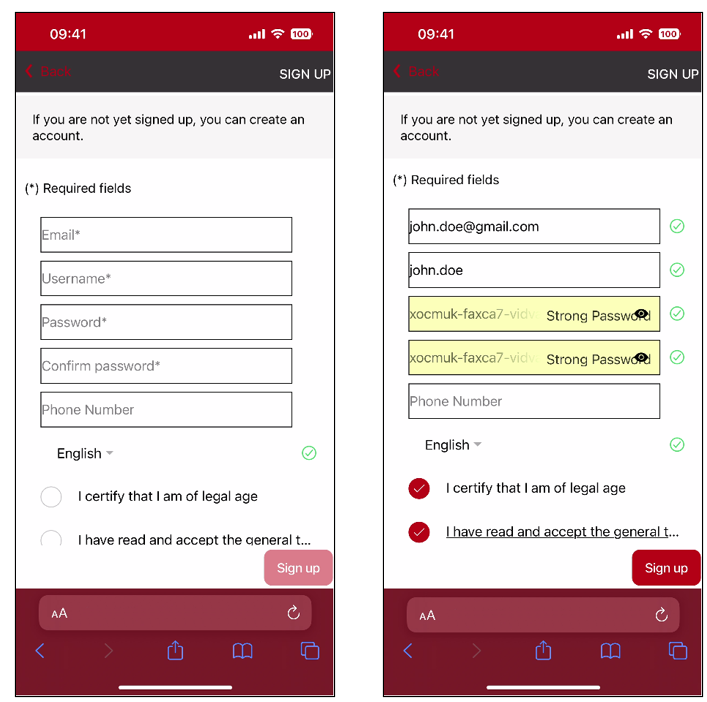
On the Home page, if users choose to log on, and if the value of the CARL Flash operating mode setting is "CARL Source and CARL Flash users" or "CARL Source, CARL Flash and anonymous users", the "Create an account" button is then present. If users press the "Create an account" button, CARL Flash displays a registration form.
3.4.2. Data displayed
The following data is displayed on the registration form:
-
Email address.
-
Identifier: As default, this corresponds to the part of the email address to the left of the @ sign.
-
Password.
-
Confirm password.
-
Telephone: This field is not required.
-
Language: As default, this is equal to the language set in the browser used to access CARL Flash.
-
Approval of the General conditions of use
-
Approval of the legal age.
|
|
The rules defined for the password in the system configuration can be described in the la_PasswordRulesViolatedException customizable label to be displayed in the event of an input error. |
3.4.3. Actions
-
Create an account: Users who have not yet registered can complete the form and then confirm their registration using the ‘OK' button.
-
Return to the login step: The Back button can be used to return to the previous step if necessary.
-
Cancel the login: The x allows users to cancel their login if they want and return to the home page.
3.5. Tracking of work requests
3.5.1. All requests
3.5.1.1. Presentation
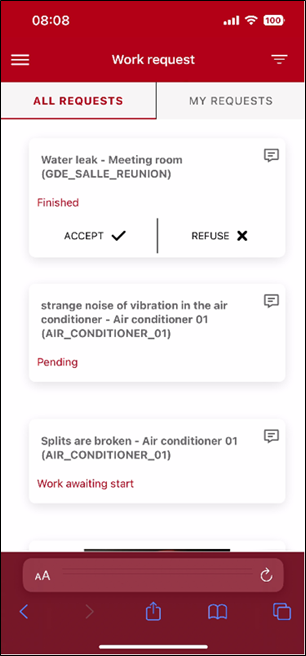
The ‘All requests' list enables users to view all requests made.
|
|
This tab is only displayed if the Display the "All requests" tab in CARL Flash for logged-in users system setting is enabled. |
3.5.1.2. Data displayed
This list displays all work requests. For each request, the following data is displayed:
-
Work request title - Description of the equipment concerned (CODE).
-
Work request status.
-
Associated photo (if any).
Using the CARL Flash operating mode settings, users can display two other attributes of the work request in the list of requests.
3.5.1.3. Actions
Actions available on the form for this step
-
View all requests: Users can view all work requests created, including their own.
-
Switch to ‘My requests': Users can view only their own requests.
-
Sort the list of requests: Users can sort the list of requests.
-
View the request comments: Users can view the comments associated with the request and add comments to it.
-
[Remind]: Users can, if necessary, send a reminder for a work request. When this button is clicked:
-
A reminder memo is created automatically in CARL Source for the corresponding request,
-
An email message is automatically sent to the request addressee(s).
-
-
[Me too]: Users can note, on a work request, that they have encountered the same problem. When this button is clicked:
-
A ‘Me too' memo is created automatically in CARL Source for the corresponding request.
-
-
Display the details of the work request: The user can display the work request details.
-
Create a new work request: Users can create a new work request.
|
|
If the "Should reminder/me too (+1) memos created be sent to everyone?" system setting is not checked and if the "Reminder memo recipient profile for CARL Flash requests" setting is not entered, and the WR recipient is not entered, the "Reminder" and "Me too" buttons will then be hidden. |
3.5.2. Managing comments
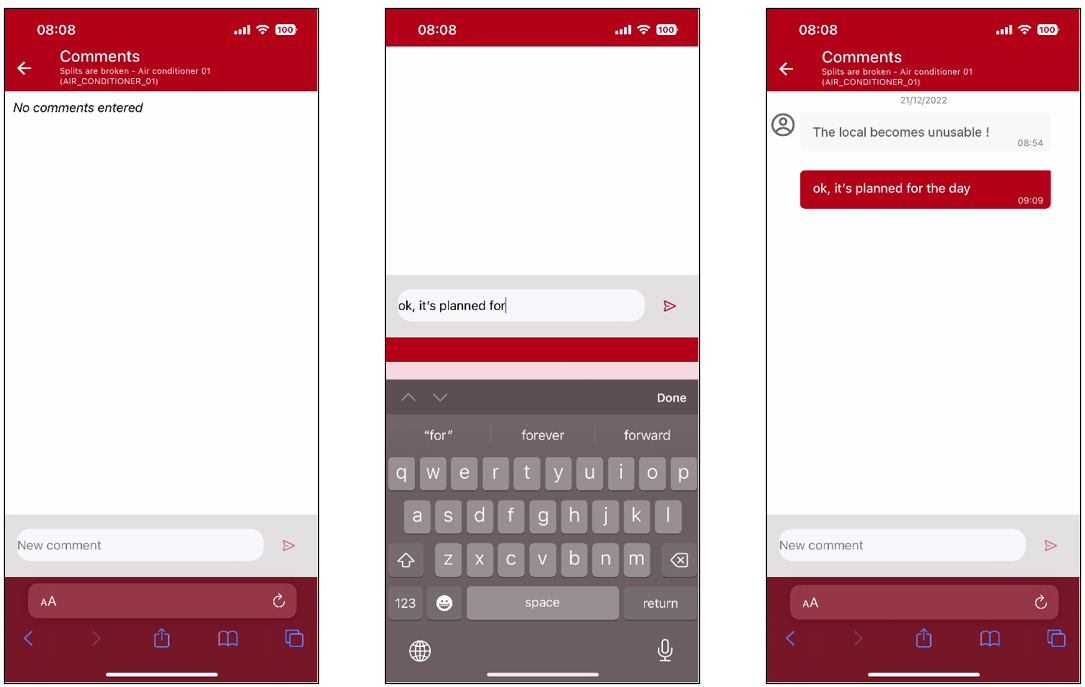
Users can view the comments entered on the WR and the work order by clicking on the bubble icon.
They can also enter a new comment themselves.
3.5.3. My requests
3.5.3.1. Presentation
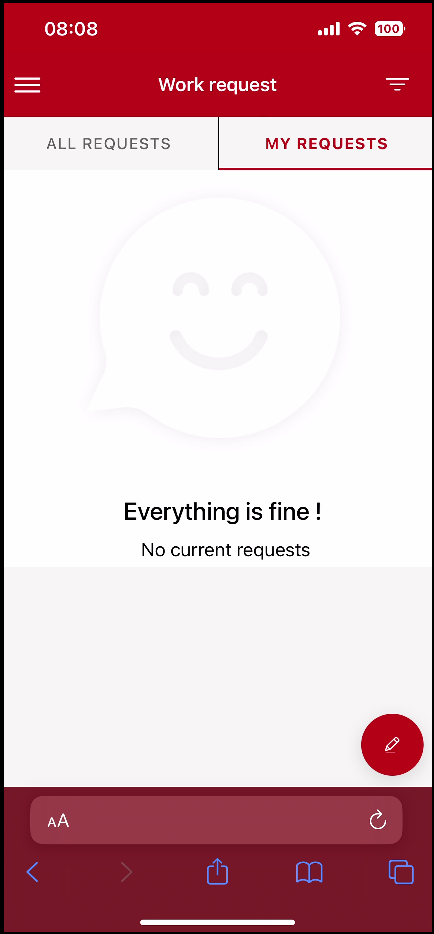
The ‘My requests' list enables users to view only requests that they created themselves, and that have the following status values: ‘Waiting to be taken into account', ‘Waiting to be implemented', ‘In progress', ‘Completed', ‘Closed' and ‘Refused'.
3.5.3.2. Data displayed
This list displays the user’s work requests. For each request, the following data is displayed:
-
Work request title - Description of the equipment concerned (CODE).
-
Work request status.
-
Carousel of possible associated photos.
Using the CARL Flash operating mode settings, users can display two other attributes of the work request in the list of requests.
3.5.3.3. Actions
Actions available on the form for this step
-
View my requests: Users can view only their own work requests. Requests that have been closed or refused are shown in the list depending on the value of the ‘Work request history display horizon' profile setting.
-
Switch to ‘All requests': Users can view all the work requests created, including their own requests (only if the Display the "All requests" tab in CARL Flash for logged-in users system setting is enabled).
-
Sort the list of requests: Users can sort the list of requests.
-
View the comments on the request: Users can view the comments associated with the request and add comments to it.
-
[Remind]: Users can, if necessary, send a reminder for a work request in progress. When this button is clicked:
-
A reminder memo is created automatically in CARL Source for the corresponding request,
-
An email message is automatically sent to the request addressee(s).
-
-
[Accept]: The user can accept the work on a Completed request, in which case the request status is set back to Closed.
-
[Reject]: The user can reject the work on a Completed request, in which case the request status is set back to Be taken into account.
-
Display the details of the work request: The user can display the work request details.
-
Create a new work request: Users can create a new work request.
3.6. Sorting the list of requests
3.6.2. Sorting options
A popup window displays the possible sorting options:
-
Request title
-
Status
-
Last change date
Once the new sorting option is selected, the popup window closes and the selected sorting is applied to the displayed list.
The sorting is applied simultaneously to the lists of the two "All requests" and "My requests" tabs.
3.7. Display the details of a work request
3.8. Creating a work request
3.8.1. Presentation
When creating a request, users can enter their work request either by calling a wizard or by scanning a device.
|
|
The device scan creation choice is only available if the Ability to create a request starting with a device scan system setting is enabled. |
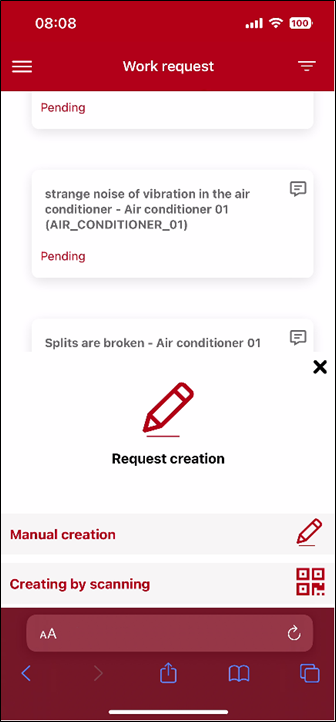
3.8.3. Actions
Actions available on this screen
-
Call a wizard: Users can choose to create a request from the wizard list.
-
Scan a device: Users can choose to create a request from a scan of an equipment code.
-
Cancel the creation of a work request: The x button can be used to cancel the work request if desired.
3.8.4. Wizard list
The creation of a work request begins with the selection of a wizard.
3.8.4.1. Presentation
This screen allows users to choose the wizard for the request they want to create.
CARL Flash only offers those wizards that are accessible to users (access restrictions).
The wizards are grouped by request type.
The groupings are sorted by the order defined in the associated FLASHREQUESTTYPE value list.
In each grouping, the wizards are sorted in alphabetical order of the wizard label.
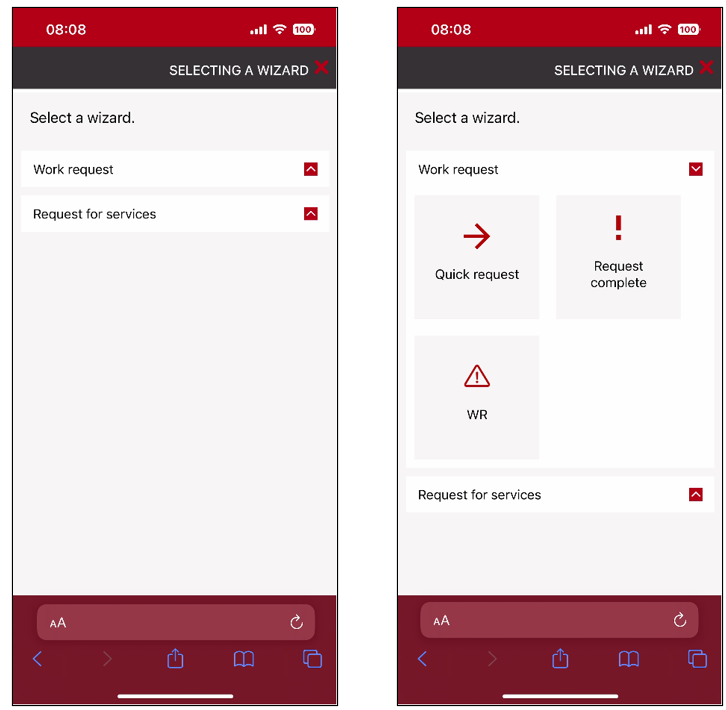
3.8.4.3. Actions
Actions available on the form for this step
-
Select a wizard: Users can select a work request wizard. They then go on to the first step of the selected wizard.
-
Return to the previous step: The Back button can be used to return to the previous step if necessary.
-
Cancel the work request: The x button can be used to cancel the work request if desired.
|
|
If no wizard is offered to users, the "No wizard available" message is displayed. |
A wizard may include several steps (see Setting up of wizards):
3.8.5. Step 1 - Asset search
This step allows you to search for the asset concerned by the request.
CARL Flash is able to present users with current work requests for the selected asset.
3.8.5.1. Presentation
This step allows users to choose the asset for which they want to issue a request.
CARL Flash offers only assets that are accessible to users (access restrictions) and whose status is confirmed, being serviced or out of order.
The displayed assets are filtered according to:
-
the technical work package of the selected wizard.
-
the selected wizard template.
-
the selected location at the location step if it precedes the asset step.
-
the user’s default location if it is filled in and there is no location step for this wizard.
|
|
For technical constraints, if the selected wizard is defined for a technical work package, and a location step is filled in, only the filter on the technical work package will be applied. |
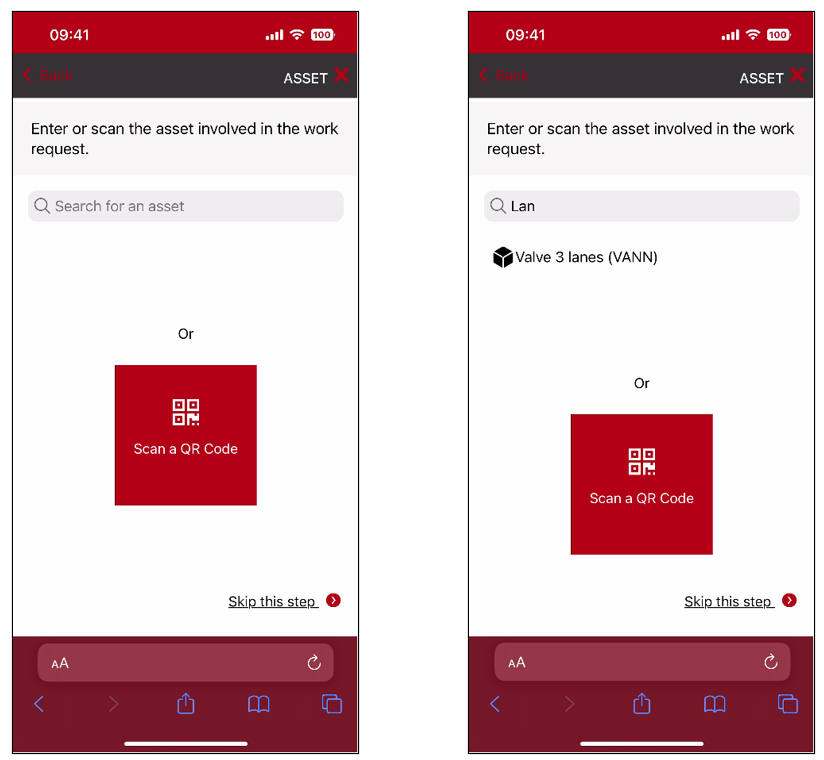
3.8.5.3. Actions (1)
Actions available on the form for this step
-
Search for an asset: Users can enter a part of the CODE and/or text (Full-text search) of the asset involved in the request. The search is carried out from the 3rd character entered. Users can continue typing to refine their search. The search is only available to Source users.
-
Scan the QRCode of an asset: Users can scan the asset QRCode.
-
Confirm this asset: The user confirms the asset involved in the request. CARL Flash then:
-
displays the next step,
-
either informs users that requests are in progress for the asset *.
-
-
Skip this step: This step is not required; users may go directly to the next step if desired.
-
Return to the previous step: The Back button can be used to return to the previous step if necessary.
-
Cancel the work request: The x button can be used to cancel the work request if desired.
3.8.5.4. Data displayed (2)
* The ‘Requests are currently in progress on this equipment' screen contains:
-
A Continue my request button.
-
A Cancel my request button.
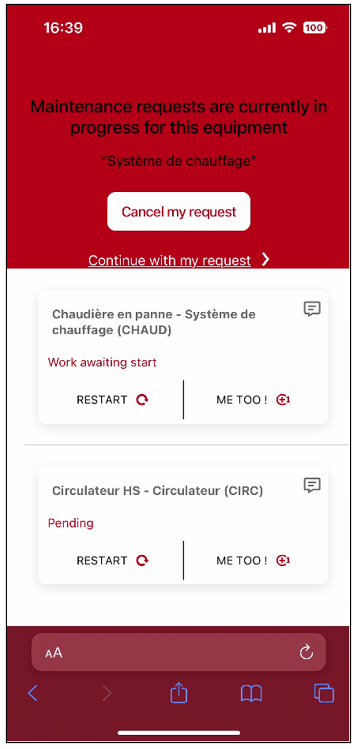
3.8.5.5. Actions (2)
Actions available on the form for this step
-
Continue my request: Users can continue to enter their work request. CARL Flash displays the next creation step.
-
Cancel my request: The user can cancel entry of the work request. CARL Flash then displays the list of All requests.
-
[Remind]: Users can, if necessary, send a reminder for a work request. When this button is clicked:
-
A reminder memo is created automatically in CARL Source for the corresponding request,
-
An email message is automatically sent to the request addressee(s).
-
-
[Me too]: Users can note, on a work request, that they have encountered the same problem. When this button is clicked:
-
A ‘Me too' memo is created automatically in CARL Source for the corresponding request.
-
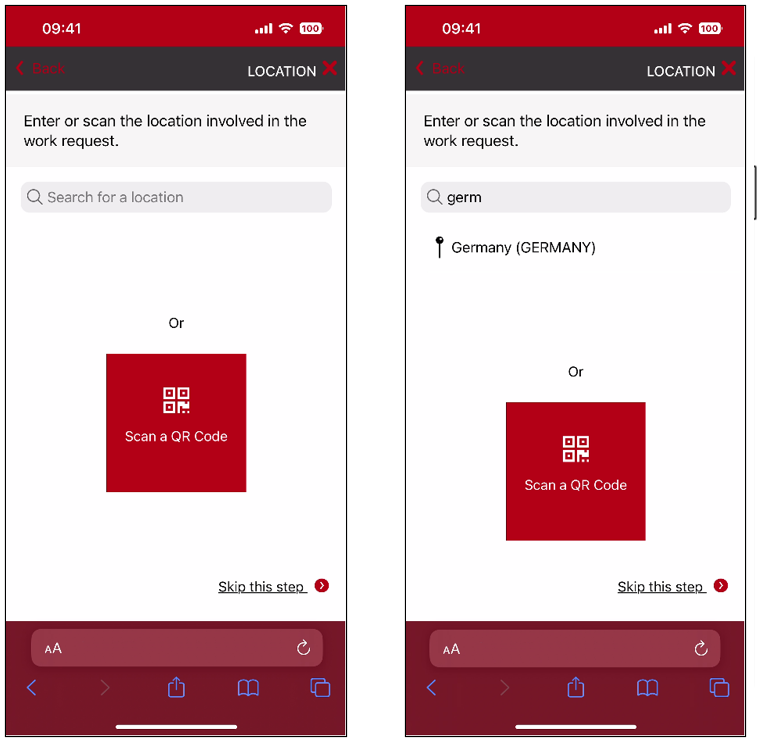
3.8.6. Step 2 - Location search
This step allows you to search for the location involved in the request.
CARL Flash can show the user the work requests in progress for the selected equipment.
3.8.6.1. Presentation
This step allows users to choose the location for which they want to issue a request.
The application only offers assets that are accessible to users (access restrictions) and whose status is confirmed.
3.8.6.3. Actions
Actions available on the form for this step
-
Search for a location: Users can enter a part of the CODE and/or text (Full-text search) of the location concerned by the request. The search is carried out from the 3rd character entered. Users can continue typing to refine their search. The search is only available to Source users.
-
Scan the QRCode of a location: Users can scan the location QRCode.
-
Confirm this location: The user confirms the location involved in the request. CARL Flash then:
-
displays the next step,
-
either informs users that requests are in progress for the location *.
-
-
Skip this step: This step is not required; users may go directly to the next step if desired.
-
Return to the previous step: The Back button can be used to return to the previous step if necessary.
-
Cancel the work request: The x button can be used to cancel the work request if desired.
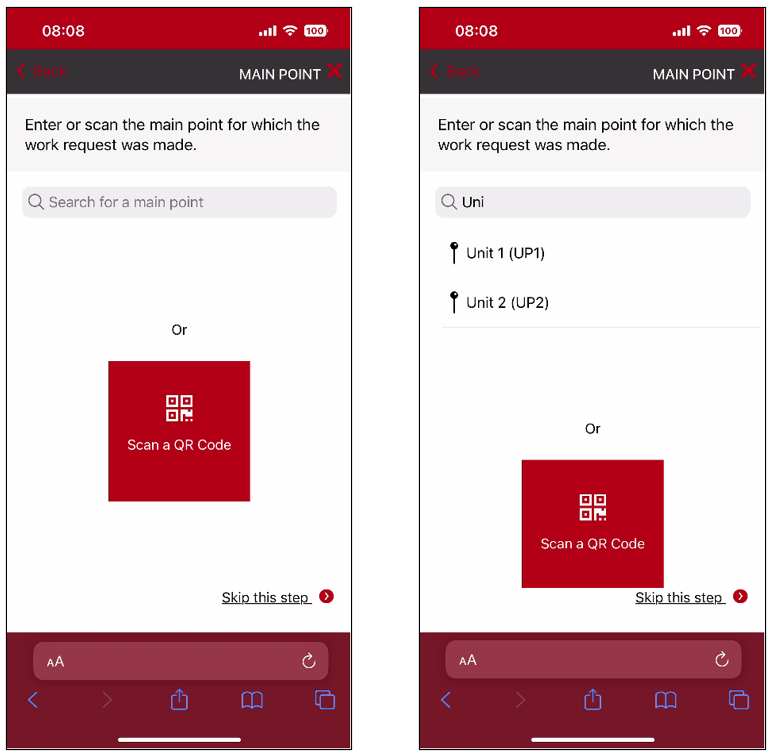
3.8.7. Step 3 - Main point search
This step allows you to search for the main point concerned by the request.
CARL Flash is able to present users with current work requests for the selected main point.
3.8.7.1. Presentation
This step allows users to choose the main point for which they want to issue a request.
The application only offers main points that are accessible to users (access restrictions) and whose status is confirmed.
3.8.7.3. Actions
Actions available on the form for this step
-
Search for a main point: Users can enter a part of the CODE and/or text (Full-text search) of the main point involved in the request. The search is carried out from the 3rd character entered. Users can continue typing to refine their search. The search is only available to Source users.
-
Scan the main point QRCode: Users can scan the main point QRCode.
-
Validate this main point: The user confirms the main point involved in the request. CARL Flash then:
-
displays the next step,
-
or informs users that requests are in progress for the main point *.
-
-
Skip this step: This step is not required; users may go directly to the next step if desired.
-
Return to the previous step: The Back button can be used to return to the previous step if necessary.
-
Cancel the work request: The x button can be used to cancel the work request if desired.
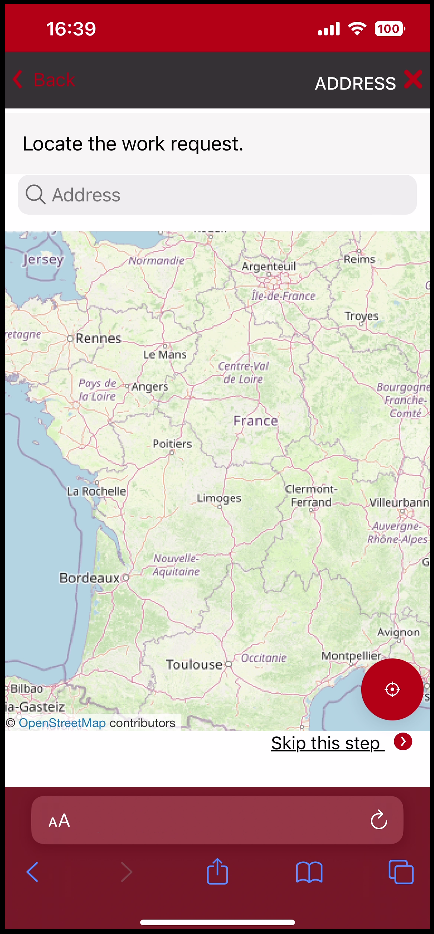
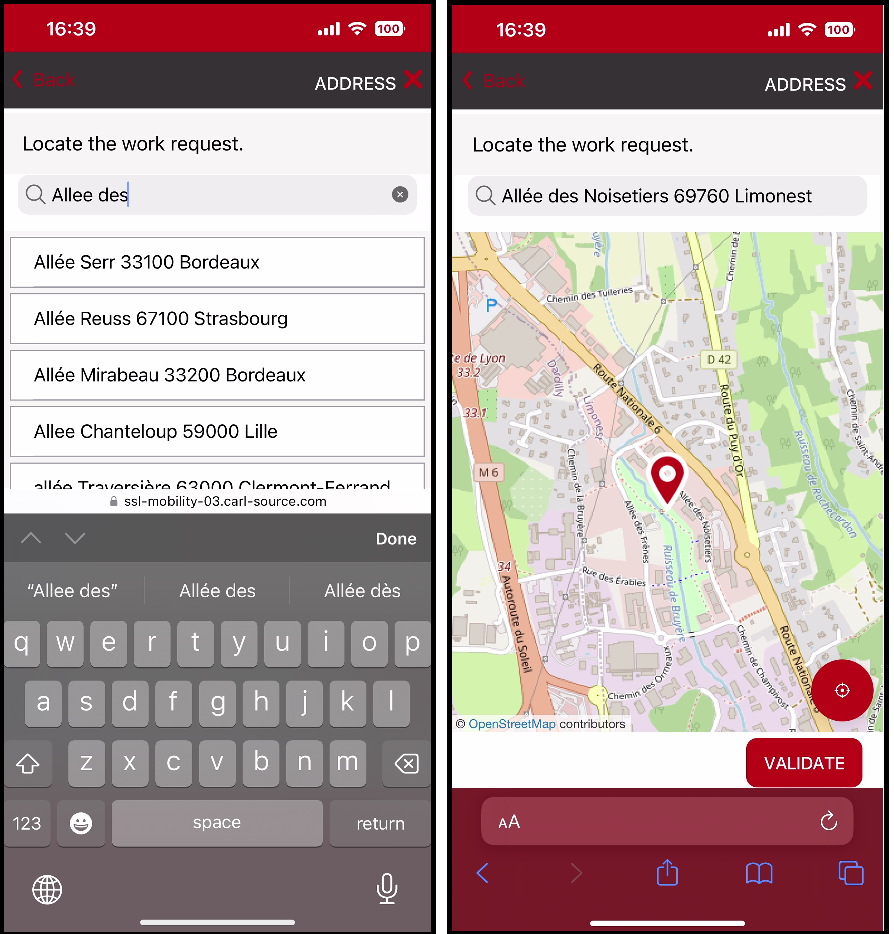
3.8.8. Step 4 - Geolocation
3.8.8.3. Actions
Actions available on the form for this step
-
Search for an address: Users can search for the work request location. To do this, they start typing and address proposals are displayed to them.
-
Geolocate: Users can geolocate their terminal. Geolocation requires the enabling of the location service specific to the device’s operating system (iOS or Android™) to determine the geographical position.
-
Confirm my location: Users can confirm their location and proceed automatically to the next step. The address entered or defined by the geolocation will be stored in the main address of the work request.
-
Skip this step: This step is not required; users may go directly to the next step if desired.
-
Return to the previous step: The Back button can be used to return to the previous step if necessary.
-
Cancel the work request: The x button can be used to cancel the work request if desired.
3.8.9. Step 5 - Problem description
3.8.9.1. Presentation
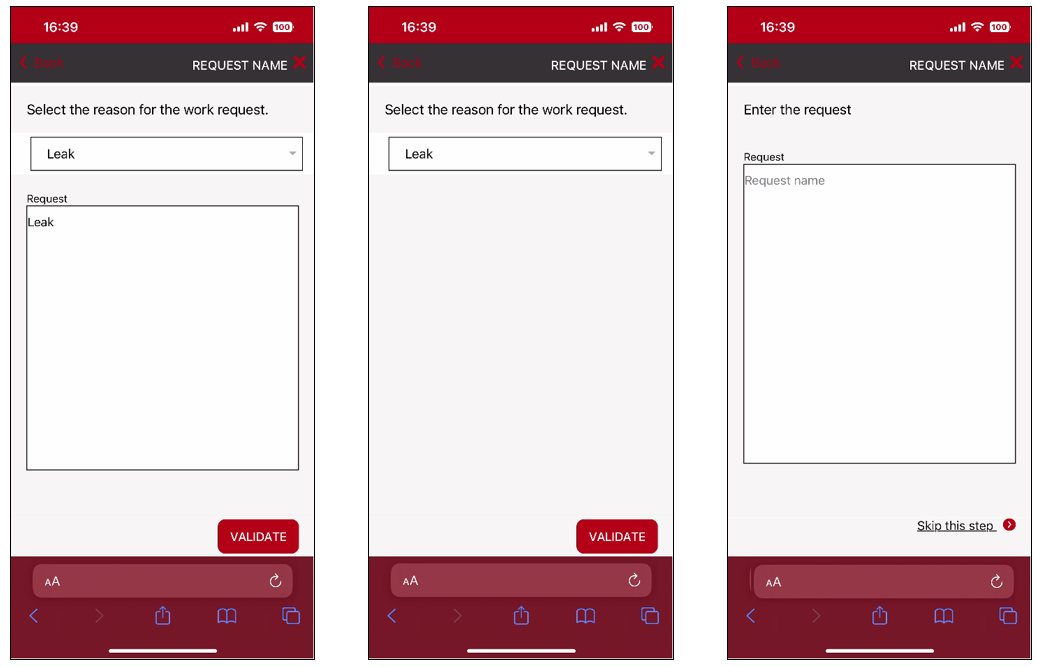
This step enables the user to describe the problem encountered and the reason for the work request.
The list of symptoms is restricted according to the rules below:
-
If an asset is entered, the application proposes the symptoms directly related to the asset via its fault tree. If there are no symptoms attached, the application then proposes the symptoms attached to the asset template via its fault tree. If the asset and its associated template do not have a fault tree, the application proposes all the symptoms at least accessible to the logged in user for consultation.
-
If a location is filled in, then the application then proposes the symptoms related to the geographical point model (location). If the geographical point does not have a fault tree, the application proposes all the symptoms at least accessible to the logged in user for consultation.
-
If no equipment (location or asset) is filled in for the request, the application then proposes all the symptoms at least accessible to the logged in user for consultation.
3.8.9.2. Data displayed
This step displays:
-
Purpose - List of symptoms.
-
Comments – Description field.
It can have three different display forms (defined in the wizard):
-
Purpose and Comments.
-
Purpose only.
-
Comments only.
3.8.9.3. Actions
Actions available on the form for this step
-
Select a subject: The user can choose the subject of the work request. Once the subject is selected, its description is automatically retrieved and may be added to if required.
-
Describe the problem: Users can enter a message. This message becomes the title of the work request and is used to initialize its comments field.
-
Skip this step: This step is not required; users may go directly to the next step if desired.
-
Confirm the description: The user confirms the description and proceeds automatically to the next step.
-
Return to the previous step: The Back button can be used to return to the previous step if necessary.
-
Cancel the work request: The x button can be used to cancel the work request if desired.
3.8.10. Step 6 - Criticality assessment
3.8.10.1. Presentation
This step enables users to assess the level of criticality of the problem encountered, and thus the priority assigned to the work request.
3.8.10.2. Data displayed
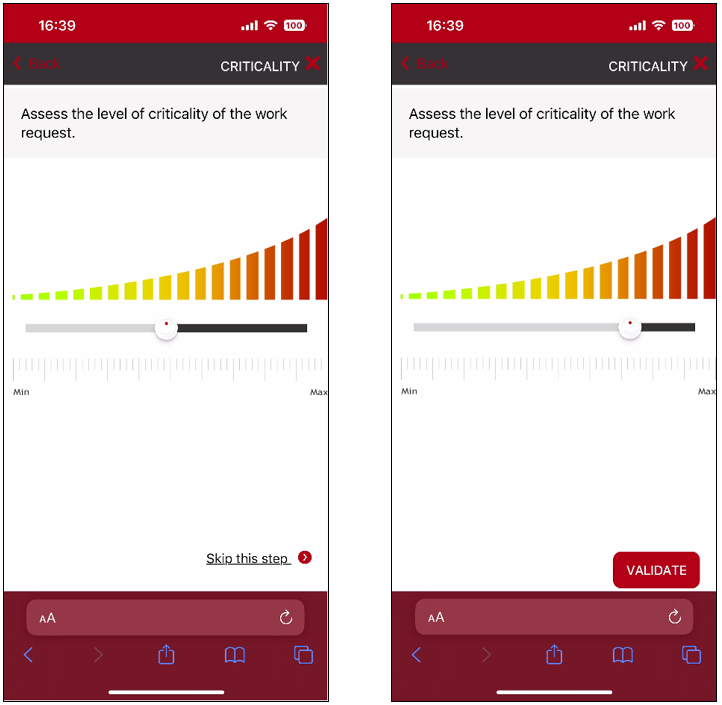
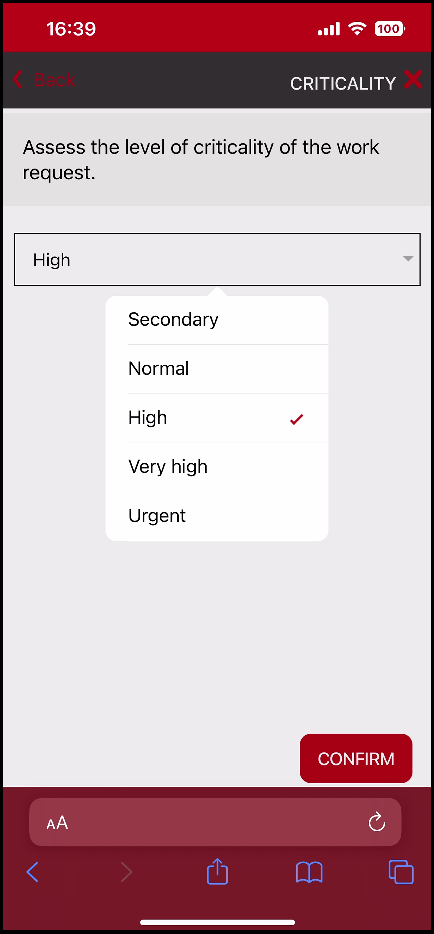
This step can have two different display forms (defined in the wizard):
-
Assessment of criticality by a gauge.
-
Assessment of criticality by values list.
3.8.10.3. Actions
Actions available on the form for this step
-
Assess the criticality: Users can assess the criticality of the problem encountered.
As default, the cursor is placed in the center of the gauge (50%). Depending on how the gauge is moved, CARL Flash deduces the criticality to be entered on the work request in CARL Source.
Calculation rule: Criticality = Total number of criticality values × gauge position. -
Confirm the criticality: The user confirms the criticality and proceeds automatically to the next step.
-
Skip this step: This step is not required; users may go directly to the next step if desired.
-
Return to the previous step: The Back button can be used to return to the previous step if necessary.
-
Cancel the work request: The x button can be used to cancel the work request if desired.
-
Total number of criticality values: 5
-
Secondary
-
Normal
-
High
-
Very high
-
Urgent
-
-
Gauge position: ¾
-
Criticality = 5 × ¾ = 3.75 =⇒ rounded to zero decimal places = 4 =⇒ Very high
-
3.8.11. Step 7 - Adding media
3.8.11.1. Presentation
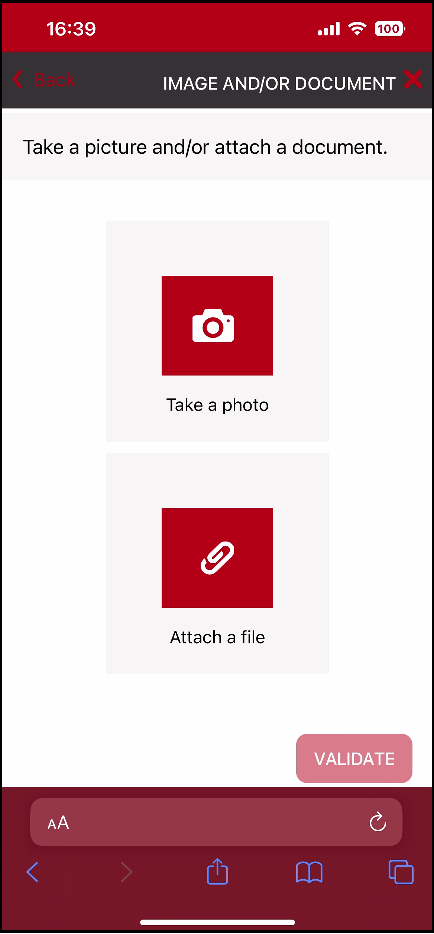
This step allows the user to add one or more photos and one or more files to illustrate the problem encountered.
3.8.11.2. Data displayed
This step displays:
-
List of media documents already added.
-
A Take a photo button.
-
An Attach a file button.
3.8.11.3. Actions
Actions available on the form for this step
-
Take a photo: Users can take a photo. CARL Flash automatically opens the device’s [Camera] function.
-
Attach a file: The user can attach a file. CARL Flash automatically accesses the documents stored on the device.
-
Send: After taking a photo or selecting a file, the user sends the document to CARL Source. The document must not exceed the maximum authorized size, otherwise it cannot be submitted to CARL Source.
-
Confirm this step: The user confirms the media added and proceeds automatically to the next step.
-
Skip this step: This step is not required; users may go directly to the next step if desired.
-
Return to the previous step: The Back button can be used to return to the previous step if necessary.
-
Cancel the work request: The x button can be used to cancel the work request if desired.
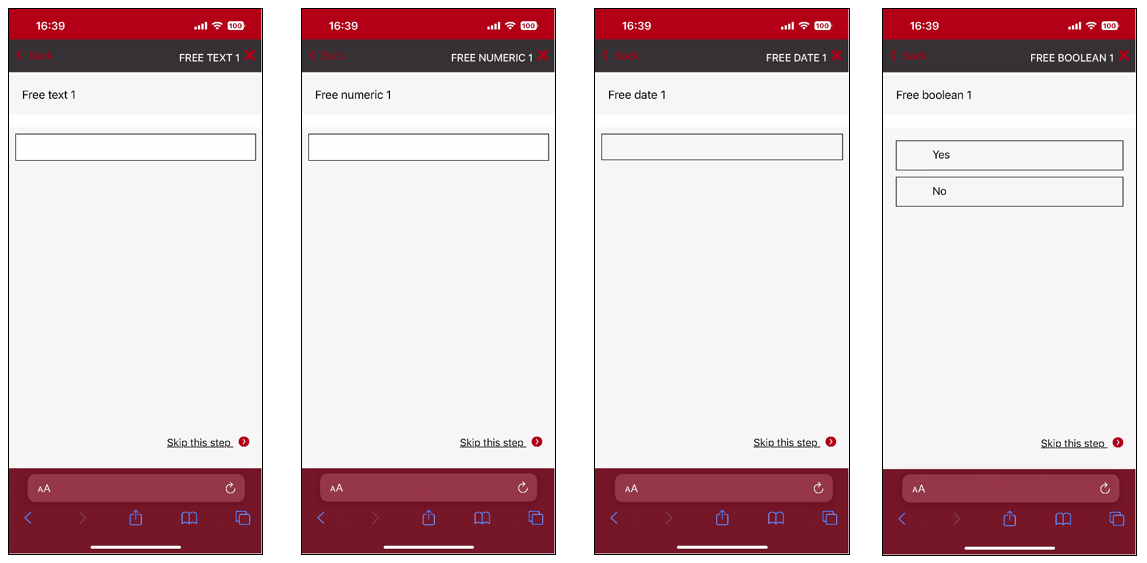
3.8.12. Step 8 - Additional field of the xtra type
3.8.12.1. Presentation
This step allows users to fill in the value of the additional field of the xtra type set up in the request wizard.
3.8.12.2. Data displayed
This step displays:
-
Additional field of the xtra type depending on the field type.
3.8.12.3. Actions
Actions available on the form for this step
-
Enter the value: Users can fill in the value of the additional field of the xtra type displayed.
-
Confirm this step: Users confirm the entry of the additional field of the xtra type and automatically go on to the next step.
-
Skip this step: This step is not required; users may go directly to the next step if desired.
-
Return to the previous step: The Back button can be used to return to the previous step if necessary.
-
Cancel the work request: The x button can be used to cancel the work request if desired.
3.8.13. Step 9 - Troubleshooting information
3.8.13.1. Presentation
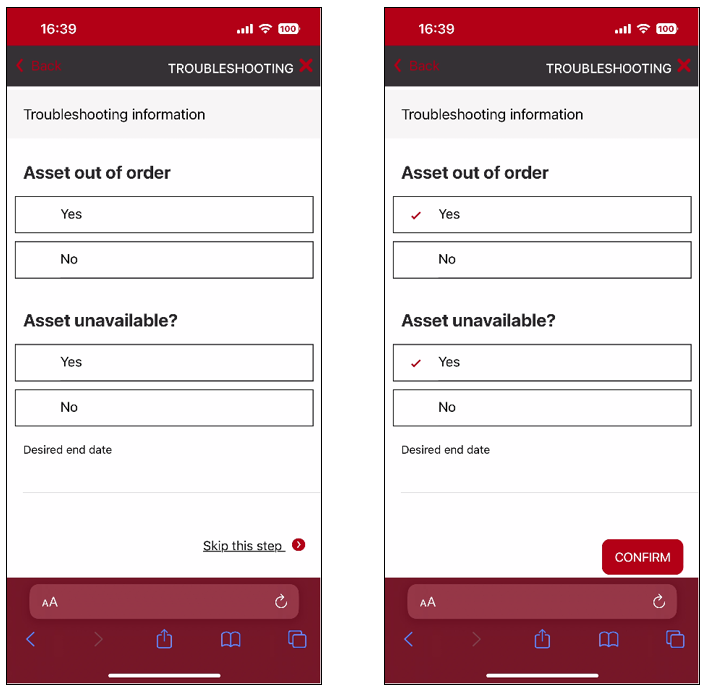
This step allows users to fill in the troubleshooting information related to the work request.
3.8.13.2. Data displayed
This step displays:
-
Asset out of order.
-
Asset unavailable.
-
Desired end date.
3.8.13.3. Actions
Actions available on the form for this step
-
Enter the information: Users can fill in the troubleshooting information to be associated with the work request
-
Confirm this step: Users confirm the entry of information and automatically go on to the next step.
-
Skip this step: This step is not required; users may go directly to the next step if desired.
-
Return to the previous step: The Back button can be used to return to the previous step if necessary.
-
Cancel the work request: The x button can be used to cancel the work request if desired.
3.8.14. Equipment scanning
The creation of a work request begins with the scanning of an equipment code.
3.8.14.1. Presentation
This screen allows users to create a work request from a QRcode.
Users can scan either an asset code or a location code.
If a match with an asset code is found, and the system setting is enabled, the wizards corresponding to this asset code are searched for:
-
Wizards with the model of the scanned asset.
-
The wizards associated with the technical work packages from all the main hierarchical ascendants of the scanned asset.
-
Wizards that do not have a defined technical work package or model.
If the system setting is not enabled, all wizards are returned.
If a match with a location code is found, and the system setting is enabled, the wizards corresponding to this location code are searched for:
-
Wizards with the scanned location model.
-
The wizards associated with all the technical work packages hierarchically descending from the scanned location.
-
The wizards associated with all the models associated with the technical work packages and assets hierarchically descending from the scanned location.
-
Wizards that do not have a defined technical work package or model.
If the system setting is not enabled, all wizards are returned.
3.8.15. Checking work
3.8.15.1. Presentation
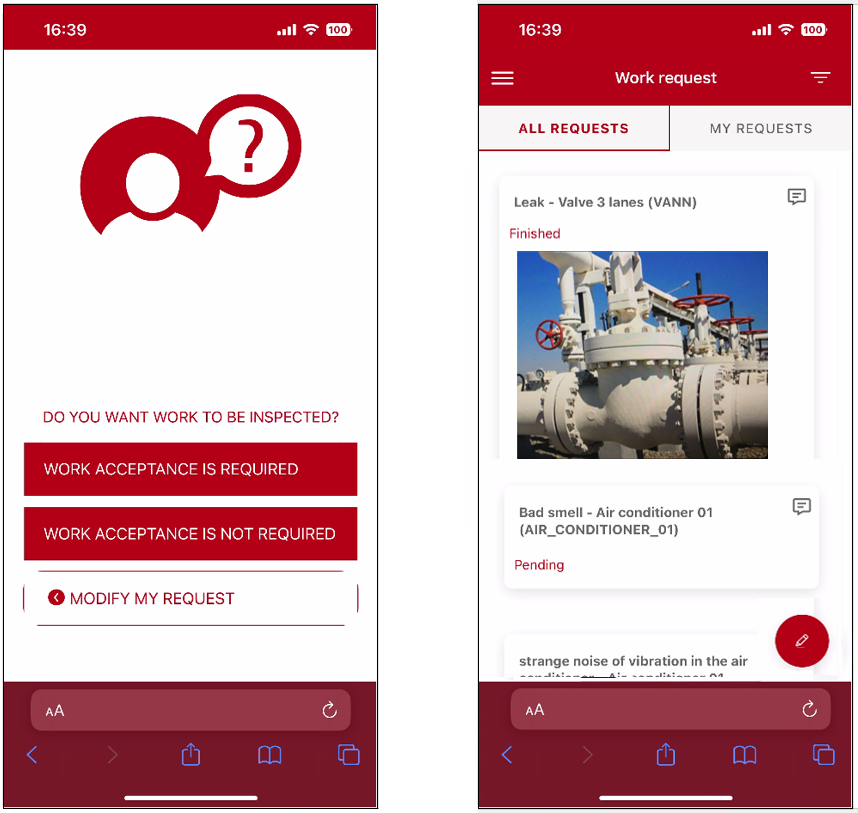
This screen (subject to profile rights) enables the user to indicate whether or not work should be checked.
3.8.15.2. Data displayed
The ‘Do you want to check the work' screen includes:
-
A Work acceptance is required button.
-
A Work acceptance is not required button.
-
A Change my request button.
3.8.15.3. Actions
Actions available on the form for this step
-
Work acceptance is required: The user can request that the work be checked. In this case, once the work is completed, the status of the request changes to ‘Completed'. The user subsequently chooses, in the My requests list, whether to ‘Accept' or ‘Reject' the work.
-
Do not accept the work: The work does not need to be checked. In this case, once the work is completed, the status of the request changes directly to ‘Closed'.
-
Change my request: The user can change the request further. The final creation step is displayed again.
|
|
The work acceptance action depends on the rights of users on the "Accept" and "Reject" state transitions in the status workflow of work requests. |
3.8.16. Submitting the work request
3.8.16.2. Data displayed
Depending on the settings, the summary of the information entered in the wizard can be displayed.
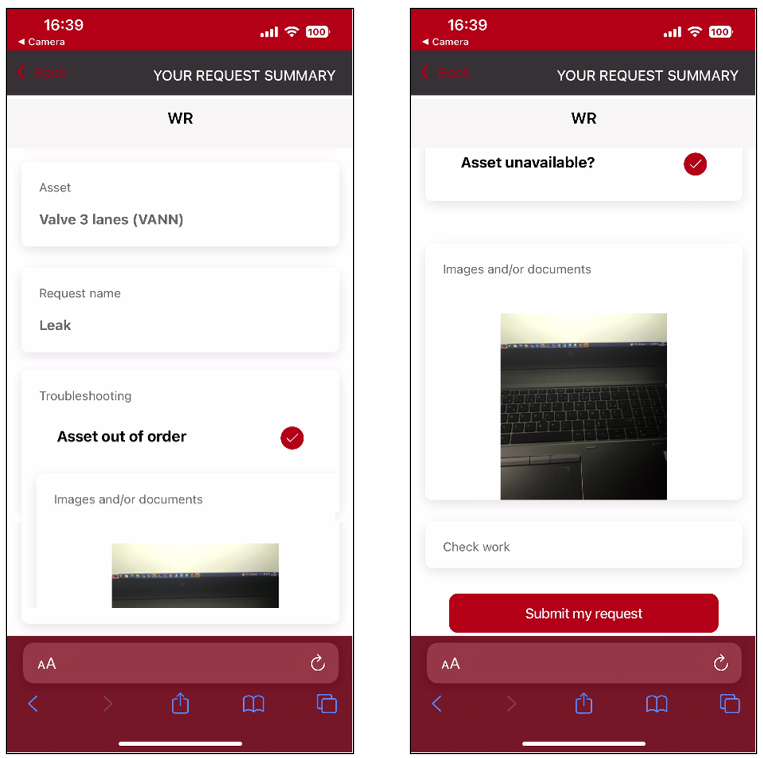
By clicking on one of the blocks, the user can return to the entry step.
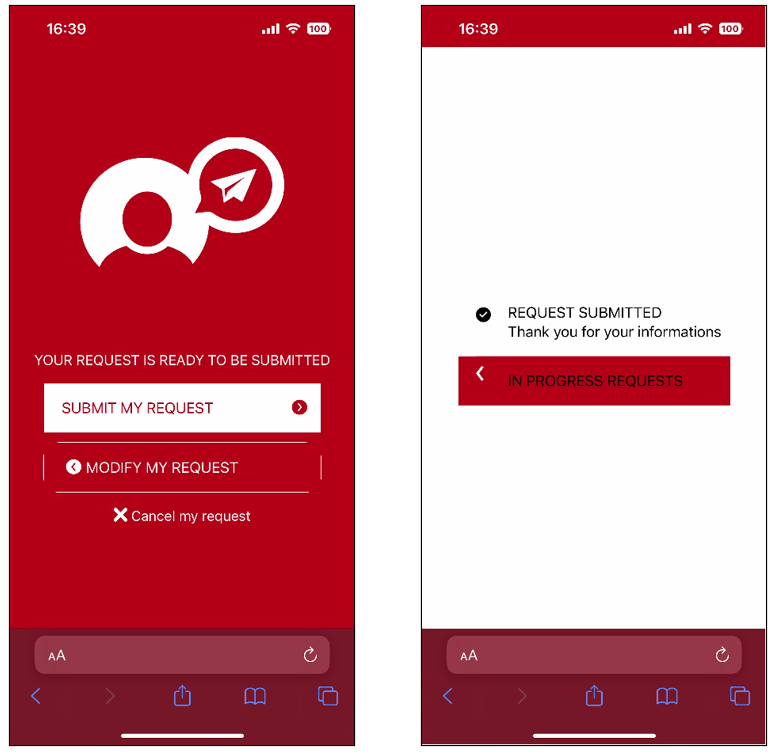
The ‘Your request is ready to be sent' screen shows:
-
A Submit my request button.
-
A Change my request button.
-
A Cancel my request button.
The confirmation screen shows:
-
A Work requests in progress button.
3.8.16.3. Actions
Actions available on the form for this step
-
Submit my request: Users can submit their work request. CARL Flash notifies the user that the request has been sent and then automatically (after a few seconds) displays the All requests list.
-
Work requests in progress: After submitting the request, users can proceed directly to the All requests list without waiting for the automatic redirect.
-
Change my request: The user can change the request further. The final creation step is displayed again.
-
Cancel my request: The user can cancel submission of the request. The Cancel the work request screen is displayed.
3.8.17. Canceling the work request
3.8.17.1. Presentation
During any creation stage, the user can cancel the work request. This cancellation is irreversible.
3.8.17.2. Data displayed
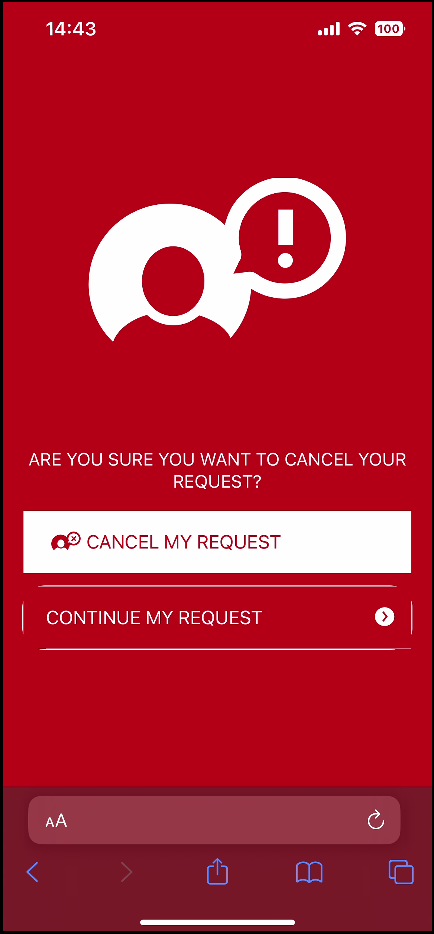
This screen displays:
-
A Cancel my request button.
-
A Continue my request button.
3.8.17.3. Actions
Actions available on the form for this step
-
Cancel my request: The user can cancel creation of the work request. CARL Flash then displays the list of All requests.
-
Continue my request: The user can continue creation of the work request. The current creation step is displayed again.
3.8.18. General menu
3.8.18.1. Presentation
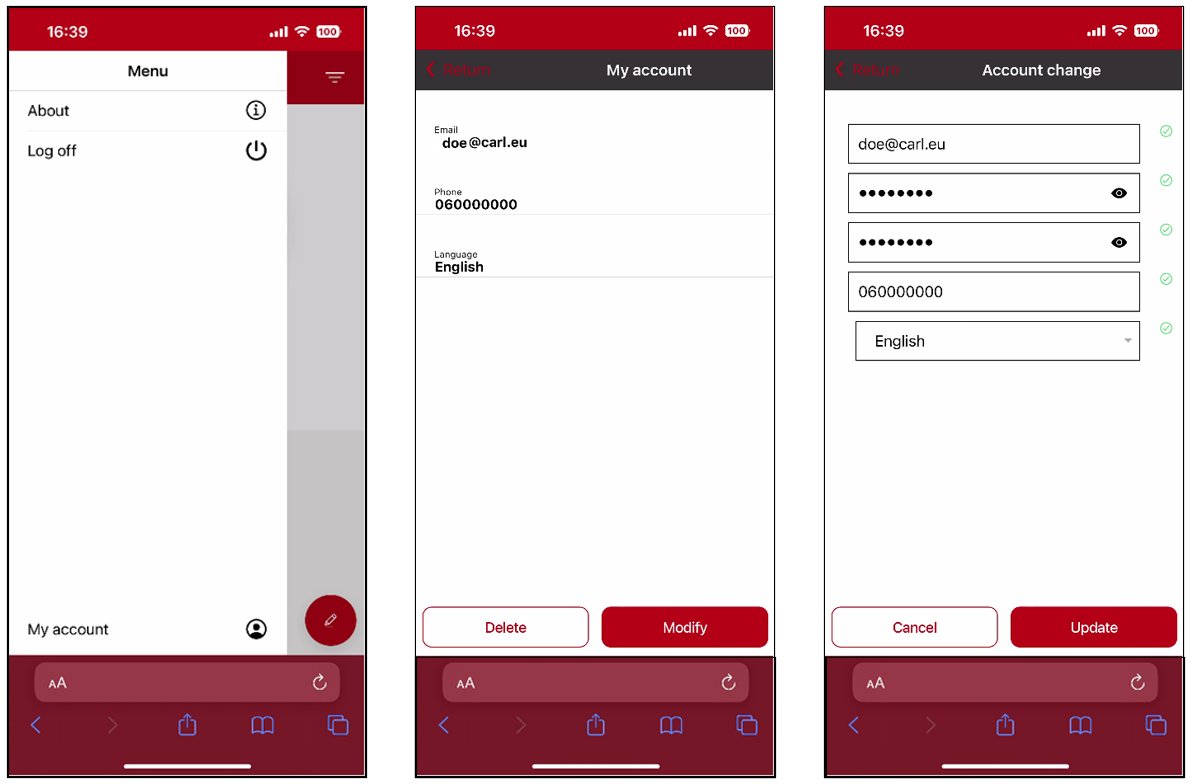
In this version 7.7.0 of CARL Flash, users can also, through the burger menu:
-
View About
-
Log out
-
Change their Flash account if they are logged in as a Flash user.
3.8.18.2. Data displayed
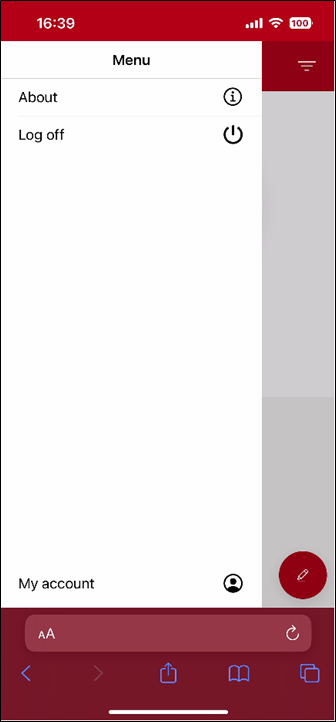
This menu displays:
-
View About.
-
Logout.
-
Change my account only available if the user is a Flash user.
3.8.18.3. Actions
Actions available on the form for this step
-
View About: The user wants to view CARL Flash’s terms and conditions of use.
-
Logout: The user wants to log out of the application.
-
Change my account: The user wants to change their account information or delete their account.
3.8.18.4. About
If the user selects "About", the CARL Flash General terms of Use popup window will be displayed.
3.8.18.5. Logging off
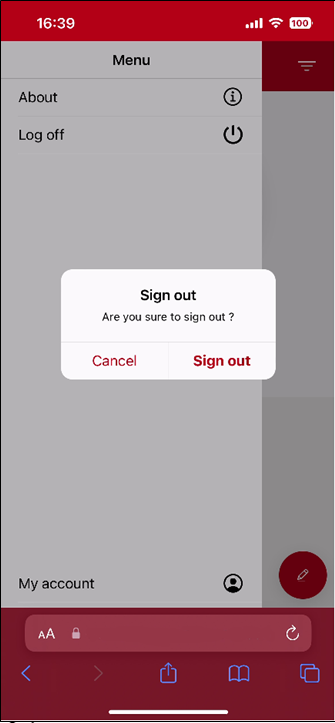
If users choose to log out, the following popup will be displayed:
-
Cancel button: The user does not want to log out of the application. CARL Flash displays the logout menu.
-
Logout button: The user wants to log out of the application.
3.8.18.6. My account
If the Flash user chooses to access their account, a screen with the account data will be displayed:
-
Email address
-
Telephone
-
Language
If the user presses the "Change" label, the data editing screen is displayed:
-
Email address
-
Password
-
Confirm password
-
Telephone
-
Language
-
Cancel button: Users wants to cancel the editing of their Flash account.
-
Update button: Users want to save the changes to their Flash account.
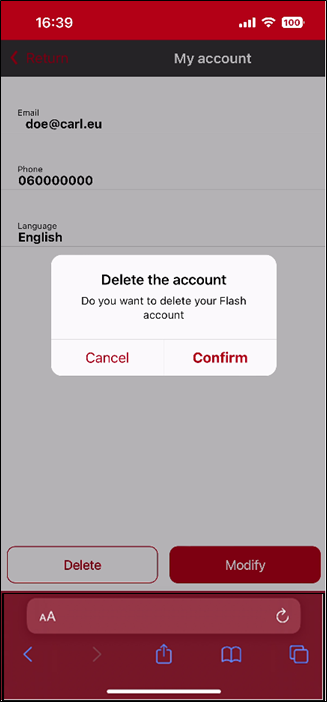
If the user presses the "Delete" label
-
Cancel button: Users do not want to delete their Flash account.
-
Confirm button: Users wants to delete their Flash account.
4. Configuring CARL Flash
4.1. Setting up of wizards
4.1.1. Presentation
In CARL Source’s [Flash] module, the Setting up of wizards screen allows you to customize the creation of a work request by setting up the wizards.

Several wizards can be set up in CARL Source. Each wizard corresponds to a work request creation path with steps chosen and ordered as users want so as to get as close as possible to each specificity.
4.1.2. Data displayed
This form displays:
-
Wizard code.
-
Wizard description. This description will be the text displayed in CARL FLash
-
Types of users having access to the wizard. The wizard can be associated with one or more types of users: Source, Flash or Anonymous
-
Icon associated with the wizard. This icon will be the one displayed in CARL Flash.
While several icons are provided in the CARL Source library, the customer may, however, load its own icons in the library, making sure that they are different.
The added icon must be defined by a complete url.
-
Request type allows the initialization of the field of the created work request.
-
Request type allows you to group the various wizards on the CARL Flash screen
-
Wizard status
-
Equipment model associated with the wizard allows you to filter the assets and symptoms proposed in the work request. A wizard is defined either for a model or for a technical work package.
-
Technical work package associated with the wizard allows you to filter the assets and symptoms proposed for the work request. A wizard is defined either for a model or for a technical work package.
-
List of wizard steps. The steps are displayed in the defined order. The required character of each of them is applied in CARL Flash.
For the Valuation steps of an xtra field, the associated xtra attribute must be defined.
|
|
Make sure that the required steps in the CARL Flash Wizard are consistent with the required attributes in the CARL Source dictionary. |
4.2. System configuration
In the CARL Source [System] module’s System configuration, you can configure CARL Flash using various settings.
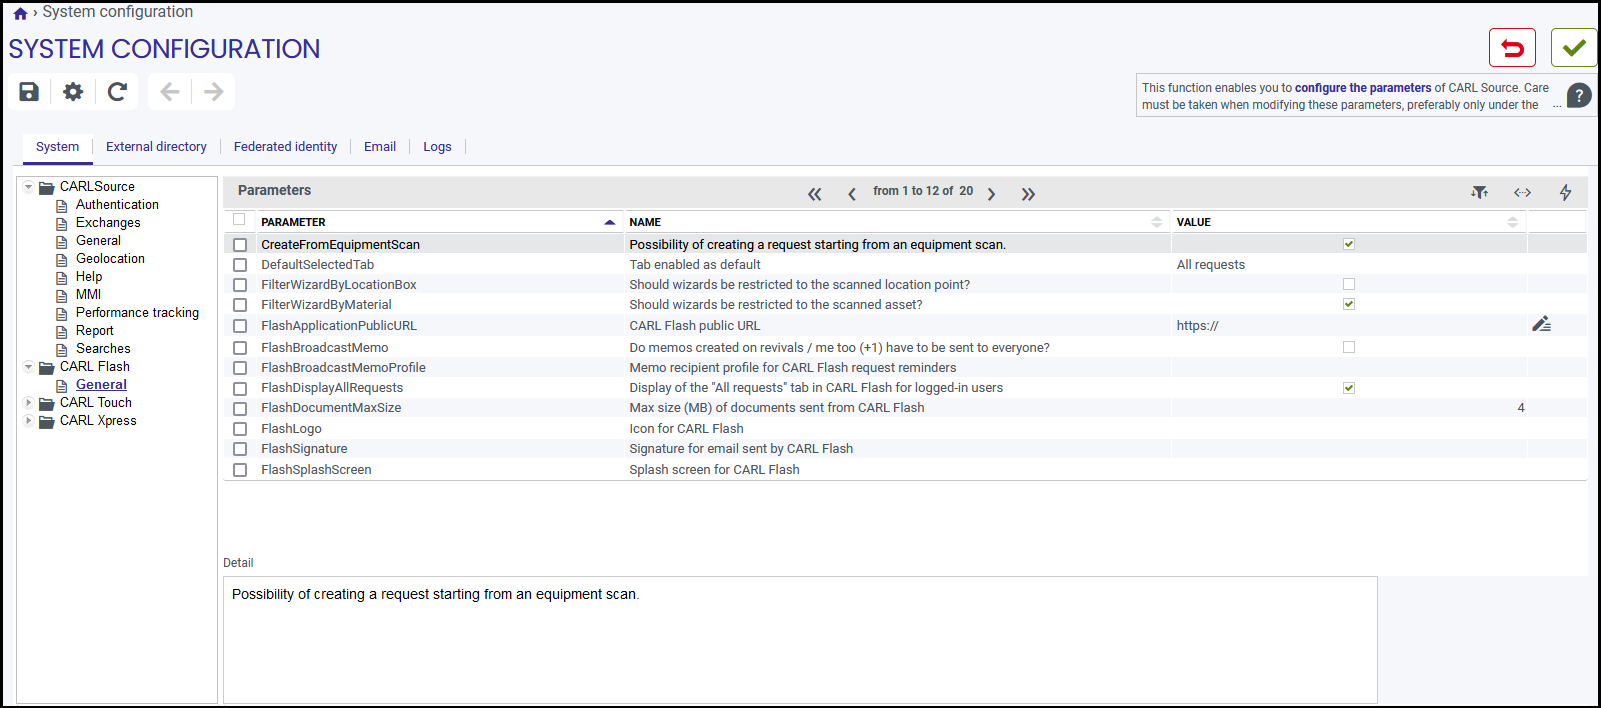
-
A request can be created from an equipment scan provided you have tagged your equipment.
-
The default active tab can be "My requests" or "All requests".
-
The restriction of wizards to the scanned geographical point can be enabled. The wizards corresponding to the technical work package descendants or to the models of the asset and technical work package descendants will be provided if a location point is scanned at the start of the entry. Caution, the enabling of this option may significantly degrade performance for a significant fleet of equipment.
-
The restriction of wizards to the scanned equipment can be enabled. The wizards corresponding to the technical work package ascendants or to the models of the asset and technical work package ascendants will be provided if a asset is scanned at the start of the entry.
-
The CARL Flash public address corresponds to the CARL Flash access URL.
-
Memos created on a work request in CARL Source, after a reminder or ‘Me too' has been submitted in CARL Flash, are displayed as default only for the addressees of the corresponding work request.
-
The Reminder memo recipient profile is used for CARL Flash request reminders when work requests do not have a defined recipient user.
-
The "All Requests" tab is displayed on the request list screen.
-
The following CARL Flash logo is shown as default:

It is displayed on the login screen. If desired, you may select another image (jpg, png, etc.), provided it has first been added to the library. -
The signature for emails from CARL Flash. You first have to add the image to the library.
-
The CARL Flash startup screen is as follows, as default:

It is displayed on the login screen. If desired, you may select another image (jpg, png, etc.), provided it has first been added to the library. -
The data hosting and the publication director relating to the General Data Protection Regulation (GDPR).
-
For the geolocation step, the country on which the map should be centered can be determined.
-
Zoom level as default of the map in the geolocation step. The higher this value, the more the map is zoomed in, as indicated in the OpenStreetMap wiki.
-
The CARL Flash operating mode. This setting defines the types of logins allowed when using CARL Flash so as to allow or forbid anonymous logins or registrations from CARL Flash.
-
The two additional attributes to be displayed in the list of requests. The proposed attributes are the request attributes except for technical attributes, attributes already displayed in the list, calculated attributes (for performance constraints) and attributes whose type is not supported.
-
The request summary can be displayed before approval.
-
The acceptance of work step can be hidden for Flash users.
4.3. Configuration of documents
In the CARL Source [System] module’s System configuration, the following settings are available for configuring the adding of documents in CARL Flash:
-
UploadFileAllowedExtensions: the extensions of the data files that can be downloaded in CARL Flash.
|
|
The management of the maximum size of documents issued from CARL Flash is now delegated to the CARL Source parameter: UploadFileDataMaxSize - Maximum size of data files uploaded to the application. |
4.4. Customizing the vocabulary
In the Dictionary – Name configuration function in the CARL Source [System] module, the ‘CARL Flash names' advanced filter can be used to quickly display all names and customize them if needed.
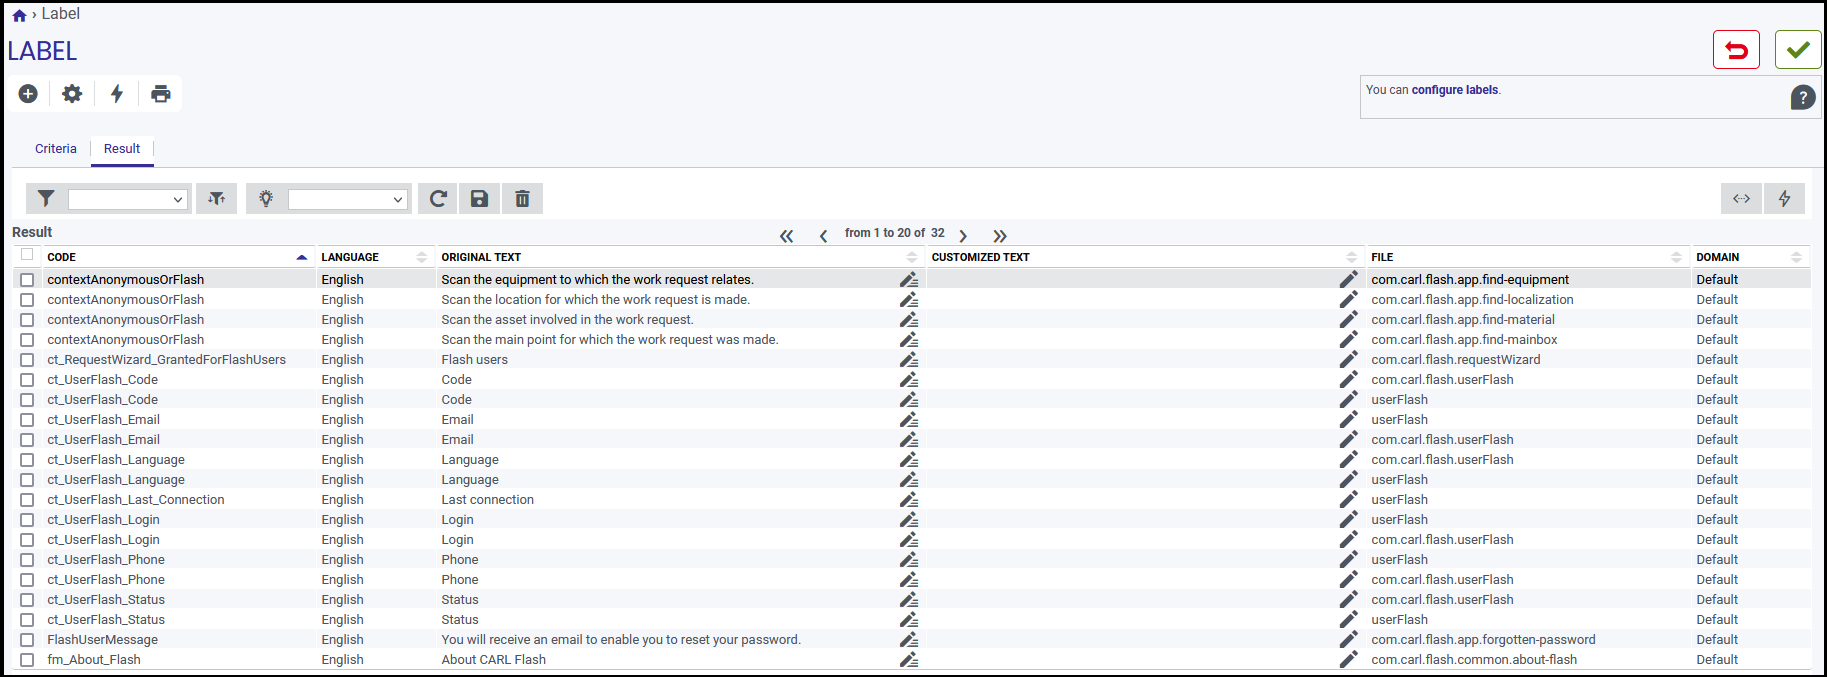
To apply the customized names in CARL Flash, the data must be refreshed.
CARL Flash data is refreshed simply by dragging the screen downward or reloading the CARL Flash URL.
4.5. Message templates
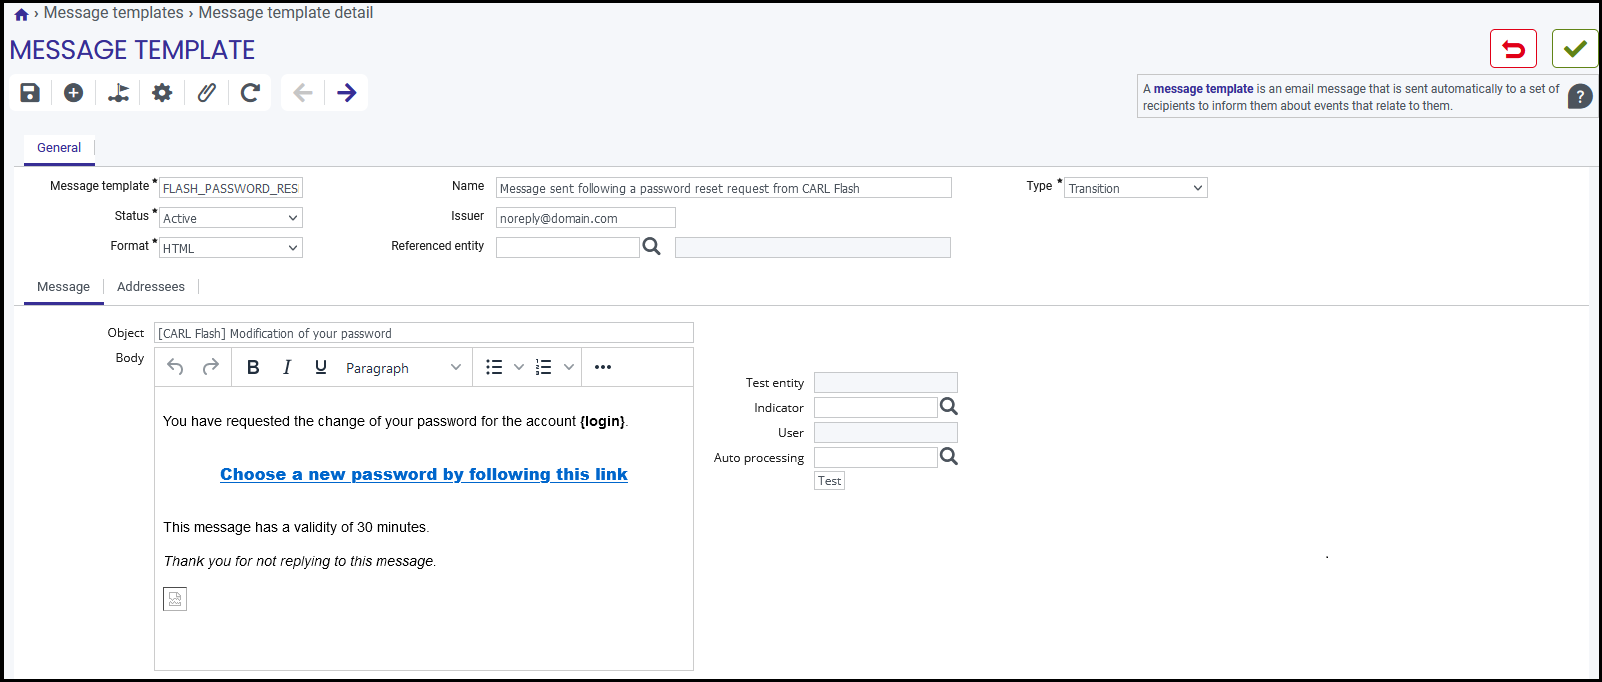
The CARL Source [System] module incorporates a number of Message templates:
The ‘Message sent following a password reset request from CARL Flash' template is used for the email message sent to Flash users who have forgotten their password.
The ‘CARL Flash work request reminder' message template is used for the email message sent automatically to work request addressees when a WR reminder is sent from CARL Flash.
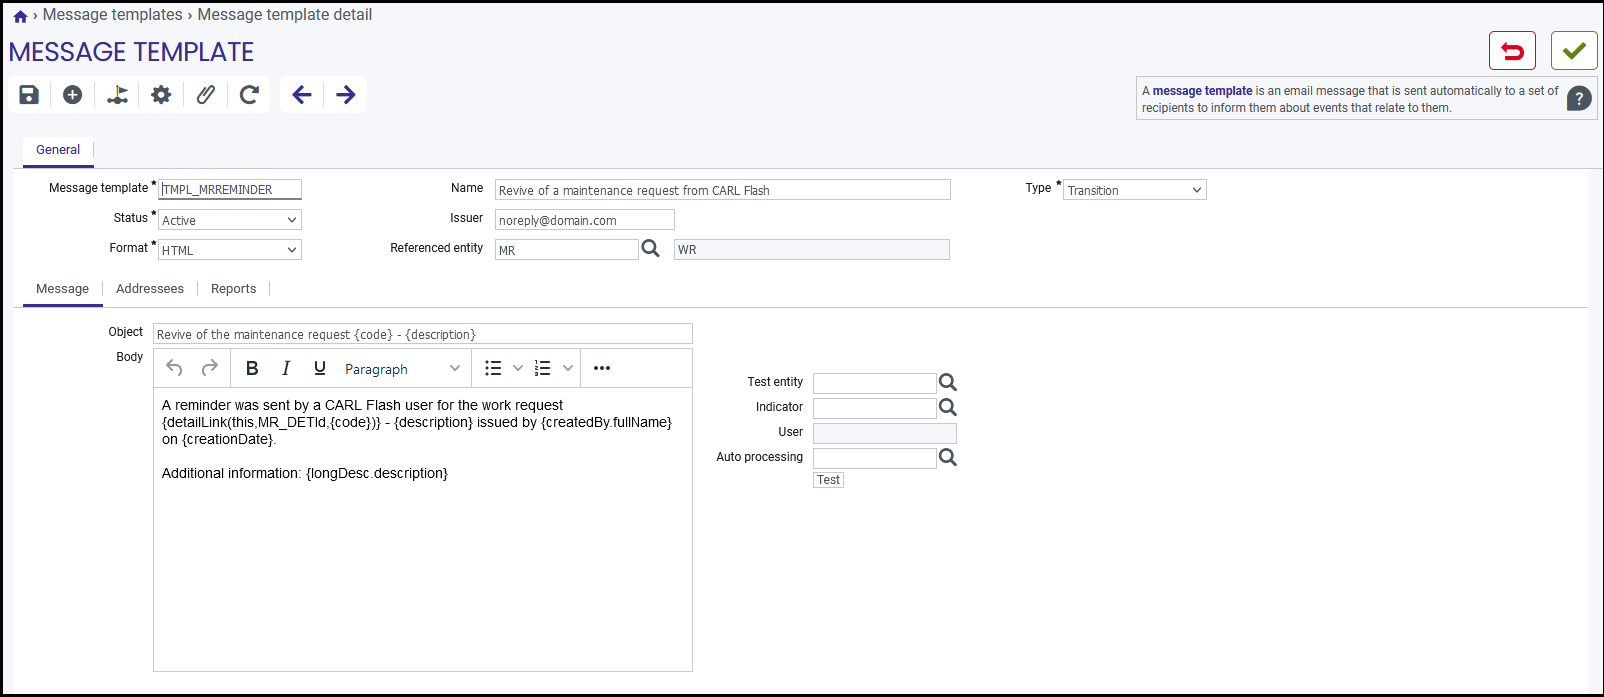
These message templates can be changed if desired.
Trademark notice
Every effort has been made to ensure the accuracy of the information at the time of publication of this document.
As CARL Source is constantly evolving, CARL Berger-Levrault cannot be held responsible for any gaps or errors in this document.
If you notice any inconsistencies or errors, please contact CARL Berger-Levrault’s support department.
Any reproduction, in whole or in part, in any form whatsoever, is strictly prohibited without the prior authorization of CARL Berger-Levrault.
All trademarks and product names mentioned in this document are the property of their respective owners as listed below:
-
Android™ and Google Chrome® are registered trademarks of Google LCC.
-
ArcGIS® is a registered trademark of the Environmental Systems Research Institute.
-
Elasticsearch® is a registered trademark of Elasticsearch B.V. in the United States and other countries.
-
Firefox® is a registered trademark of the Mozilla Foundation.
-
Java™ and Oracle® are registered trademarks of Oracle Corporation.
-
PostgreSQL® is a registered trademark of The PostgreSQL Community Association of Canada.
-
Safari® is a trademark of Apple Inc. registered in the U.S. and other countries.
-
Azure®, SQL Server®, Microsoft Edge® and Windows® are registered trademarks of Microsoft Corporation.
-
Tomcat® is a registered trademark of the Apache Software Foundation in the United States and other countries.