

1. Purpose
This document aims to list the different steps to configure OIDC via Microsoft Azure® Active Directory (AD).
2. Creating the Azure® "App Registration"
The following actions must be performed on the Microsoft Azure® portal:
-
Log in to the Azure® portal with an account having access rights to the "Microsoft Entra ID" menu.
-
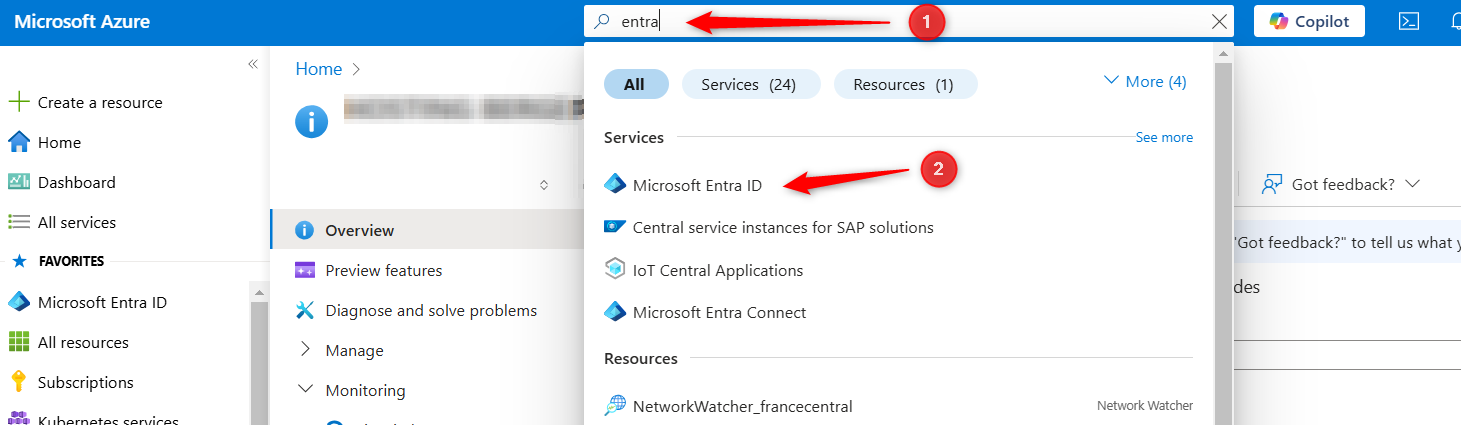
Search for "entra id" (1) and click the corresponding menu (2):
-
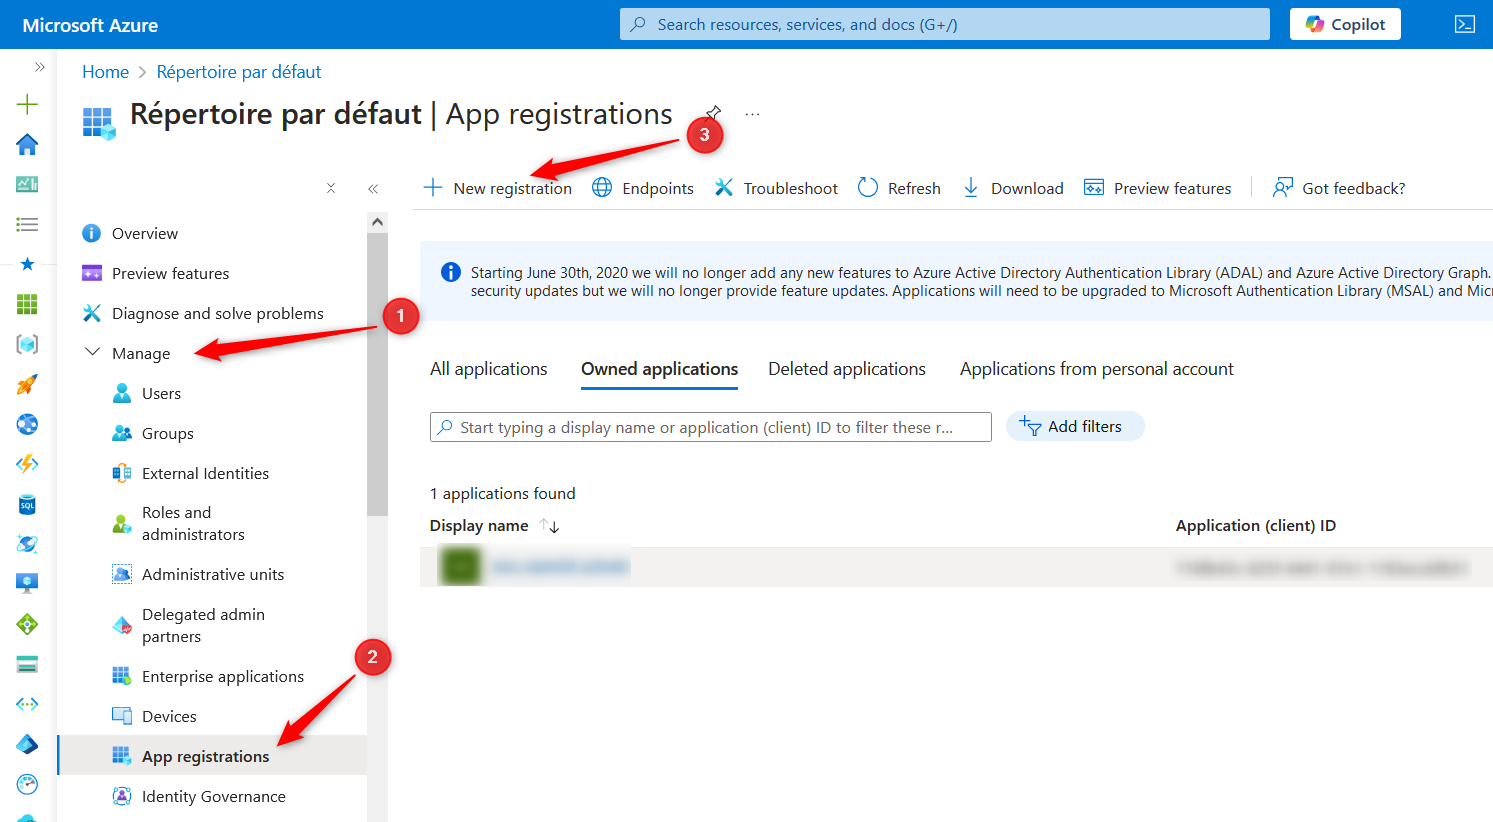
In the left-hand menu "Manage" (1), open "App Registrations" (2) and click on "New registration" (3):
-
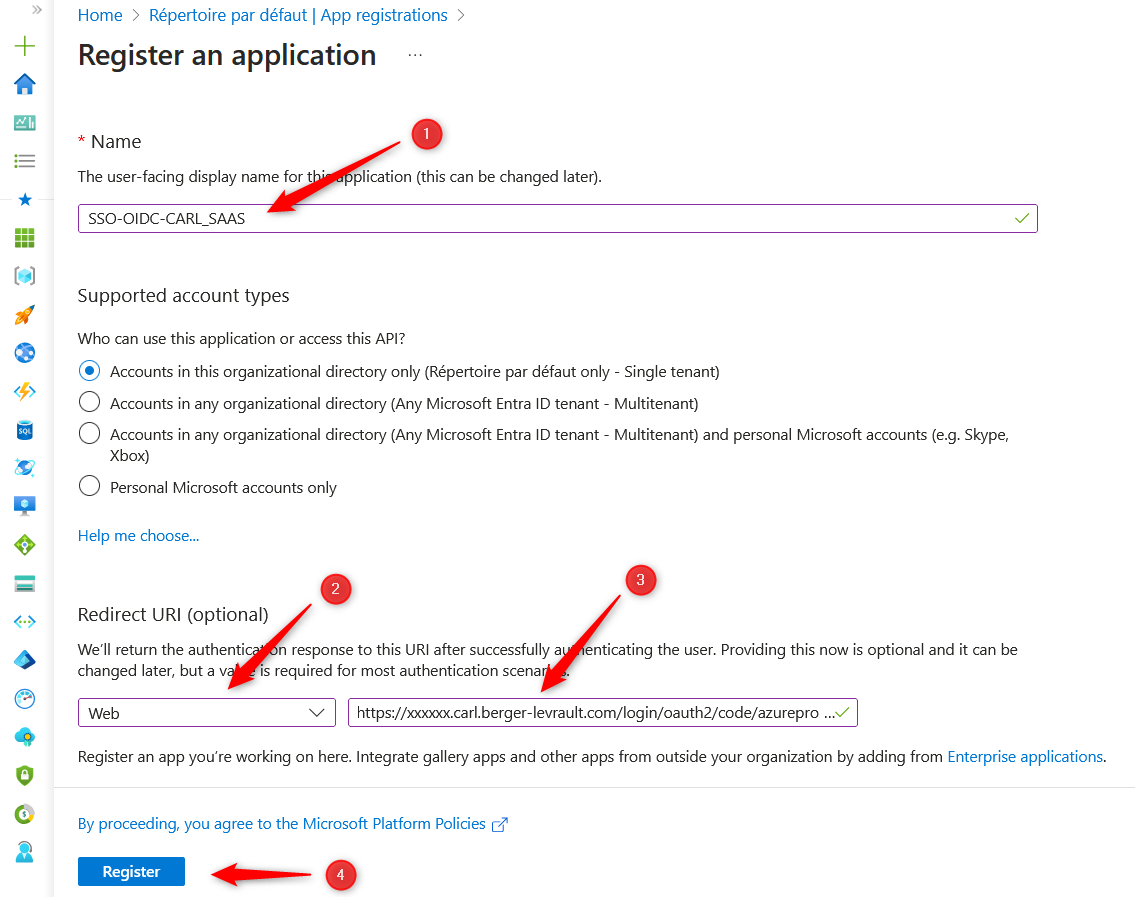
Fill in the following fields (see below):
-
Application name - e.g. SSO-OIDC-CARL_SAAS (1)
-
The "redirect URI" of the CARL SaaS application (2), of type "Web" (3), in the format:
https://xxxxx.carl.berger-levrault.com/login/oauth2/code/azureprovider(replace "xxxxx" with the relevant tenant)
-
-
Click "Register" (4).
-
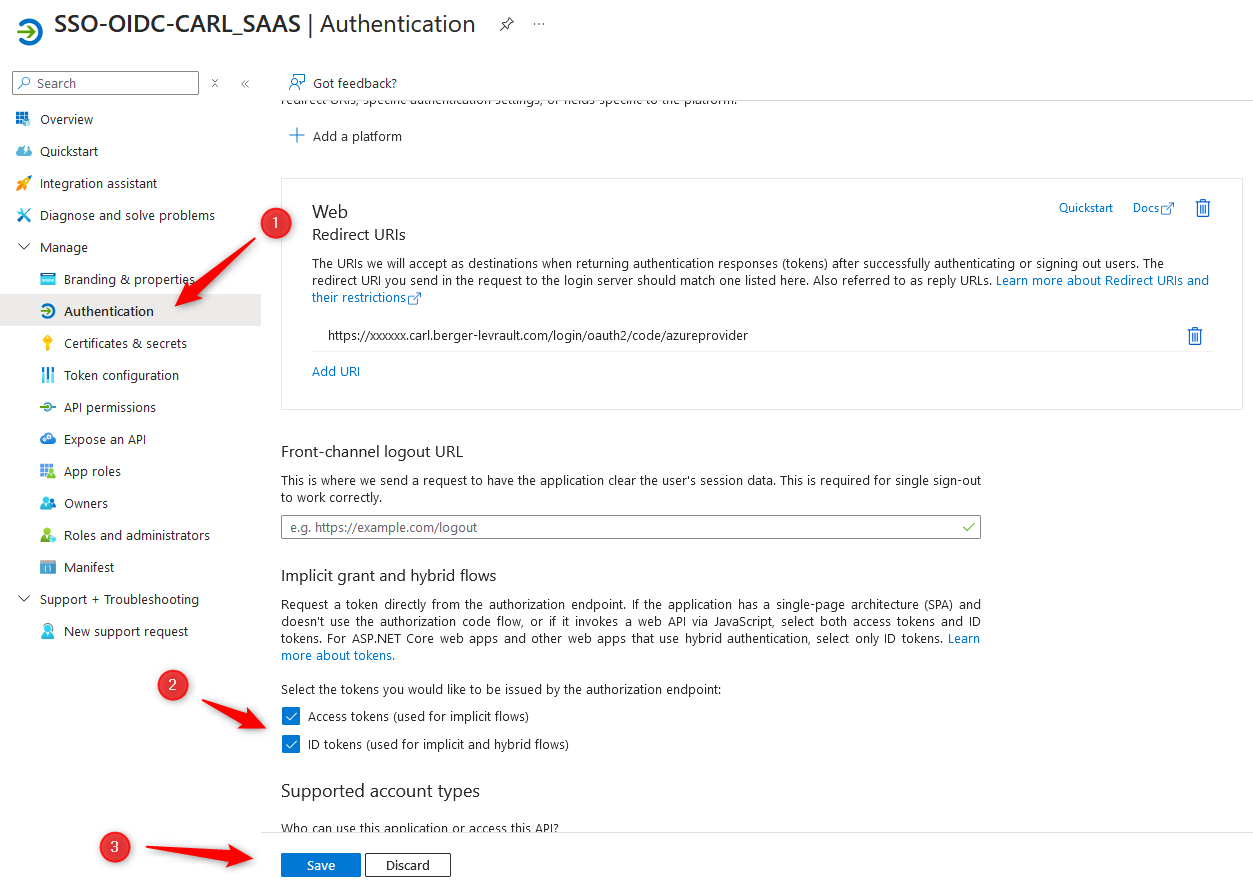
Once the application is created, a configuration screen opens.
-
Click "Authentication" (1).
-
Check the boxes "Access tokens (used for implicit flows)" and "ID tokens (used for implicit and hybrid flows)" (2).
-
Then click "Save" (3).
-
-
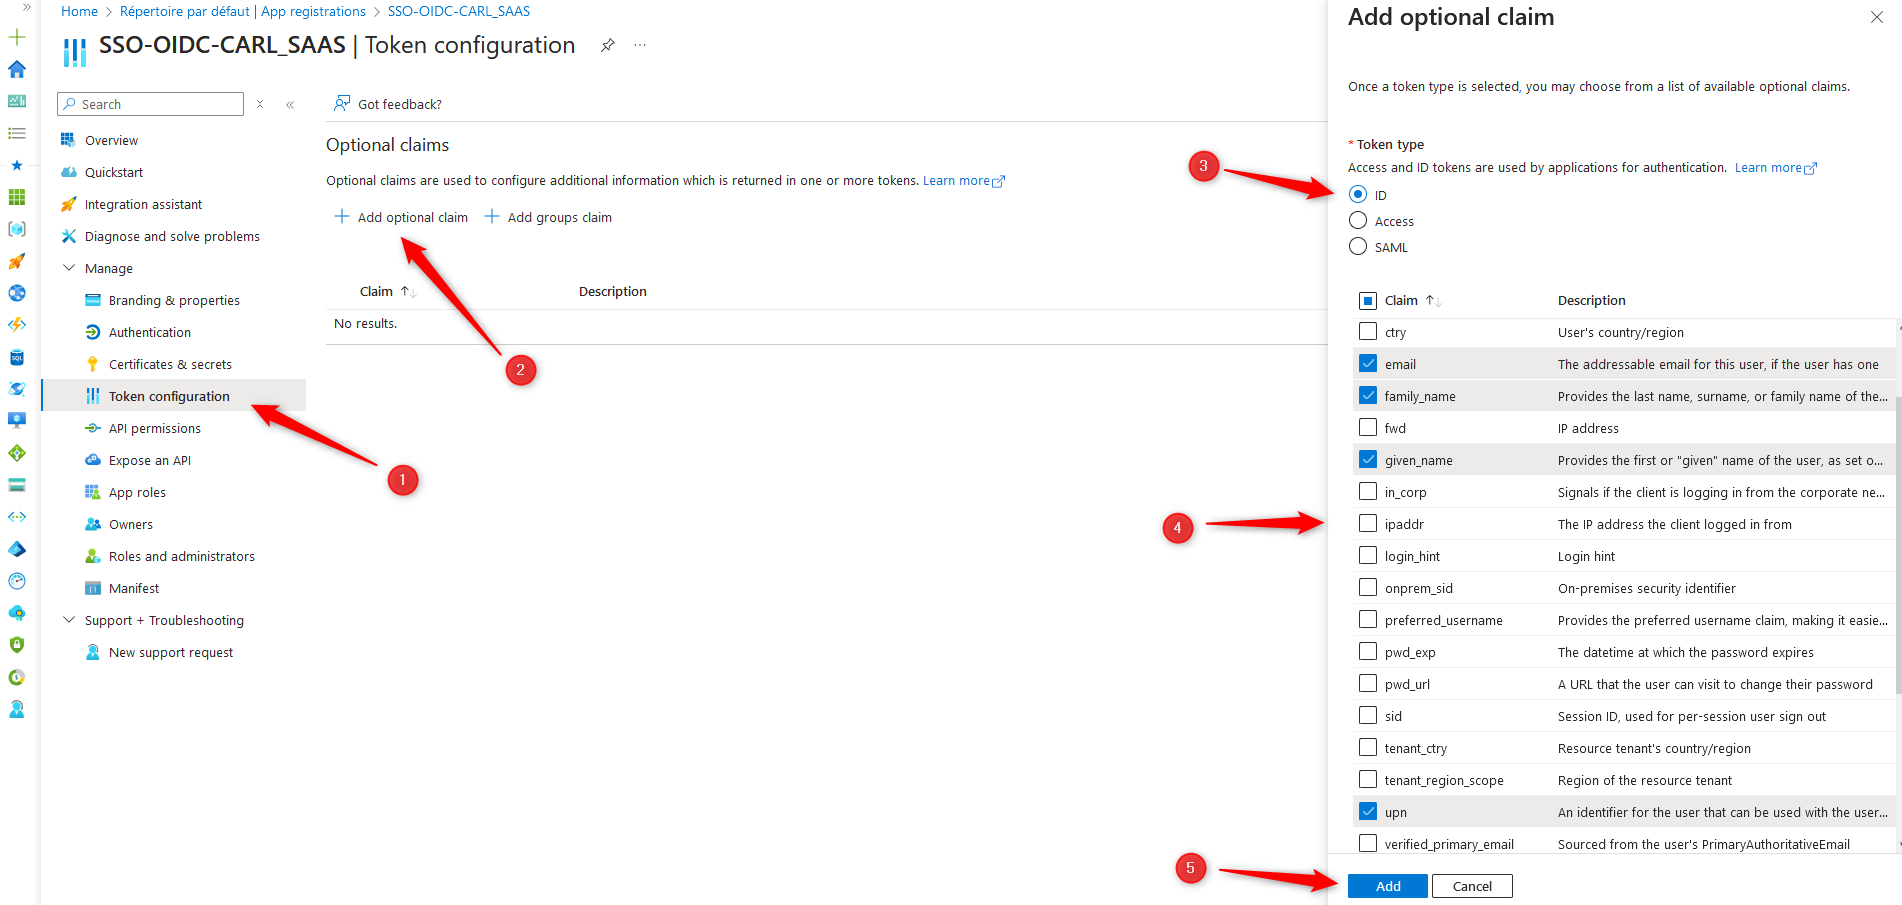
Click "Token Configuration" (1) then "Add optional claim" (2).
-
Check "ID" (3) and select each Claim (4) you wish to use for identity mappings in CARL SaaS.
-
Once selected, click "Add" (5).
-

|
The screenshot below is just an example: selected Claims must match actual requirements. |
-
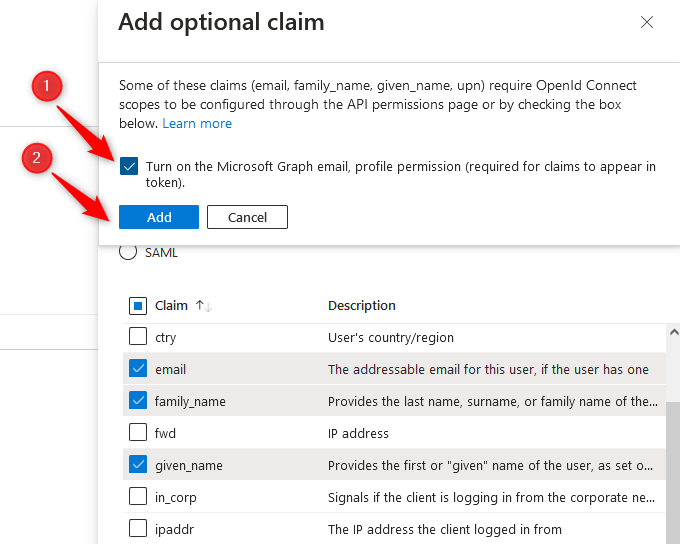
During confirmation, the following window appears - check the box (1) then click "Add" (2):
-
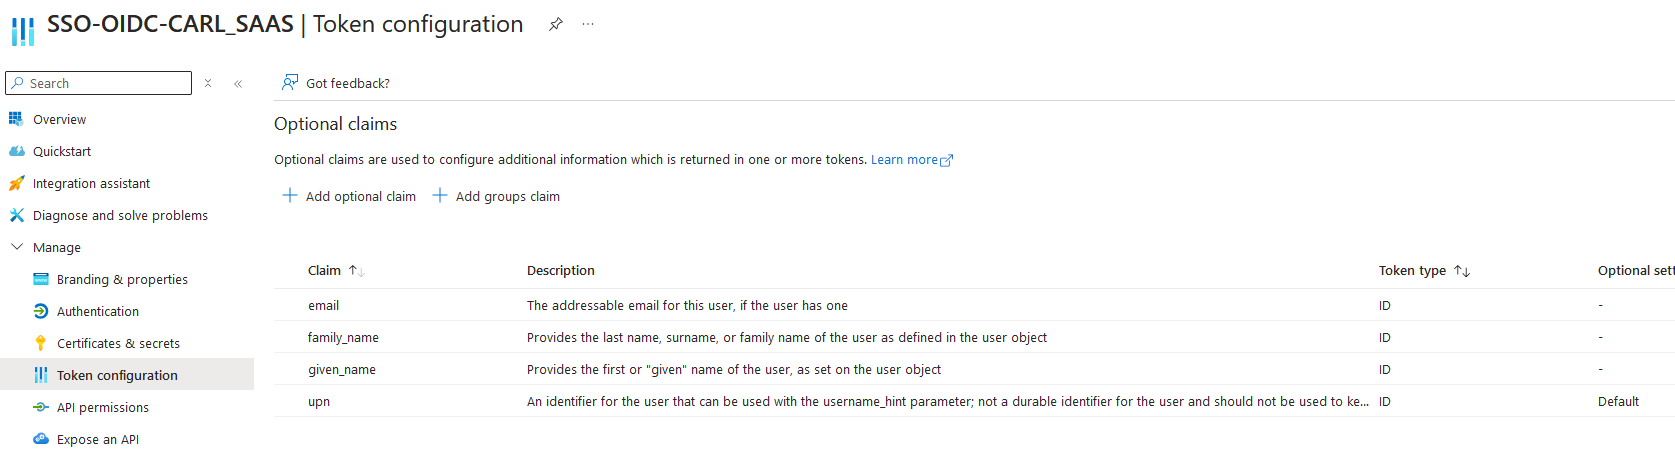
You should now see a configuration similar to the one below (this menu can be changed later):
-
Continue to the next chapter: Generating the application secret.
3. Generating the application secret
After completing the above steps, you must generate the application’s secret.
There are two possible solutions:
-
Option 1: Generate a secret with a long expiration date (preferred solution).
-
Option 2: Generate a secret with a maximum expiration of 2 years (SSO will stop working once the secret expires).
-
In this case, the administrator is responsible for providing a new valid secret before the expiration date.
-
3.1. Option 1: Generate a secret with a long expiration date
To generate a secret valid for more than 24 months, you must use an AZ CLI command.
The simplest way is to use the web command interface provided in the portal to execute AZ CLI commands.
-
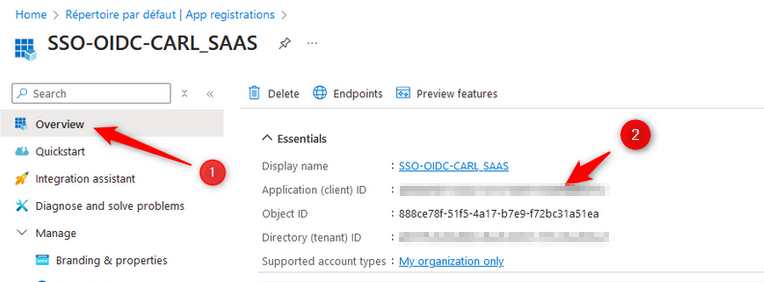
First, retrieve the value of "Application (client) ID" from the following location:
-
Save this value.
-
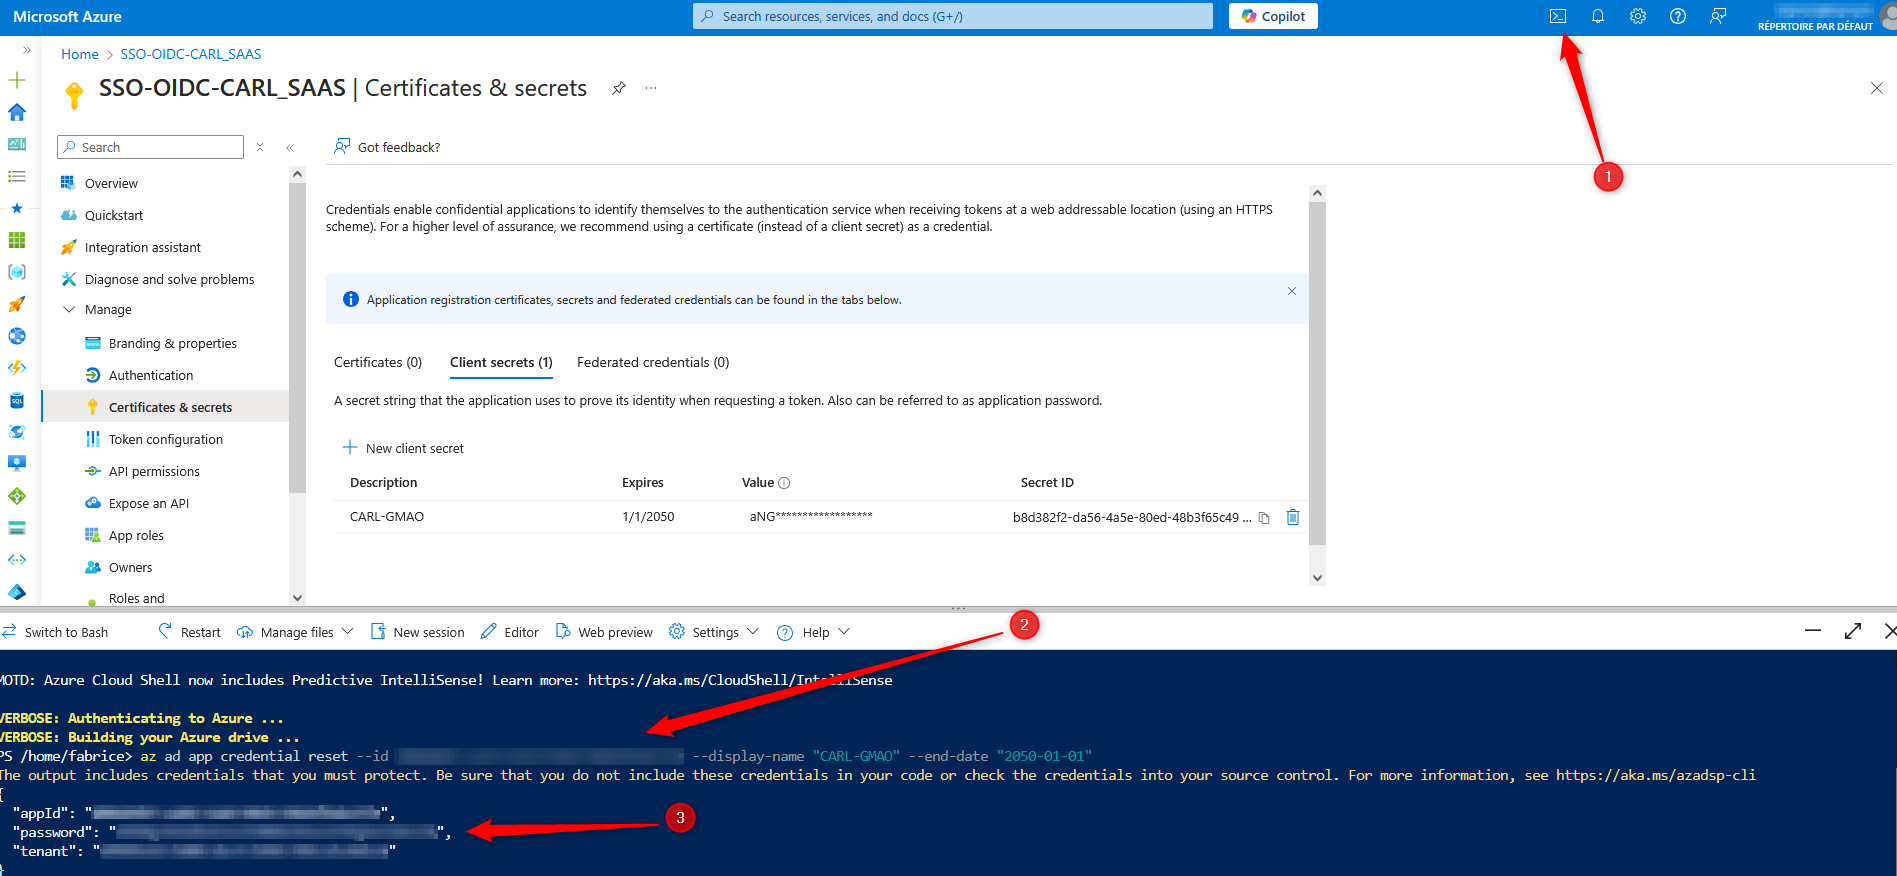
Open the command interface using the (1) button (see image below).
-
Run the following command (2) replacing 'XXXXX' with the retrieved "Application (client) ID":
az ad app credential reset --append --id XXXXX --display-name "CARL-GMAO" --end-date "2050-01-01" -
Copy the secret displayed in (3): it will be needed later.
-
Continue to chapter Finalizing the configuration.
3.2. Option 2: Generate a secret with a maximum 2-year expiration
-
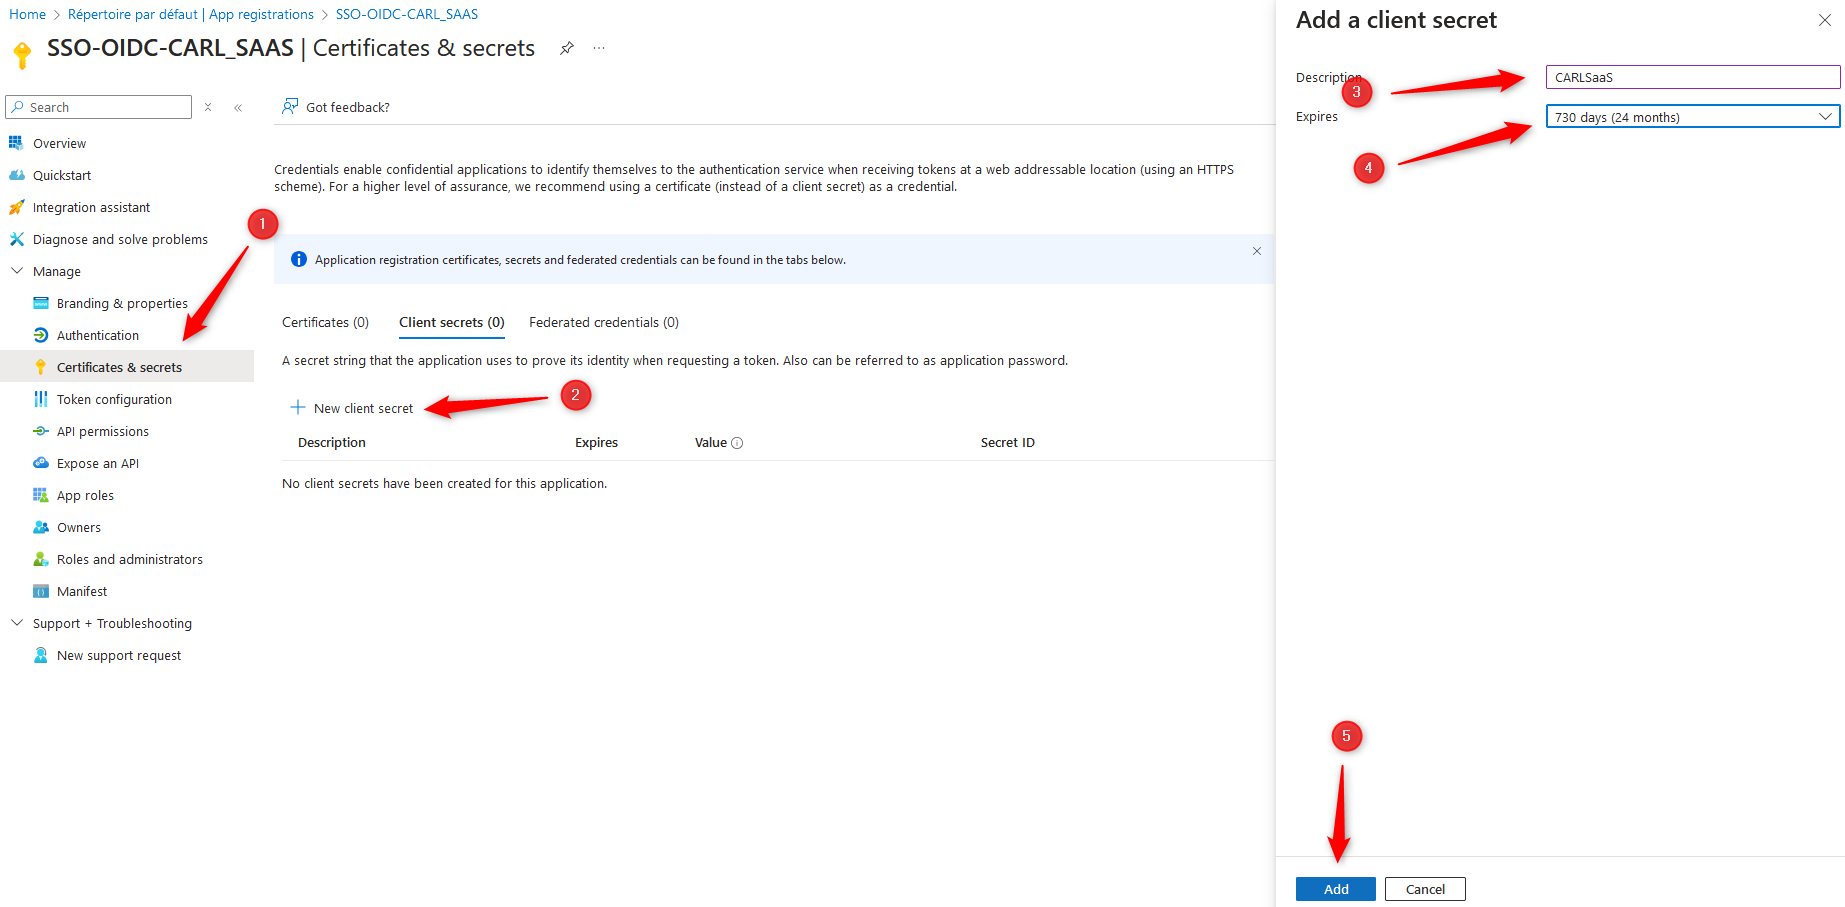
Go to the "Certificates & secrets" menu (1).
-
Click "New client secret" (2).
-
Choose a description for the secret (3) – e.g., CARLSaaS.
-
Select the token validity period (4).
-
Then click "Add" (5).
|
|
Note: After the token expires, a new one must be generated and sent to the SaaS team. |
-
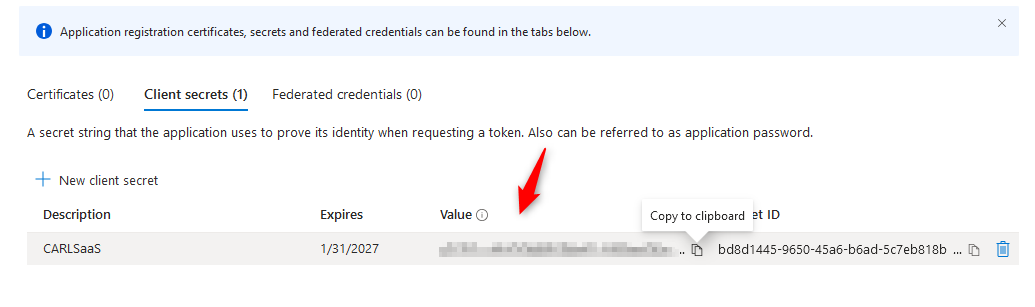
You will receive a secret that must be saved (only the "Value" part is relevant):

|
Important: this secret cannot be retrieved later. |
-
Continue to chapter Finalizing the configuration.
4. Finalizing the configuration
4.1. Assigning usage rights
-
Go back to the "Overview" menu (1) and click the link to the "Managed application" (2):
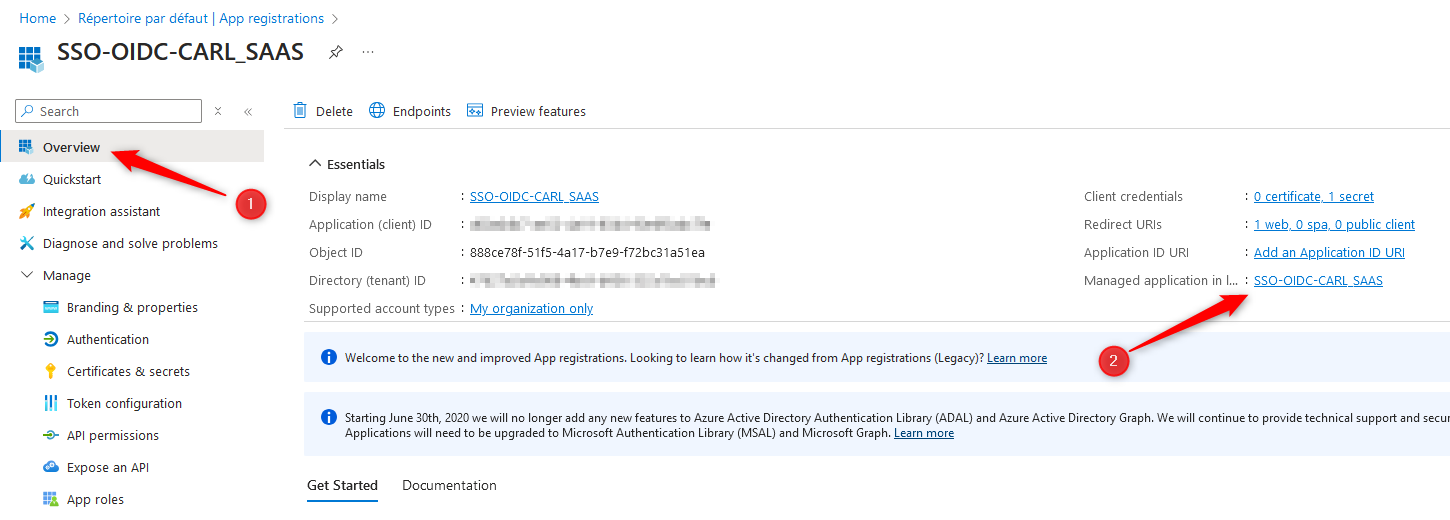
To restrict SSO access to CARL SaaS only to approved users, enable the "Assignment required?" option as follows:
-
Go to the "Properties" menu (1).
-
For "Assignment required?": select "Yes" (2).
-
Click "Save" (3).
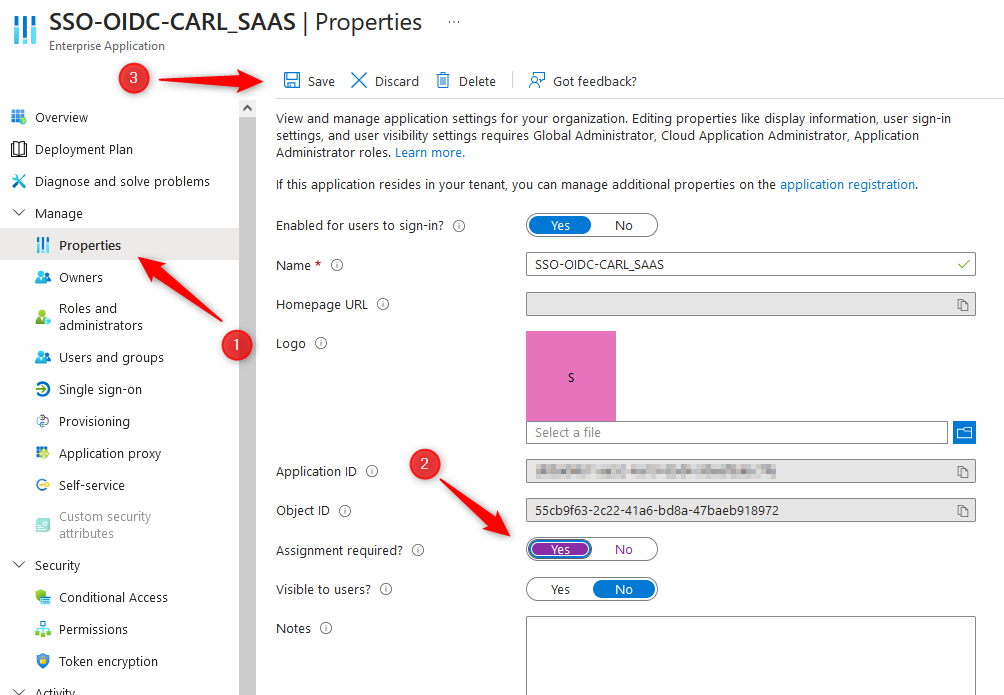
-
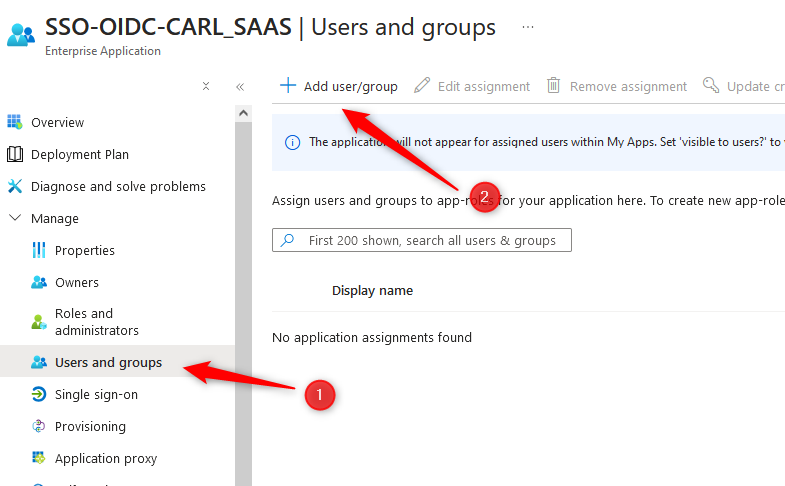
Then add authorized groups or users:
-
Click "Users and groups" (1).
-
Then "Add user/group" (2).
-
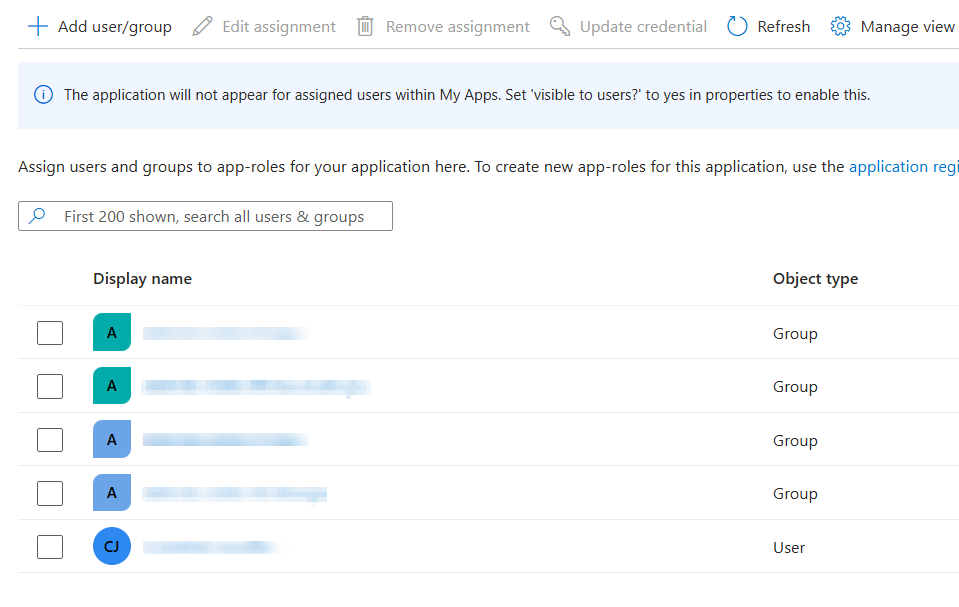
Once users/groups are added, you’ll see a list similar to this:
4.2. Transmitting information to CARL Berger-Levrault
The configuration on Azure® is now complete.
Before leaving the portal, retrieve the following information for the rest of the configuration.
-
You can use the tool Securely Send a Password | CARL - Berger Levrault to transmit the information securely.
-
ClientSecret - retrieve it based on the chosen solution:
-
ClientID: found in Overview → Application (Client) ID.
-
ClientName: found in Overview → Display name.
-
TenantID: found in Overview → Directory (tenant) ID.
Trademark notice
Every effort has been made to ensure the accuracy of the information at the time of publication of this document.
As CARL Source is constantly evolving, CARL Berger-Levrault cannot be held responsible for any gaps or errors in this document.
If you notice any inconsistencies or errors, please contact CARL Berger-Levrault’s support department.
Any reproduction, in whole or in part, in any form whatsoever, is strictly prohibited without the prior authorization of CARL Berger-Levrault.
All trademarks and product names mentioned in this document are the property of their respective owners as listed below:
-
Android™ and Google Chrome® are registered trademarks of Google LCC.
-
ArcGIS® is a registered trademark of the Environmental Systems Research Institute.
-
Elasticsearch® is a registered trademark of Elasticsearch B.V. in the United States and other countries.
-
Firefox® is a registered trademark of the Mozilla Foundation.
-
Java™ and Oracle® are registered trademarks of Oracle Corporation.
-
PostgreSQL® is a registered trademark of The PostgreSQL Community Association of Canada.
-
Safari® is a trademark of Apple Inc. registered in the U.S. and other countries.
-
Azure®, SQL Server®, Microsoft Edge® and Windows® are registered trademarks of Microsoft Corporation.
-
Tomcat® is a registered trademark of the Apache Software Foundation in the United States and other countries.